Service Manager
Customizing Your HEAT Voice-to-Ivanti Service Manager Integration
•About Customizing Your HEAT Voice-to-Ivanti Service Manager Integration
•About Administering the Two Systems
•Installing and Configuring HEAT Voice
•Integrating HEAT Voice with Ivanti Service Manager
•Managing a HEAT Voice User Account Management
•Modifying the Not Ready Reasons
About Customizing Your HEAT Voice-to-Ivanti Service Manager Integration
The set up and configuration of users in HEAT Voice utilizes standard Service Manager business objects and forms.
Business object and field names must be maintained so synchronization can occur.
With the exception of business object and field names, you can customize the integration to fit your needs. Some examples of potential customizations include the following:
•Role-based forms that limit the specific data that supervisors can manage.
•Adding additional auditing of fields as required to track changes.
•Adding dashboards to show user dial plan and extension listings.
To effectively use the information in this section, you should have experience using Service Manager and be familiar with user administration in HEAT Voice.
When HEAT Voice and Service Manager have been properly integrated, much of the day to day administrative tasks for HEAT Voice can be accomplished using Service Manager.
Before you begin, you need to load any user profiles that require HEAT Voice access as employee records in Service Manager.
This section does not cover HEAT Voice-specific settings. Refer to the HEAT Voice online help for HEAT Voice configuration settings. This section focuses on the settings unique to a synchronized environment.
About Administering the Two Systems
Typically, different sets of people administer Service Manager and HEAT Voice systems, so they use separate administrative interfaces. However, they do have some user management features in common.
With Service Manager, you can use synchronization so that users can be administered exclusively in Service Manager. HEAT Voice automatically synchronizes the settings, eliminating duplicated efforts. All synchronization between the two systems is from Service Manager to HEAT Voice. No data is transferred from HEAT Voice to Service Manager.
Installing and Configuring HEAT Voice
For information about installing and configuring HEAT Voice, see the IP Communications Management Administrator Guide in the Service Manager Knowledge Base as article 25218.
Integrating HEAT Voice with Ivanti Service Manager
After you have configured HEAT Voice to integrate with Service Manager, you need to configure Service Manager to integrate with HEAT Voice. This is done through the Service Manager Configuration Database.
1.Log in to the Service Manager Configuration Database. For information about using the Service Manager Configuration Database, see the Configuration Database Guide for Ivanti Service Manager.
2.Navigate to the Tenants workspace, select the tenant that you want to integrate with HEAT Voice, and open that record.
3. Select the IPCM tab at the bottom of the Tenants workspace.
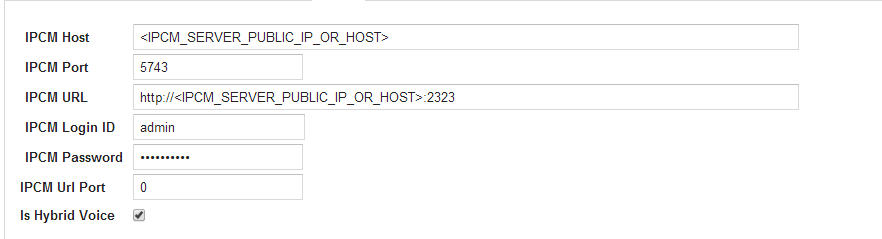
4. Enter the following values:
IPCM Host: Enter the fully-qualified domain name of the HEAT Voice server.
IPCM Port: 5743
IPCM URL: Enter the URL in the form http://HEAT_Voice_server:2323 where HEAT_Voice_server is the fully-qualified domain name of the HEAT Voice server. If you have changed the port that HEAT Voice uses for web services from 2323, enter the correct port here.
IPCM Login ID: Enter a valid user name for HEAT Voice. This is used by Service Manager to call web services in HEAT Voice. No specific role is required, it just needs to be a valid HEAT Voice user.
IPCM Password: Enter the password associated with the HEAT Voice login ID.
IPCM Url Port: Enter the HEAT Voice URL port.
Is Hybrid Voice: Check this if you want the system to ignore all the settings above (that start with HEAT Voice) and to use the settings that were previously set in the Configuration Console.
IPCM Tab in the HEAT Configuration Database
5.Save your changes.
Service Manager is now configured to connect to HEAT Voice.
Managing a HEAT Voice User Account Management
HEAT Voice user accounts are managed as employee records in Service Manager. They are administered through Service Manager. To administer HEAT Voice users, follow these steps:
1.Log in to the Service Manager Application.
2.Open the Employee workspace.
3.Find the employee to manage, and open the employee record for that employee.
4.On the Details tab, check Enable Voice to synchronize the user to HEAT Voice and click Save.
The system displays two new tabs, called Voice - Agent Properties and Voice - Agent Skills, from which you can configure the HEAT Voice properties.
To disable a user account in HEAT Voice, change the employee status to terminated. The system disables the user on the next synch.
To stop a user from being synchronized to HEAT Voice, uncheck Enable Voice.
5.To configure the voice properties of a user, select the Voice - Agent Properties tab. Enter values in the relevant voice properties. This page consolidates all user and agent settings from the HEAT Voice Management Portal to one form.
6.Select Is Voice Agent to assign the employee to the Contact Center Agent role.
7.Select Is Voice Supervisor to assign them to the Contact Center Supervisor role.
8.Select both fields if the user will act as an agent and as a supervisor. You can modify the permissions associated with these roles in the HEAT Voice Management Portal. You can assign additional roles for the user in the HEAT Voice Management Portal.
9.In Service Manager, users can control their phone via an integrated voice toolbar. To allow a user to access this interface, check Enable Voice Integrated Toolbar. If they will use the Voice Agent dashboard instead, do not select this option.
Configuring User Extensions
In HEAT Voice, users are assigned an extension, which is configured in the SIP Soft Switch phones section of the HEAT Voice Management Portal. In Service Manager, this is configured as a configuration item (inventory item). Follow these steps to configure user extensions:
1.Log in to the Service Desk Console.
2.Open the Employee workspace, find the employee to manage, and open the employee record for that employee.
3.On the Details tab, check Enable Voice to synchronize the user to HEAT Voice and click Save.
4.Click the Voice - Agent Properties tab.
5.In the VOIP Device field, select a VOIP device to associate with this user. (You can also create a new configuration item, if the user has a soft phone, or a desktop IP phone that is not already generated as a configuration item. Click Add VOIP to create a new configuration item of type VOIP. Enter a unique name for this device. In the Owner field, enter the name of the employee to which this extension is assigned.)
6.Enter the details that you would normally configure in the SIP Soft Switch Phones page of the HEAT Voice Management Portal. Configure the type of device to be phone. Configure the number, which is the extension number associated with this extension. You can also configure the authentication and forwarding sections as needed. Once you have associated a VOIP configuration item with the user, their extension is displayed in the Voice - Agent Properties tab.
7.Click Save.
Assigning Skills to a User
If a user is assigned the role of Contact Center Agent, you need to assign their skills on the Voice - Agent Skills tab. This tab displays a list view of all of the agent's skills grouped by skill group.
1.Log in to the Service Manager Application.
2.Open the Employee workspace, find the employee to manage, and open the employee record for that employee.
3.On the Details tab, check Enable Voice to synchronize the user to HEAT Voice and click Save.
4.Click the Voice - Agent Skills tab.
5.Click New Agent Skill from the toolbar. The system displays the New Agent Skill dialog box.
6.Select the skill group, skill name, and threshold for the user.
7.To add a new skill group to Service Manager, do the following:
| a. | Go to the Configuration Console and click Extend > Voice Integration > Skill Groups to open the Skill Groups workspace. |
| b. | Click New Skill Group and enter a skill group name. |
| c. | Click Save. |
8.To add a new skill, do the following;
| a. | Go to the Configuration Console and click Extend > Voice Integration > Skills to open the Skills workspace. |
| b. | Click New Skill and enter a skill name and optionally a skill group. |
| c. | Click Save. |
Modifying the Not Ready Reasons
1.Log in to the Service Manager Application.
2.Open the Employee workspace, find the employee to manage, and open the employee record for that employee.
3.On the Details tab, check Enable Voice to synchronize the user to HEAT Voice and click Save.
4.Click the Voice - Agent Properties tab.
5.Enter values in the Not Ready Reason Required and Initial Not Ready Reason fields.
6.Click Save.
7.To add a new not ready reason, do the following:
| a. | Go to the Service Desk Console and open the Voice - Not Ready Reason workspace. |
| b. | Click New Voice - Defined Reason and enter a new reason. |
| c. | Click Save. |
Modifying the UI Language
1.Log in to the Service Desk Console.
2.Open the Employee workspace.
3.Find the employee to manage, and open the employee record for that employee.
4.On the Details tab, check Enable Voice to synchronize the user to HEAT Voice and click Save.
5.Click the Voice - Agent Properties tab.
6.Enter values in the UI Language field.
7.Click Save.
8.To add a new user interface language, do the following:
| a. | Go to the Service Desk Console and open the Voice - UI Supported Language workspace. |
| b. | Click New Voice - UI Supported Language and enter a new language. |
| c. | Click Save. |
Synchronizing Users
User synchronization occurs via a Windows service running on the HEAT Voice server. The Windows service polls Service Manager on a predefined basis. If the Sync Status record is set to start, it copies values from Service Manager to HEAT Voice.
1.Go to the Configuration Console and click Extend > Voice Integration > Synchronization Status to open the Synchronization Status workspace.
2.Check Enable Sync.
3.Click Start Sync. This sets the value of the Sync Status field to start, which causes the synchronization to run.
The Synch Status record shows the last synch date and result. You can find further details by clicking the Audit tab. The system automatically attaches a backup of the host configuration and SIP server configuration files.
There must only be one Synch Status record.
For security reasons, the Service Manager user password is not accessible to the HEAT Voice synchronization service.
Was this article useful?
Copyright © 2019, Ivanti. All rights reserved.