Service Manager
Filtering Data and Records in Lists
Filtering data allows you to display records that meet your filter criteria and hide the records that you do not want to view.
When a column is filtered, a green filter icon  is displayed on the column header indicating that the data displayed in the column is based on some filter criteria. Click the filter icon to see the applied filters or to clear the filter criteria.
Filtering List Records for a Non-Validated List
A non-validated list is a list that is not prepopulated. For example, a column that holds text such as the Summary field or the Customer field is a non-validated list because you can enter any value, and do not select from a list of predefined items.
1.Log in to the application.
2.Open a workspace. In this example, open Incident.
3.Hover over the Summary column header and click the filter icon .
.
4.Hover over Filters. The application displays a text field.
By default, the application does not filter any of the records until you enter a value.
5.Enter the text in the filter box to filter the data by that text string. In this example, enter "email" in the filter text box.
The application compares the text against the contents of the corresponding fields for each record in the list and displays matching records.
6.To clear the filer, delete the text in the filter text box.
Filtering List Records for a Validated List
A validated list is a list that is prepopulated. For example, the Priority column holds priority values of 1, 2, 3, 4, 5, and 6. You can only select a priority from the list and you cannot enter a different value.
1.Log in to the application.
2.Open a workspace. In this example, open Incident.
3.Hover over the Status column header and click the filter icon.
4.Hover over Filters. A list of options is displayed.
If there are less than 500 values, the application displays a checkbox for each value. If there are more than 500 values, you must manually enter the values to select. By default, the application does not filter any of the records until you select an item or enter a value.
5.Select the checkbox against the values to filter. In this example, select the Resolved checkbox.
The application displays all the records of status Resolved.
6.To clear the filter, clear the checkbox selected.
Filtering List Records by Date
You can show only those items that were created or modified on a certain date or within a date range. This feature works only on date fields.
1.Log in to the application.
2.Open a workspace. In this example, open Incident.
3.Hover over the Created On column header and click the filter icon.
4.Hover over Filters and the date options appear.
Date Options
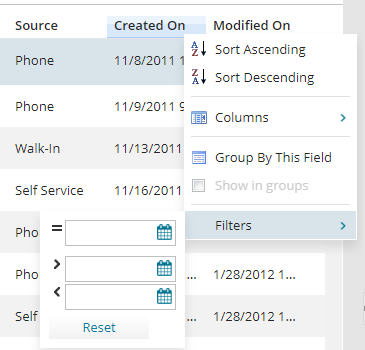
5.Click the calendar icon next to the appropriate filter criteria.
•To find records matching an exact date, use the equals (=) box.
•To find records after a specific date, use the greater than (>) box.
•To find records before a specific date, use the less than (<) box.
•To find records within a date range, enter a start date in the greater than (>) box and an end date in the less than (<) box.
The application displays the records based on the defined date filter.
6.To remove the date filter, click Reset at the bottom of the filter box.
Was this article useful?
Copyright © 2019, Ivanti. All rights reserved.