Service Manager
Creating an Escalation
If an escalation includes automatic email notification, ensure that the email server is configured correctly. See Setting Up Email.
•Creating an Escalation Schedule
•Modifying an Escalation Schedule
•Deleting an Escalation Schedule
Creating an Escalation Schedule
Escalations for incidents, service requests, and tasks automatically run by default when you are not using service level agreements.
1.From the Configuration Console, click Build > Automation Tools > Escalation Schedules to open the Escalation Schedules workspace.
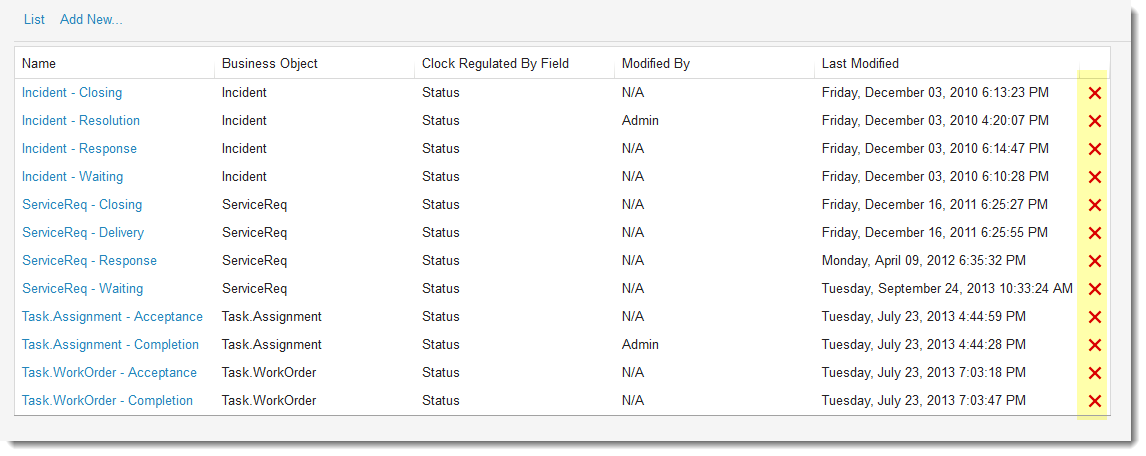
The list of escalation schedules appears, sorted by business object. Although you can create an escalation for any object, escalations are usually created for incidents, service requests, tasks, or problems.
Escalation Schedules Workspace

2.Click Add New. The New Escalation Settings window appears.
New Escalation Settings
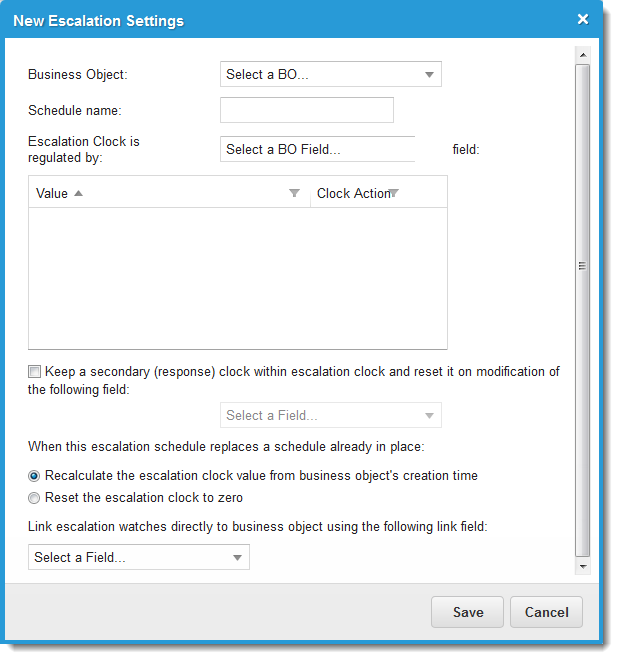
3.Enter information into the fields.
| Field | Description |
|---|---|
| Business Object | The name of the business object. |
| Schedule name | A unique name for the schedule. |
| Escalation clock is regulated by | The event that drives the escalation schedule. |
| Value |
The clock action for each value of the selected field. The default is Run. The values in this table are derived from the selected field. If needed, you can set a clock action for individual values. See Watching Escalations. |
| Keep a secondary (response) clock | Optional. Specifies a controlling field. The secondary clock resets when the value of the field that you specify here changes. When the secondary clock has run for a duration set in the escalation lifecycle, (that is, when the specified field has remained unchanged for that amount of time) a quick action executes. A secondary clock is typically used to monitor response times. |
| When this escalation schedule replaces a schedule already in place |
Recalculate the escalation clock value from the business object's creation time: Continues using the original creation time of the record as the starting point for elapsed time calculations. Reset the escalation clock to zero: Restarts the escalation clock when the new schedule is implemented. |
| Link escalation watches directly to business object using the following link field | Optional. Employs a link field in an escalation watch. |
4.Click Save to save the escalation schedule. The escalation is added to the list in the left panel and in the escalation schedules area.
Adding Escalation Levels
After you create an escalation, you can define its lifecycle by defining its escalation levels, which are the thresholds that must be reached to trigger a call for additional resources to meet a service level target or customer expectation.
The following procedure describes how to define escalations only if the Service Level Management module is not available. Do not use this procedure if the Service Level Management module is available at your site; rather, define and manage escalations through service level packages and service level agreements.
1.From the Configuration Console, click Build > Automation Tools > Escalation Schedules to open the Escalation Schedules workspace.
2.Click the schedule to which to add a level.
3.Click Set Thresholds. The Escalation Parameters for window appears.
Escalation Parameters Window
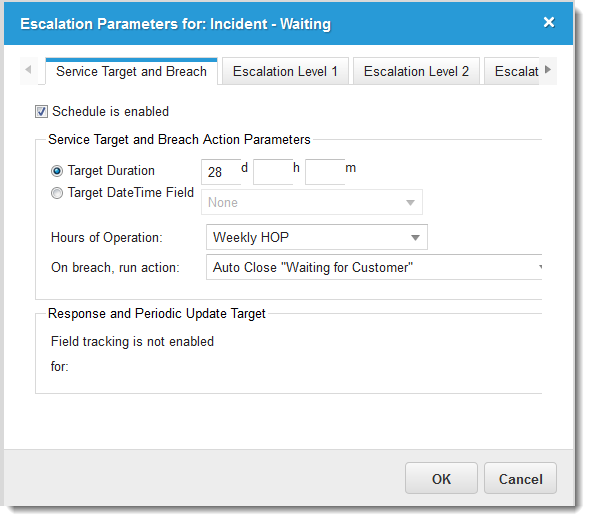
4.Enter information under the Service Target and Breach tab.
| Field | Description |
|---|---|
| Schedule is Enabled | Activates the escalation schedule after the item has been saved. Enable the fields. |
| Target Duration |
Defines the total amount of time used to track this escalation. Enter values in the day (d), hour (h) and minute (m) fields.
Do not use with the Target DateTime Field option. |
| Target DateTime Field |
Defines the deadline for the target.
Do not use with the Target Duration option. |
| Hours of Operation | The business operating hours to apply to this escalation. |
| On breach, run action | The quick action that executes if the escalation lifecycle exceeds the time limit defined above. |
5.If you have configured a secondary clock, enter the following information in the Response and Periodic Update Target area:
| Field | Description |
|---|---|
| If 'x' field value hasn't changed, while clock is running: | Schedules actions at intervals within the lifecycle. |
| for | Defines the interval used to track this action in the day (d), hour (h) and minute (m) fields. |
| then run action | The quick action that executes. |
6.Enter information under the Escalation Level 1, 2 and 3 tabs as needed. If the Service Desk cannot successfully meet a service level target, the incident is elevated to a second or even third tier of support.
| Field | Description |
|---|---|
| Do Not escalate at this level | Ignores this escalation level. |
| Set as follows | Enables the escalation threshold and action parameters area. |
| Escalate at (%) | The percentage of the escalation lifecycle to elapse before raising the escalation to the next level. You can enter a value or use the slider bar to set the percentage. |
|
i.e. at: out of target: |
Reflects hours and minutes in relation to the breach target interval (in the out of target: field). |
| By running action |
The quick action to execute when this interval is exceeded. Examples of quick actions include closing an incident, reassigning an incident, or sending an escalation or automated failure message. |
7.Click OK to save the escalation schedule.
Modifying an Escalation Schedule
1.From the Configuration Console, click Build > Automation Tools > Escalation Schedules to open the Escalation Schedules workspace.
2.Click the schedule to modify.
3.Click Edit Schedule. The Edit Escalation Settings window appears.
4.Modify the information as described above.
5.Click Save.
Deleting an Escalation Schedule
1.From the Configuration Console, click Build > Automation Tools > Escalation Schedules to open the Escalation Schedules workspace.
2.Click the delete icon  in the row containing the escalation schedule to remove. The application displays a confirmation message.
Delete an Escalation Schedule
3.Click Yes to delete the escalation.
Was this article useful?
Copyright © 2019, Ivanti. All rights reserved.