Service Manager
FedRAMP Configurations
The Federal Risk and Authorization Management Program (FedRAMP) is a government-wide program that provides a standardized approach to security assessment, authorization, and continuous monitoring for cloud products and services.
Listed below are features that are required to be FedRAMP compliant in Ivanti Service Manager (ISM).
The Password Complexity specifies the password complexity requirements for application users. FedRAMP requires specific values to be set for the Password Complexity and Minimum Password Length fields.
- From the Configuration console, go to Configure > Security Controls > Security and Session to open the Security and Session workspace.
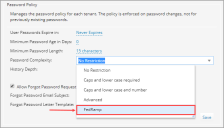
- Go to the Password Policy section and set the Minimum Password Length to 15. This is the minimum value required, according to FedRAMP standards.
- Select FedRamp from the Password Complexity list.
- Click Save.
Password History defines the number of times a user can change the password in ISM.
- From the Configuration console, go to Configure > Security Controls > Security and Session to open the Security and Session workspace.
- Go to the Password Policy section and set the History Depth to 24. This is the minimum value required, according to FedRAMP standards. A user will be unable to change the application password using any one of the last 24 previous passwords.
- Click Save.
Minimum Password Age defines the number of days for a password before it can be reset by a user. For example, if the value is set to 2, then a user will be unable to reset the password for two days. If the Minimum Password Age in Days value is set to zero, then the password can be reset at any point in time. If a user wants to reset the password before meeting the set value, then the user must contact the administrator.
- From the Configuration console, click Configure > Security Controls > Security and Session to open the Security and Session workspace.
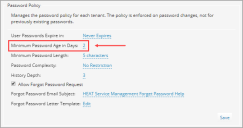
- Go to the Password Policy section, and type the desired number of days in the Minimum Password Age in Days field.
- Click Save.
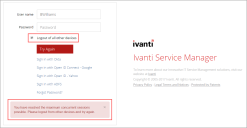
Concurrent interactive sessions refer to the number of active sessions a user can have simultaneously on one or more devices or browsers. When users reach the concurrent session limit, an error message will be displayed and an option will be provided to do a force login, which will terminate all their existing sessions.
- From the Configuration console, click Configure > Security Controls > Security and Session to open the Security and Session workspace.
- Go to the Concurrent Session section, and enter the number of concurrent sessions for all three types of users - Named User, Privileged User, and Non Privileged User.
- Click Save.
These configurations are applicable to users who reach the concurrent session limit, when they are connected to ISM through Active Directory (AD), LDAP, or other single sign on (SSO) technologies.
- From the Configuration console, click Configure > Security Controls > Authentication Providers to open the Authentication Providers workspace.
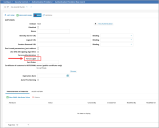
- Select an existing record or click New Record Menu and then select New ADFS/SAML from the list.
-
The Force Login option is applicable to users reaching concurrent session limits, in the case of external authentication.
- If the option is selected, when users reach a concurrent session limit, the application terminates all existing sessions and devices and automatically logs them into a new session.
- If the option is not selected, when users reach a concurrent session limit, an error message will appear on the page, and the users will need to log out of existing sessions or devices, and then try logging in again.
If the value is set to zero, the number of times a user can login is unlimited. This means, infinite number of active sessions are possible at the same time.
-
Click Save.
As per FedRAMP standards, the Auto-Deactivate User feature sets the duration to automatically deactivate users who do not log in to the Ivanti Service Manager (ISM). To set the auto-deactivate feature for a user, do the following steps:
-
From the Configuration console, click Build > Global Constants to open the Global Constants workspace.
- Select UserDeactivationDuration from the list.
- The following information is displayed for the global constant.
Field Description Name A unique name for the global constant. For example, UserDeactivationDuration. Value The value for the global constant. By default, the value will be displayed as 5184000, for 60 days. To adapt to FedRAMP specifications, the value can be changed to 35 days. The calculation can be done as follows: 35 days X 24 hours X 60 minutes X 60 seconds = 3024000. Type Field type - Text, Number, Boolean. In this case, type in the value Number.
Description A description of what the global constant is used for. For example, Duration set for a user who does not log in to ISM for [n] number of days. Once the set number of days has passed, the user will get disabled, as per FedRAMP standards.
- Click Save to save any changes done.
- From the Configuration Console, click Build > Workflow > Workflows to open the Workflows workspace.
- Go to the Schedule Entry section, and select Disable Inactive User.
- Select More Actions, and then select Activate version from the list.
- Click Save. The workflow will run daily, based on the "Disable User Not logged In Last N days" daily schedule. If there are any users who did not log into the application for [n] days, they will get disabled automatically.
Was this article useful?
Copyright © 2019, Ivanti. All rights reserved.


