Service Manager
Working with Lists
In previous releases, lists were referred to as grids. The term grid has now been deprecated in favor of the term list.
•About Reordering Columns in a List
•Hiding Preview Settings in a List
•Adding a Progress Bar in a List
•Creating a Hyperlink in a List
•Opening a List to a Specific Business Object
•Displaying a Field Name in a List
•Setting a Blank Column Header in a List
•Defining Default List Settings
•Example: Highlighting Certain Incidents in a List
•Example: Replacing Text with Images in a List
About Lists
A list shows multiple records in a table view. Columns represent the fields for each record. Lists are defined within each business object, and are then viewed in a layout.
You can customize the colors of a list by using highlighter styles. See Using Highlighter Styles.
Viewing Lists
1. From the Configuration Console, click Build > Business Objects to open the Business Objects workspace.
2.Open a business object.
3.Click the Lists tab. The application displays a set of lists created for the business object.
List of Lists for a Business Object

About Reordering Columns in a List
Each business object has its own list configuration; that is, which column headers appear and in what order they appear depends on the business object that you are viewing.
To rearrange columns in any list, click a column header and drag it where you want it. In the example below, click the Source header and drag it to the left of the Status header. The check icon means that the header is in position.
Reordering Columns in a List

Service Manager remembers how you arranged the columns in each list. The next time you log in, Service Manager displays the column heads in the order that you arranged them.
To restore the default column order, click the restore icon  at the bottom of the list.
Creating a List
1.From the Configuration Console, click Build > Business Objects to open the Business Objects workspace.
2.Open a business object.
3.Click the Lists tab. The application displays a set of lists created for the business object.
4.Click Add New List. The application displays the list editor and the List Properties dialog box opens.
5.Enter information into the fields.
| Field | Description |
|---|---|
| List Name | A unique name. |
| Style | The style. See Working with Styles. |
| Workspace Paging | The number of records to appear by default when the list is used in a workspace (layout). |
| Dashboard Paging | The number of records to appear by default when the list is used in a dashboard part. |
| Dialog Paging | The number of records to appear by default when the list is used in a dialog box. |
| Search Paging | The number of records to appear by default when the list is used as search results. |
| Description | A brief description. |
| Sort Column | The column to be used as the default sort column. |
| Sort Order |
The sort, either ascending or descending. |
| Group By | The column to be used as the default group column. |
| Open in a New Tab | Select Yes or No. The list opens in a new tab if you select Yes. |
| Go to | Where the list goes. |
6.Click Submit. The application creates an empty list. You can access these fields again by clicking List Properties.
Now you can add columns to the list.
7.From the Toolbox panel, expand the Fields or Relationship lists, then drag and drop each field onto the List pane. Each field appears as a column in your list. When your cursor is in the right place to drop the field, the application displays a green check mark. You can drop the fields in any order and reorder them later by dragging them around. See About Reordering Columns in a List.
Adding Columns to a List
As you add each field, the application displays a column header.
8.Define the properties of each list column as needed. Column properties appear in the far right pane.
| Property | Description |
|---|---|
| Header | |
| Title | Adds a customized column name. Double-click the field and enter the custom text. |
| Width | The pixel width of this column. The default is 100. |
| Data | |
| Field | The exact name of the field you added in the List pane. Even if you customized the name in the Title field, the Field entry remains the same. |
| Sortable | Enables sorting features for this list column. The column name is added to the Sort Column drop-down list. |
| Groupable | Enables grouping features for this column. The column name is added to the Group By drop-down list. |
| Word Wrap | Enables word wrap for column text. By default, all column text is displayed as one line, allowing longer entries to be obscured in the list. |
| Initially Visible |
Specifies if the application initially displays this column name in the initial list view with a check. (If the user clicks Columns for a list, the application displays the initial list view with the names of all columns but only shows information for the columns that are checked.)
Initial List View
To have this field name show up on the initial list view with a check, select Yes. To have this field name show up on the initial list view without a check, select No.
NOTE: Regardless of how you set this field, users can check or uncheck the columns from the list. |
| Hidden Expression |
Specifies if the application displays this column name in the initial list view.
To display this column name in the initial list view, select Always from the drop-down list, then click the expression button to display the Expression Editor. Enter an expression such as $(GetGlobal("FeatureA")) and click Save. The application displays this column name if the expression evaluates to true. To never display this column name in the initial list view, select Never from the drop-down list. |
| Allow Tips |
Specifies if the application displays tool tips. Yes: Tool tips appear when users hover over the field name. The tool tip shows the header text of the column. No: Tool tips do not appear. |
| Style |
Style. Default: No changes to the style of this column. Expression: Open the Expression Editor and enter an expression for this style. (See Home .) These ad-hoc styles can not be accessed by other elements. To link a field. For example, [link:OrgUnitLink]Name. To combine a business object type and internal relationship name in relationship instances using a link_RecID field. For example: [OrganizationalUnit#.]Name. To create a unique style. For example, the expression $(if Status == "Closed" then "RedStyle" else "LimeStyle")) returns the row as red if the record status is closed and returns the row as lime green if it is not closed. Style names: Style names are created in Highlighter Styles. See Using Highlighter Styles. |
| Renderer | A rendering option. For example, you can render the column as an option to be checked, or as a Yes/No option. These options are different for each field type. See Field Renderer Options. |
| Image | Specifies an image to display. To display an image, click the expression button to display the Expression Editor. Enter an expression such as $(if IsVIP == true then "crown2_orange.png" else "") and click Save. The application displays this image if the expression evaluates to true. |
| Link | |
| Hyperlink |
Shows the field value as a hyperlink: Yes: The field value is a hyperlink. No: The field value appears as the default. |
| Go to |
Choose This Object or a link field. |

Field Renderer Options
The following render options are available for each field type.
You cannot sort or group a column that has an unlimited length or is in binary form.
| Field Type | Renderer Option Available |
|---|---|
| AsymmetricallyEncryptedString | No options |
| Binary |
Left Aligned Right Aligned |
| Currency |
Left Aligned Right Aligned |
| Date/Time |
Default. Shows date and time. Date Only |
| Link |
Text HTML Link to object |
| Number |
Left Aligned Right Aligned |
| Password | No options |
| SymmetricallyEncryptedString | No options |
| Text |
Text HTML: Strips out HTML tags and shows only the text. Use if the tags are not formatted properly or if the data is large. HTML V2: Keeps HTML tags and shows the formatted HTML text. Multiline Text: Choose to enable word wrap and preserve line breaks for column text. By default, all column text is displayed as one line, allowing longer entries to be obscured in the list. Progress Bar: For information about the Progress Bar see Adding a Progress Bar in a List. |
| Yes/No |
Also known as Boolean. Checkbox Yes/No Y/N |
Duplicating a List
1.From the Configuration Console, click Build > Business Objects to open the Business Objects workspace.
2.Open a business object.
3.Click the Lists tab. The application displays a set of lists created for the business object.
4.Click the copy list icon  in the lower right corner of a list.
Copying a List
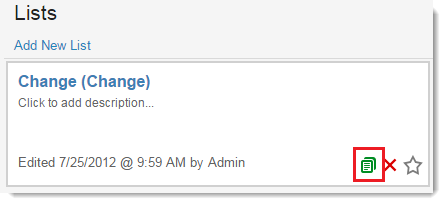
5.Enter a unique list name in the field.
6.Click Save. The application appends a copy of the list with the new name to the existing lists.
Modifying a List
1.From the Configuration Console, click Build > Business Objects to open the Business Objects workspace.
2.Open a business object.
3.Click the Lists tab. The application displays a set of lists created for the business object.
4.Open a list. The application displays the List Editor.
5.Change the information as needed. See Creating a List.
Localizing List Values
When you work with lists in a language other than English, you might observe a word or phrase that is not properly translated.
To add or correct a translated word or phrase, do the following:
1.From the Configuration Console, click Build > Business Objects to open the Business Objects workspace.
2.Open a business object.
3.Click the Lists tab. The application displays a set of lists created for the business object.
4.Open a list.
5.Click Translation Tool and choose the locale language from the drop-down menu. The application displays the Translation Tool dialog box.
6.Optional. To view words and phrases from all lists, choose All in the Lists drop-down menu.
7.Click Search to view the words and phrases from the current list.
The application displays the search results. The first column shows the property, that is, the specific place, where a word or phrase is used in the current list. The third column shows the word or phrase as it appears right now.
8.In the third column, click a string to open it for editing.
9.From the drop-down list, choose a new string, if any are suggested, or enter new text.
10.Press Enter to record (but not save) the change. The application displays a red triangle next to the unsaved text string.
11.Change additional strings as necessary.
12.Click Save. The translation string changes are now implemented.
Hiding Preview Settings in a List
To prevent the Preview area from displaying in a list, follow these steps:
1.From the Configuration Console, click Build > Business Objects to open the Business Objects workspace.
2.Open a business object.
3.Click the Layouts tab.
4.Open a layout.
5.In the Views in this layout section, click gridView.
Clicking gridView
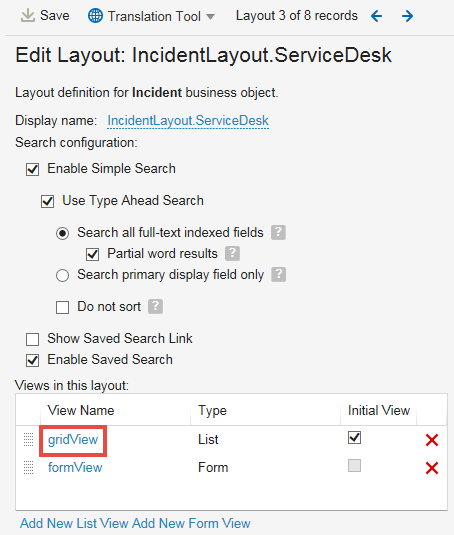
6.In the Preview Form field, select not set from the drop-down list.
7.Click Save.
8.Return to the Service Manager Application and refresh the browser.
9.Open the business object to verify that the Preview area does not show and that the list displays on the page.
Opening a List in a New Tab
1.From the Configuration Console, click Build > Business Objects to open the Business Objects workspace.
2.Open a business object.
3.Click the Lists tab. The application displays a set of lists created for the business object.
4.Open a list.
5.Click List Properties to display the List Properties dialog box.
6.In the Open in New Tab field, select Yes.
7.Click Submit.
8.Click Save.
9.Return to the Service Manager Application and refresh the browser.
10.Click a business object to verify that it opens in a new tab.
Adding a Progress Bar in a List
See From the "List Configuration" Tab
1.From the Configuration Console, click Build > Business Objects to open the Business Objects workspace.
2.Open a business object.
3.Click the Lists tab. The application displays a set of lists created for the business object.
4.Open a list.
5.Highlight a column.
6.In the Renderer field on the right-hand side, select Progress Bar.
7.Click Save.
8.Return to the Service Manager Application and refresh the browser.
9.Open a business object and verify that the progress bar displays in the correct column.
Progress Bar in a List
Using the Image Renderer
You can add an image to any column in a business object. You can show different images for different sets of records. For example, you may want to include a particular image for customers that have special privileges due to their status or importance.
The available images are stored in the Image Manager. Follow these steps to add an image:
1.From the Configuration Console, click Build > Business Objects to open the Business Objects workspace.
2.Open a business object.
3.Click the Lists tab. The application displays a set of lists created for the business object.
4.Open a list.
5.Select a column.
6.In the Image field on the right-hand side, click inside the field.
7.At the bottom right of the Expression Editor, click Image Manager.
8.Highlight an image and click Select.
9.Click Save.
10.Click Save again.
11.Return to the Service Manager Application and refresh the browser.
12.Open a business object and verify that the image displays in the correct column.
Using the Size Renderer
If a column contains numerical data in bytes, the size renderer converts the bytes into kilobytes. Follow these steps to use the size renderer:
1.From the Configuration Console, click Build > Business Objects to open the Business Objects workspace.
2.Open a business object.
3.Click the Lists tab. The application displays a set of lists created for the business object.
4.Open a list.
5.Select a column that contains numerical data.
6.In the Renderer field on the right-hand side, select Size. Size is not listed as a choice in the drop-down list unless the column you selected contains numerical data.
7.Click Save.
8.Return to the Service Manager Application and refresh the browser .
9.Open a business object and verify that the numerical data displays in kilobytes.
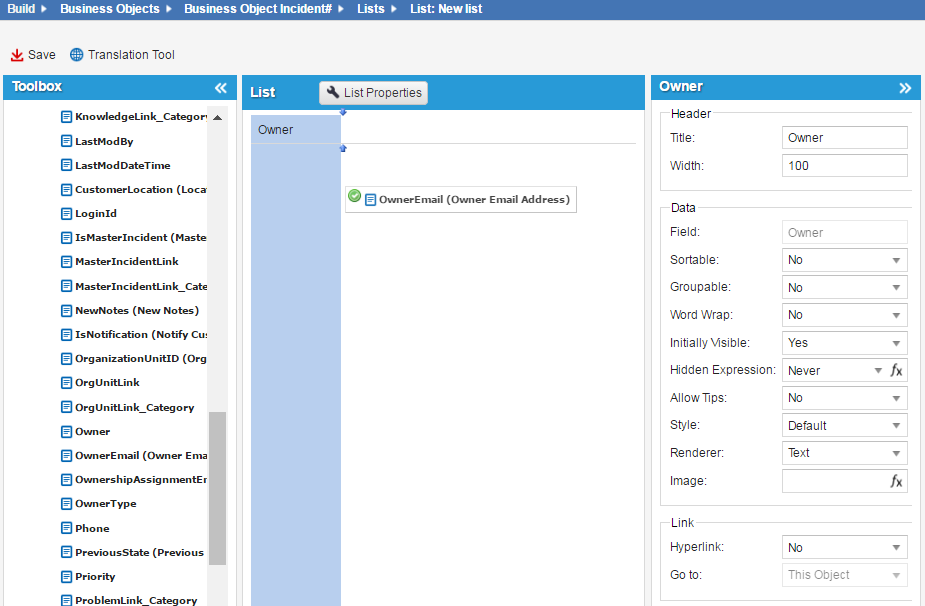
Creating a Hyperlink in a List
1.From the Configuration Console, click Build > Business Objects to open the Business Objects workspace.
2.Open a business object.
3.Click the Lists tab. The application displays a set of lists created for the business object.
4.Open a list.
5.Select any column.
6.Set the Hyperlink field to Yes.
7.In the Go to field, select a link field object from the drop-down list.
Setting the Hyperlink Field to Yes

8.Click Save.
9.Return to the Service Manager Application and refresh the browser.
10.Verify that the information in the selected column contains a hyperlink to your selection.
Opening a List to a Specific Business Object
1.From the Configuration Console, click Build > Business Objects to open the Business Objects workspace.
2.Open a business object.
3.Click the Lists tab. The application displays a set of lists created for the business object.
4.Open a list.
5.Click List Properties.
6.In the Go to field, select where the list should go when opened. For example, select either This Object or another business object in the list.
List Properties
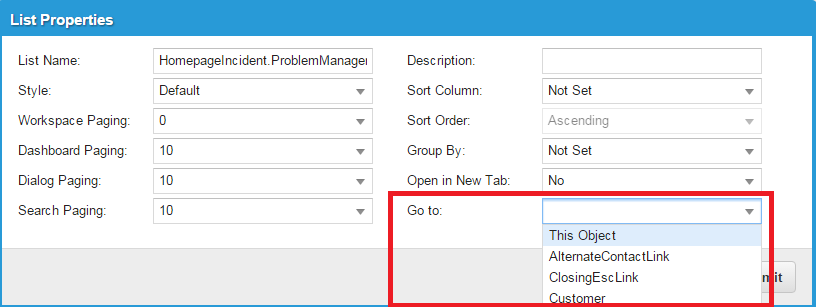
7.Click Submit.
8.Click Save.
9.Return to the Service Manager Application and refresh the browser.
10.Open the workspace that you selected and click on any record to verify that it opens to the selection that you made in step 6.
Displaying a Field Name in a List
When you click the header of a selected column, the header title displays in the Field and Title fields in the right-hand side.
1.From the Configuration Console, click Build > Business Objects to open the Business Objects workspace.
2.Open a business object.
3.Click the Lists tab. The application displays a set of lists created for the business object.
4.Open a list.
5.Click a column header.
The application displays the column name in the Field and Title fields on the right-hand side.
Setting a Blank Column Header in a List
1.From the Configuration Console, click Build > Business Objects to open the Business Objects workspace.
2.Open a business object.
3.Click the Lists tab. The application displays a set of lists created for the business object.
4.Open a list.
5.Select any column.
6.On the right side, remove the text in the Title field.
Removing the Text in the Title Field

7.Click Save.
8.Return to the Service Manager Application and refresh the browser.
9.Verify that the column header in the column you selected contains no header (is blank).
Deleting a List
1.From the Configuration Console, click Build > Business Objects to open the Business Objects workspace.
2.Open a business object.
3.Click the Lists tab. The application displays a set of lists created for the business object.
4.In the box with the list information, click the delete  icon.
icon.
Deleting a List
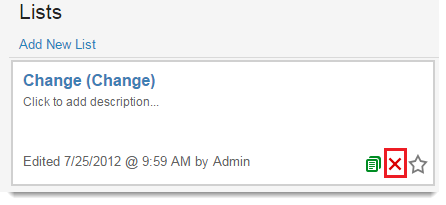
The Delete confirmation dialog box appears.
5.Click Yes to confirm the deletion.
The application checks whether the list is used in another object. If so, a validation message informs you that the list cannot be deleted and where the list is used.
If this list is not used in another object, the application deletes the list.
Was this article useful?
Copyright © 2019, Ivanti. All rights reserved.