Service Manager
Indexing Business Objects
These guidelines apply primarily to Cloud administrators. On-premise customers are responsible for tuning their own individual databases.
About Indexing
Indexing Benefits
You can index various fields within a business object. Indexing decreases the execution time for queries. Designating a field as an index field can help the search performance in the following instances:
•Indexing fields that containing many (thousands of) records that are frequently accessed can improve performance.
•Indexing fields that are not used often or that have few records might reduce performance. Therefore, we do not recommend this.
•Indexing too many fields can slow down performance. The optimum number of fields is based on the amount of access, number of users, and number of records, and is usually determined by trial and error.
Metadata also contains index-related information. Use cached metadata to reduce the number of times that the database is accessed. Metadata indexes are a subset of the indexes in the database schema.
Smart indexing does the following:
•Enables you to capture indexes from the database schema and import them to a business object definition (table metadata).
•Automatically creates and maintains cover indexes based on the business object metadata.
•Automates the creation of the primary and unique key constraints, to manage data integrity.
•Automates the creation of cover indexes with commonly-searched fields, to improve query performance.
You can manage indexes directly from the Configuration Console, even without direct access to the Service Manager database. You can fix mismatches and resolve discrepancies between indexes in the metadata and database schemas.
Indexing Rules
•The primary key column must be a unique, non-nullable, single-column that does not have a filter, and has a maximum size of 900 bytes.
•If the unique key column is nullable, then it must have a filter expression.
•View cannot have filter expressions.
•The maximum total size of index key columns is 900 bytes.
About Derived Objects
Group objects share fields with other objects and contain derived objects. For example, Address is a group object.
For example: A sales area is determined by a BrokerID (with its own table), company (with its own table), and StateID (with its own table). These three fields need to connect to a fourth table to pull proper information about the sales area (such as sales area number, sales reps, sales region, and sales regional manager), and this fourth table also has BrokerID, company and StateID fields. We need to connect three fields from three different tables to this fourth table. The fourth table is known as a derived object.
Derived objects list the base object indexed items. You can index the fields from this derived object, and at the same time, see which fields are indexed in the original objects.
Accessing Indexes
1.From the Configuration Console, click Build > Business Objects. The application displays the Business Objects workspace.
2.Select any business object. The application displays the Business Object workspace.
3.Click the Indexes tab. The application displays the Indexes workspace with a list of indexes for the business object.
Indexes Workspace

The Indexes workspace contains the following information:
•Name: The name of the index.
•Configuration: Describes the index configuration, in a comma-separated list, including the following:
•Primary Key: Specifies that the index is defined for a field with a primary key constraint (such as the RecID field for incidents).
•Clustered: Specifies that the index is clustered. Currently, this is always disabled and cannot be changed.
•Unique: Specifies that the index is defined for a field with a unique constraint. When you set a field as unique, the application creates a unique constraint and unique index in the database schema.
•Filtered: Specifies that the index has at least one filter expression defined.
•Cover: Indicates that the index has at least one included field.
•Disabled: Indicates that the index is disabled. You cannot set this parameter from the Indexes workspace. It must be set within the database.
•System: Indicates that the index is a application index. You cannot set this parameter from the Indexes workspace. It must be set within the database.
•Key Fields: Lists the key fields for this index. See Viewing, Adding, and Deleting Key Fields.
•Included Fields: Displays a list of all the included columns used by the index. The order of included fields does not matter. See Viewing, Adding, and Deleting Included Fields.
4.To delete an index, click the delete icon  at the end of the row.
Adding Indexes
•Viewing, Adding, and Deleting Key Fields
•Viewing, Adding, and Deleting Included Fields
•Viewing, Adding, and Deleting Filter Expressions
Adding a New Index
1.From the Configuration Console, click Build > Business Objects. The application displays the Business Objects workspace.
2.Select any business object. The application displays the Business Object workspace.
3.Click the Indexes tab. The application displays the Indexes workspace with a list of indexes for the business object.
4.To add a new index, click Add new.... The application displays index fields associated with this business object.
5.Select the field to index for this business object. You can add more fields later. The application displays the System Properties workspace.
System Properties Page
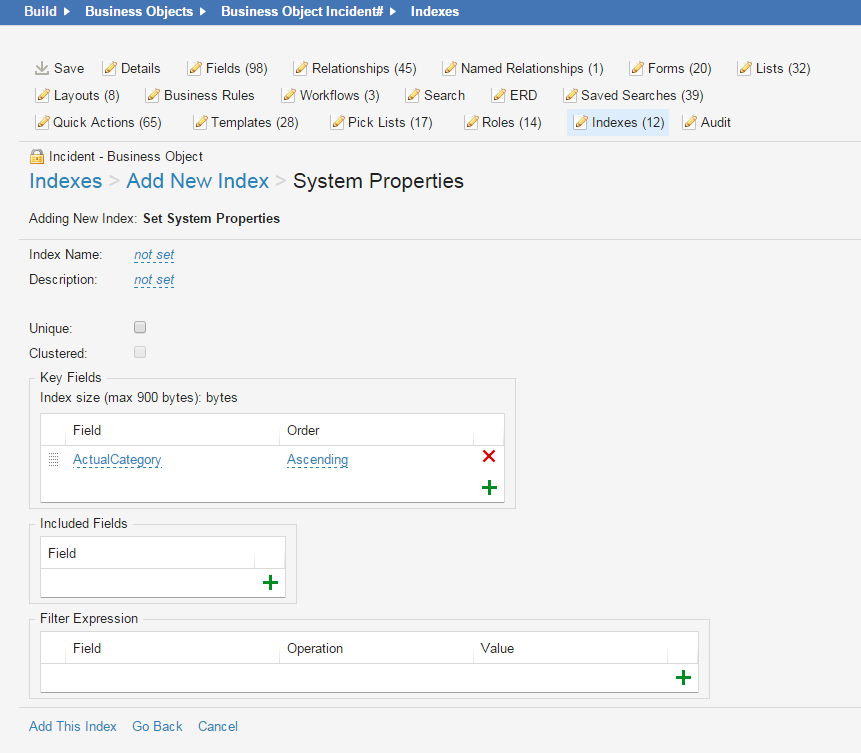
6.Enter information into the fields.
| Field | Description |
|---|---|
|
Index Name |
A unique name for this index. |
|
Description |
A useful description for this index. |
|
Unique |
Designates this value as unique, preventing duplicate entries in the index and its backing table. You can create uniqueness by using multiple fields. This option automatically creates an unique index of this field. Unlike the primary key field: You can have multiple unique fields in the business object. This field is allowed to contain NULL values (although the NULL values are not indexed). |
|
Clustered |
Checks if the business object is part of a clustered index at the database level. Clustered indexes can greatly increase overall speed of retrieval, but usually only where data is accessed sequentially in the same or reverse order of the clustered index, or when a range of items is selected. This is the same as a clustered index function for a Microsoft SQL database.
A clustered index cannot contain included fields (it cannot be a cover index).
This checkbox is disabled for index fields that have an increasing value, such as GUID. |
| Key Fields | See Viewing, Adding, and Deleting Key Fields |
| Included Fields | See Viewing, Adding, and Deleting Included Fields. |
|
Filter Expression |
Optional. You can apply a filter to the index that does not include NULL values. Click the add icon Operation: Choose an operation from the drop-down list for this filter. NotNull: The filter does not index NULL values. See About Null Values for more information on defining NULL values. Value: Enter a string value or expression (see About Expressions) for this filter. |
7.Click Add this Index. The application adds the index to the business object.
Viewing, Adding, and Deleting Key Fields
The application displays the running size, in bytes, of the index for the key fields. The limit is 900 bytes.
1.From the Configuration Console, click Build > Business Objects. The application displays the Business Objects workspace.
2.Select any business object. The application displays the Business Object workspace.
3.Click the Indexes tab. The application displays the Indexes workspace with a list of indexes for the business object.
4.Click an index name to open the record.
5.To add a key field, do the following:
| a. | Click the add icon  at the end of the row. at the end of the row. |
| b. | Click not set to select a field from the drop-down list. |
| c. | Click Ascending to change the order. You can select either ascending or descending. |
6.To delete a key field, click the delete icon at the end of the row.
7.Click Save.
Viewing, Adding, and Deleting Included Fields
1.From the Configuration Console, click Build > Business Objects. The application displays the Business Objects workspace.
2.Select any business object. The application displays the Business Object workspace.
3.Click the Indexes tab. The application displays the Indexes workspace with a list of indexes for the business object.
4.Click an index name to open the record.
5.To add an included field, do the following:
| a. | Click the add icon at the end of the row. |
| b. | Click not set to select a field from the drop-down list. |
6.To delete an included field, click the delete icon at the end of the row.
7.Click Save.
Viewing, Adding, and Deleting Filter Expressions
1.From the Configuration Console, click Build > Business Objects. The application displays the Business Objects workspace.
2.Select any business object. The application displays the Business Object workspace.
3.Click the Indexes tab. The application displays the Indexes workspace with a list of indexes for the business object.
4.Click an index name to open the record.
5.To add a filter expression, do the following:
| a. | Click the add icon at the end of the row. |
| b. | Click not set under Field to select a field from the drop-down list. |
| c. | Click NotNull to select an operation from the drop-down list. |
| d. | Click not set under Value to enter a value. |
6.To delete a filter expression, click the delete icon at the end of the row.
7.Click Save.
About Synchronizing Indexes
Index Types
There are two types of indexes: database schema and metadata.
| Property | Metadata Indexes | Database Schema Indexes | Are Compared? |
|---|---|---|---|
| Index name | IndexName | index name | Yes |
| Description | Description | N/A | No |
| Fields | Fields | N/A | Yes |
| Condition: Unique | Unique | is_unique | Yes |
|
Condition: System |
System | N/A | No |
| Condition: IsDisabled | IsDisabled | is_disabled | Yes |
| Condition: IsClustered | IsClustered | is_clustered | Yes |
| Origin | Origin | N/A | No |
| Condition: IsPrimaryKey | IsPrimaryKey | is_primary_key | Yes |
| Table Name | N/A | table_name | No |
| Index ID | N/A | index_id | No |
| Unique Constraint | N/A | is_unique_constraint | No |
The application compares some of the index values, and if there are any differences, the application displays the differences.
Synchronizing Index Messages
If you open a business object and see a caution sign next to the Indexes tab, that means that the indexes need to be synchronized.
Mismatched Index Message 1
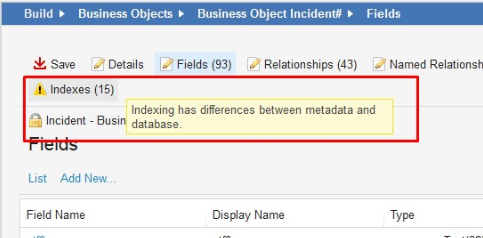
The application also displays a warning message on the Indexes workspace.
Mismatched Index Message 2
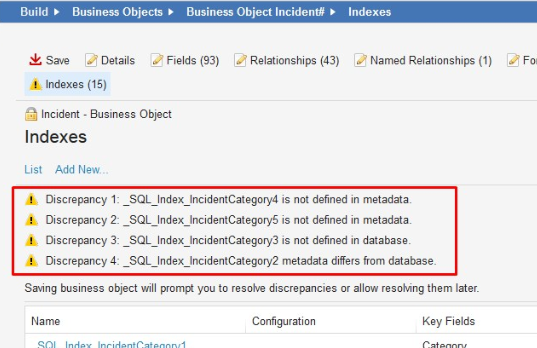
Depending on the type of error, you may also see both an error message and a caution icon next to the affected index.
Synchronizing Indexes
1.From the Configuration Console, click Build > Business Objects. The application displays the Business Objects workspace.
2.Select any business object. The application displays the Business Object workspace.
3.Click the Indexes tab. The application displays the Indexes workspace with a list of indexes for the business object.
If there are any indexes that need to be synchronized, the application displays an error message.
4.Click Save. The application displays the Resolve Indexing Discrepancies dialog box.
5.Select one of the following:
•Accept database indexes: Select this option if you see an error that an index is not defined in the metadata. Does the following:
•Copies database schema indexes to the metadata if they are not in the metadata.
•Removes metadata indexes from the metadata if they are not in the database schema.
•Applies changes from the database schema indexes to the metadata indexes.
•Accept metadata indexes: Select this option if you see an error that an index is not defined in the database schema. Does the following:
• Copies metadata indexes to the database schema if they are not in the database schema.
•Removes database schema indexes from the database schema if they are not in the metadata.
•Applies changes from the metadata indexes to the database schema indexes.
•Resolve later: Does not change the indexes.
6.Click OK.
Was this article useful?
Copyright © 2019, Ivanti. All rights reserved.