Service Manager
Resource Management
A new Quick Action is available beginning with ISM release 2017.3 that allows you to open and view the Resource Calendar workspace for an employee.
The quick action displays as a View Calendar button next to an Employee name, for any task within a business object where the quick action is implemented.
It is available on upgrade, to the Admin, Change and Project Manager roles. However, for customers who began using Service Manager prior to release 2017.3, the quick action may need to be implemented before it can be used.
This feature, is useful when planning projects or checking for availability of an employees time. Once installed, the View Calendar button allows you to view the employees calendar. If an employee requests time off and enters it through the application, the information is also displayed on the Resource Calendar.
The function does not perform any validations against the time span, nor does it account for time-off, weekends or holidays, competing project priorities, or other factors.
It is available through one of the following methods:
•For new customers and existing customers who have installed ITFM and Portfolio and Project Management packages, the option is available automatically for the Project Phase workspace on upgrade to Release 2017.3.
•For existing customer who have not installed ITFM and Portfolio and Project Management packages, these packages must be installed before installing the Resource Management package. The packages are available for import from the Ivanti App Store.
The Calendar only displays newly created items in the Resource Calendar. That is, it displays the View Calendar button and the task assignment schedule for tasks created and assigned after the upgrade or package installation. It does not display for any previously created or existing task assignments.
To implement the quick action for workspaces other than Project Phase workspace, use the procedure described in To Install the Quick Action for a Different Workspace .
On upgrade, or once the package is imported, the Resource Management View Calendar button is automatically enabled on the Task tab for the Project Phase workspace, for all newly created tasks, after a Start Date/End Date is entered and an employee is assigned to the task.
To Display the View Calendar Button
1.Log in to the application as Project Manager and open the Project Phase workspace
2.Open a project and open the Task tab.
3.Click New Task to create new task.
4.In the Edit Task dialog, enter information into the following fields:
| Field | Description |
|---|---|
| Summary | Required - Enter a summary of the Task. This will display on the Calendar. |
| Start Date/End Date fields | Required in order to display on the Calendar. |
| Team | Required by the dialog. |
| Owner | Required in order the view the assignment on a Calendar. |
Once a Start date and End date are entered, and the task is assigned to an employee, the View Calendar button is enabled and displayed.
5.Click the button to see the employee schedule on a Resource Calendar.
The item can be viewed before the task is saved in order to allow the Project Manager to confirm availability of the resource. In the initial view the task will show as the color assigned to non-saved items. Once the task is saved, it will appear in the color assigned in the legend.
6.Save the task to enter it into the calendar.
You can open the task at any time to view the details and the Resource Calendar.
The non-saved and saved task colors can be customized to distinguish between the two. For information about how to do this see To Change the Color Setting.
To Install the Quick Action for a Different Workspace
The View Calendar button can be installed for any workspace that contains a Task component. Ensure that you also allow access to the appropriate roles in order to implement this functionality. The Incident workspace is used in the following example.
1.Log into the application using the Administrator role and open the Configuration Console.
2.From the Settings pane, click on Business Objects > Incident.
3. At the Incident page select Layouts from the toolbar, then select IncidentLayout.ServiceDesk.
4. Under Views in this Layout, click on formView.
5.At the formView page, scroll to Child Panels.
6.In the Display Name column find Task then scroll across to the Form(s) column
7.In the Form(s) column, find, then click on Task.Assignment to open the Form Selection dialog.
8.In the dialog, click on Task.Assignment to enable the drop-down, then select Task.Assignment.ResourceManagement from the list.
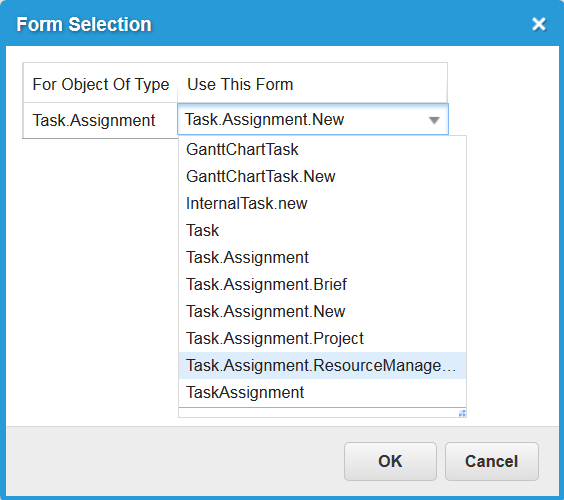
9.Click OK at the dialog, then click Save from the layout to add the functionality to the layout.
After you have added the functionality to the form, refresh the application in order to apply the changes you made from the configuration console.
To See the View Calendar Button in the Incident Workspace
1.Log into the application as any user with access to create a task on an Incident.
2.Open the Incident workspace. If you don't see it immediately click More... and enter "Incident".
3.From the Incident workspace click any incident from the list, for which you want to add a task.
4. Click the Task tab, then click New Task.
5.In the Edit Task dialog, enter information into the following fields:
| Field | Description |
|---|---|
| Summary | Required - Enter a summary of the Task. This will display on the Resource Calendar |
| Start Date/End Date fields | Required in order to display on the Resource Calendar. |
| Team | Required by the dialog. |
| Owner | Required in order the view the assignment on the Resource Calendar |
Once a Start date and End date are entered, and the task is assigned to an employee the View Calendar button is displayed.
6.Click the button to see the employee schedule on a Resource Calendar.
The item can be viewed before the task is saved in order to allow you to view availability. In the initial view the task will show as the color assigned to non-saved items. Once the task is saved, it will appear in the color assigned in the legend.
7.Save the task to enter it into the calendar.
You can open the task at any time to view the details and to view the Resource Calendar.
Entering Employee Time off
Any employee or person with access to the Employee workspace can enter time off for an employee. This will display on the Resource Calendar and is helpful when viewing the schedules.
To do this:
1.Find, then open the Employee workspace.
2.Select an employee and double-click on the employee name to open the record.
3.From the Time Off tab, click New Employee Time Off, then enter the Start Date and End Date for the requested time off.
4.Click Save to exit the dialog. The time off entries for the employee will appear on the Resource Calendar.
Changing the Default Settings
You can edit some of the settings within the Quick Action in order to customize the colors or the default views. For more information about the Calendar see also Creating a Calendar.
To Change the Color Setting
1.Log into the Configuration Console as Administrator
2.Edit the Quick Action code to change the background display color.
Colors are expressed as HEX values.
Open Owner Calendar.'BackgroundColor': '#OOFFOO'
Change the Default View for the Calendar
By default the Resource Calendar is opened in Week view. Use the following steps to change the default setting:
1.From the Configuration Console go to Settings >Build > Page Layouts >
2.In the right pane scroll to find and select Resource Calendar. Click View All if you cannot find it in the list.
3.Click Advanced Options.
4.At the Viewing/Editing Tab Details page, in the Configuration section, modify the Default View: setting to any of the selections available in the drop-down (Week, Month, or Day)
5.Click Save to save your changes.
Was this article useful?
Copyright © 2019, Ivanti. All rights reserved.