Service Manager
About the Schedule Entry and Scheduled Jobs Workspaces
•About the Schedule Entry and Scheduled Jobs Workspaces
•Accessing the Schedule Entry and Scheduled Jobs Workspaces
•Configuring the Time Zone Control
About the Schedule Entry and Scheduled Jobs Workspaces
The Schedule Entry workspace enables you to create a variety of schedules to be used in different functions, such as using time zones within the time object. These schedules appear in a drop-down list within corresponding workspaces. The schedule must be created in Schedule Entry before it will appear in other places.
Time zone is not yet available in the request offering time control. This will be considered in a future release.
Accessing the Schedule Entry and Scheduled Jobs Workspaces
1.Do one of the following:
•From the Service Desk Console, log in as an administrator and open the Schedule Entry workspace.
•From the Configuration Console, click Monitor > Scheduled Jobs to view the Scheduled Jobs workspace.
A list of schedules appear. Several default schedules come with Service Manager, but you can modify these or create your own schedules. See Default Schedules.
2.Double-click an item from the list to view details.
Creating a Schedule
1.From the Configuration Console, click Monitor > Scheduled Jobs to view the Scheduled Jobs workspace.
2.From New on the toolbar, choose the type from the list (daily, hourly, monthly, weekly, or yearly). The schedule form appears.
3.Enter information into the fields.
| Field | Description |
|---|---|
| Name | A unique name for the schedule, such as Weekly Baseline Report. |
|
Start Time |
The start time, including a time zone. By default, the application uses the local time based on your machine. |
| End Time | The end time, including a time zone. By default, the application uses the local time based on your machine. |
| Recur Every | The number of units after which to schedule the next entry. |
|
Start Date |
The date to start the schedule. |
| End Date | The date to end the schedule. |
| No End Date | Specifies that the schedule runs forever or until it is deleted. |
The time zone used is based only on the Time field (as opposed to a DateTime field).
Further options appear according to the schedule type:
Daily
Daily Recurring Schedule Form
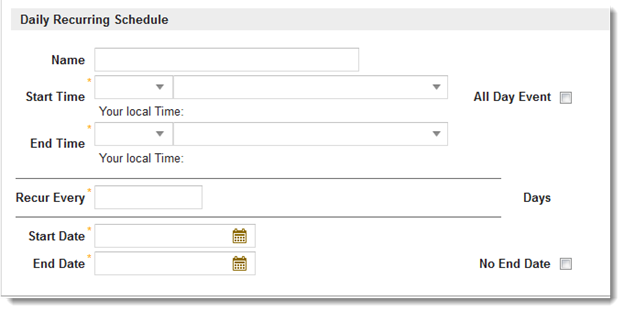
| Option | Description |
|---|---|
| Recur Every Days | The number of days between each run. For example, to run the schedule every other day, enter 2. |
| All Day Event | Lets the schedule run an entire day without a specific start and end time. |
To run multiple imports or exports of the same data each day, you need to create multiple entries. For example, to run an import in the morning and in the afternoon each day (twice a day), create a schedule for the morning run and another for the afternoon run.
Hourly
Hourly Recurring Schedule Form
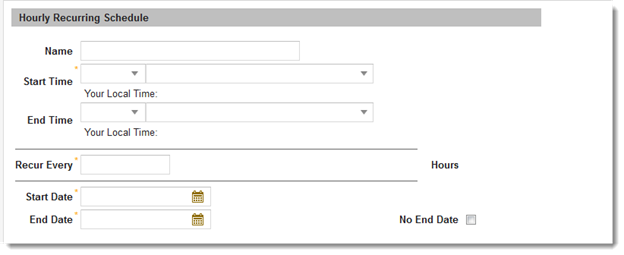
| Option | Description |
|---|---|
| Recur Every Hours | The number of hours between each run. For example, to run the schedule every other hour, enter 2. |
Weekly
Weekly Recurring Schedule Form
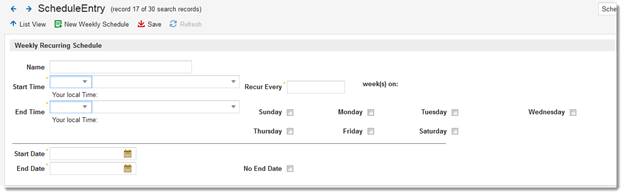
| Option | Description |
|---|---|
| Recur Every Weeks | The number of weeks between each run. For example, to run the schedule every other week, enter 2. |
| Days of the Week | The specific days of the week for the schedule to run. |
Monthly
Monthly Recurring Schedule Form
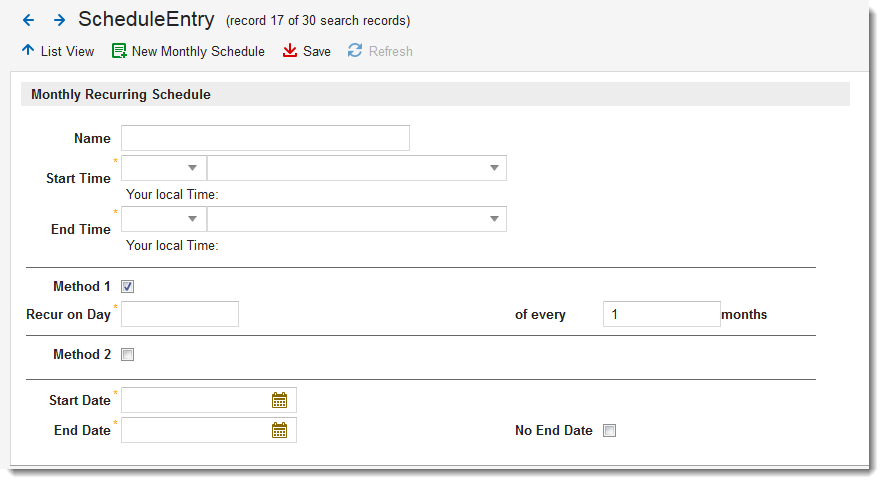
| Option | Description |
|---|---|
| Method 1 | The cardinal day number (such as 5 or 26) of every number of months for the schedule to run. |
| Method 2 | The ordinal day number (such as the first Tuesday or last Saturday) of every number of months for the schedule to run. |
If you get an error message ("The following information does not satisfy validation constraints:"), you must do the following:
If using Method 1, create a new required rule for DayNumber.
If using Method 2, update the required rules for WeekNumber and WeekDay.
WeekNumber is Required

Delete the required rule for RecurEvery. In its place, add a new initialization rule for RecurEvery, and set it to 1.
Yearly
Yearly (Annual) Recurring Schedule Form
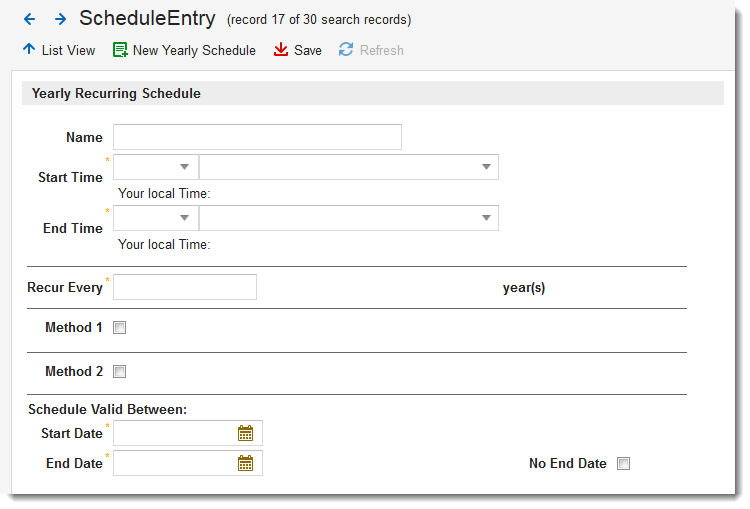
| Option | Description |
|---|---|
| Recur Every Years | The number of years between each run. For example, to run the schedule every other year, enter 2. |
| Method 1 | The specific day of the year for the schedule to run (such as March 1). |
| Method 2 | The ordinal day number (such as the first Tuesday of January or the last Saturday of July) for the schedule to run. |
4.Click Save.
Modifying a Schedule
1.From the Configuration Console, click Monitor > Scheduled Jobs to view the Scheduled Jobs workspace.
2.Double click the schedule to modify. The schedule settings appear.
3.Change the settings as needed.
4.Click Save.
Deleting a Schedule
Use caution when deleting a schedule, as unpredictable results could affect related functions.
1.From the Configuration Console, click Monitor > Scheduled Jobs to view the Scheduled Jobs workspace.
2.Select the schedule to delete.
3.Click the delete icon  .
.
The schedule no longer appears in the list.
Configuring the Time Zone Control
•How the Time Zone Control Works
•Removing the Existing Time Controls from the Forms
•Activating the Time Zone Control
•Placing the Time Zone Controls onto the Forms
About the Time Zone Control
The time zone control is automatically included in schedule entry forms. Users who have created forms prior to this version and who want to use time zones in their forms must manually replace the time field with the time zone field.
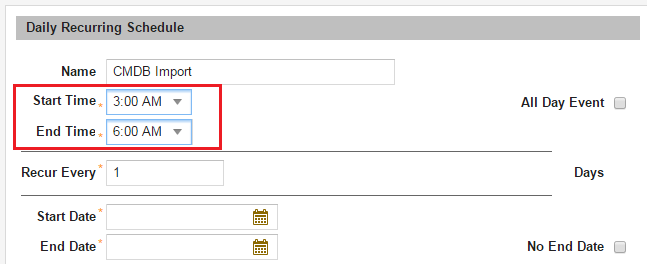
If a daily schedule in the Scheduled Jobs workspace shows only time fields for start and end time, then you do not have the time zone control enabled.
Schedule Entry Example: Time Zone Control Not Enabled
How the Time Zone Control Works
You can specify which time zone options appear whenever you encounter a date or time control on a form. The date and time controls reflect the local date and time of the user. The time zone control enables the user to select a specific time according to a specified time zone, while indicating the local time of the user.
For example, users can choose a time and a time zone (including standard and daylight savings times) from a drop-down list. The time zones are specified as they appear in the IANA time zone database. See Working with Dates, Times, and Time Zones.
Choose a Time and Time Zone

At the same time, the local time of the user is automatically shown, so no conversions or mathematical calculations are needed to figure out time differences.
Local Time

Removing the Existing Time Controls from the Forms
1.From the Configuration Console, click Build > Business Objects to view the Business Objects workspace.
2.On the top right, click View All to view all business objects.
3.Scroll down the list to the ScheduleEntry business object. Notice that it has five member business objects: Daily, Hourly, Weekly, Monthly, and Yearly.
4.Select a member business object (such as ScheduleEntry.DailySchedule).
5.Choose the Forms tab. Two forms appear.
6.Choose a form. Notice that the form contains time only controls.
Schedule Entry Form
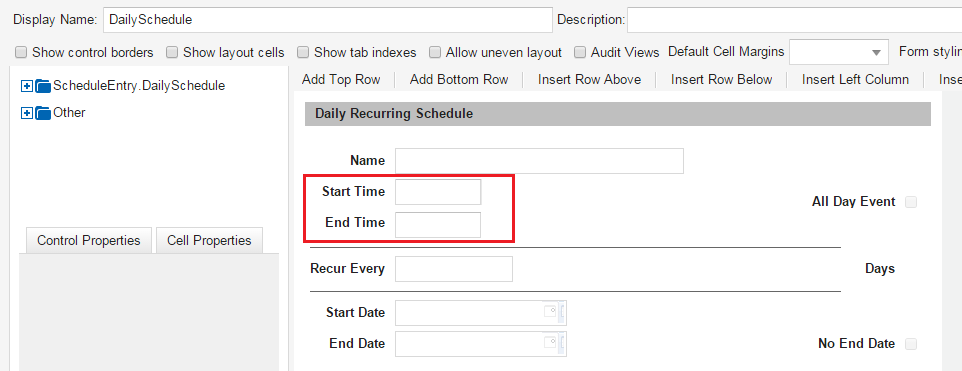
7.Remove the start time and end time controls.
8.Click Save.
9.Repeat this procedure for all forms under each member object (ScheduleEntry.DailySchedule, ScheduleEntry.WeeklySchedule, ScheduleEntry.MonthlySchedule, and ScheduleEntry.YearlySchedule).
Activating the Time Zone Control
1.From the Configuration Console, click Build > Business Objects to view the Business Objects workspace.
2.Open the ScheduleEntry business object.
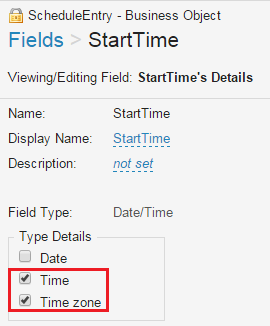
3.Click the Fields tab.
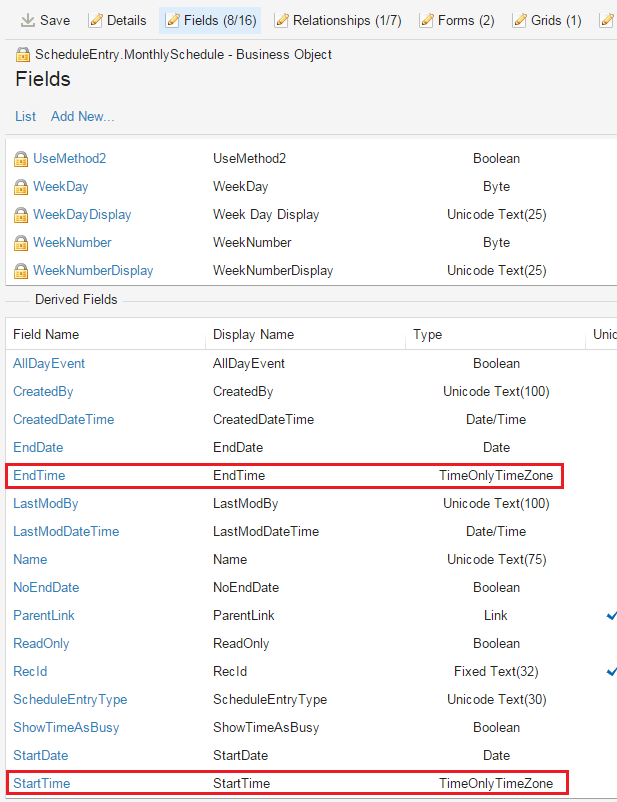
4.Select the StartTime field.
5.Check Time and Time zone.
Schedule Entry Field Types
6.Click Save.
7.Repeat this process for the EndTime field.
Setting these fields automatically sets the time fields for the member objects.
Schedule Entry Member Objects
Placing the Time Zone Controls onto the Forms
1.From the Configuration Console, click Build > Business Objects to view the Business Objects workspace.
2.Open a business object.
3.Click the Forms tab.
4.Open a form.
5.Drag the StartTime and EndTime controls onto the form where the former time-only fields once were.
Notice that the control now includes a container for time zone and a label for local time.
Schedule Entry Example: Time Zone Enabled

6.Click Save.
7.Repeat this procedure for all forms under each member object (ScheduleEntry.DailySchedule, ScheduleEntry.WeeklySchedule, ScheduleEntry.MonthlySchedule, and ScheduleEntry.YearlySchedule).
Was this article useful?
Copyright © 2019, Ivanti. All rights reserved.