Service Manager
Creating Reports and Report Templates
•About Creating Reports and Report Templates
•Step 1: Creating a Report Template
•Step 2: Uploading a Report Template
•Creating a Time-Based Report Template
•Downloading and Uploading a Report Template
•About Data Security for Report Templates
About Creating Reports and Report Templates
Only Report Managers and administrators can create report templates.
You create reports in Service Manager from report templates; however, the system does not support drill-down reports. You can create report templates using the report builder in Microsoft SQL Server Reporting Service (SSRS). Microsoft SSRS is integrated with Service Manager to facilitate building templates.
In addition to using the report builder in Microsoft SSRS to create reports, you can also use Microsoft Business Intelligence Studio (BIDS) to create reports. See Creating a Report Using Microsoft Business Intelligence Development Studio (BIDS) for more information about using Microsoft BIDS.
After you create a report template, upload it to Service Manager. You can then use the report template that you created to create new reports. In addition, Service Manager has predefined report templates that you can also use to create reports.
When using the Microsoft SSRS report builder, note the following:
•if you are inactive for 180 minutes or longer, the report builder times out and displays the following error: Object moved ReportServer Logon.aspx.
•You only need to enter your credentials once per session.
The main steps in creating a custom report are:
•Step 1: Creating a Report Template
•Step 2: Uploading a Report Template
Step 1: Creating a Report Template
Before you can create a custom report, you must have a report template. The report template contains the search parameters, filters, and layout of a report. When you run a report, the data is organized according to the definition of the report template.
Report Managers create report templates using the Microsoft SSRS report builder, which is integrated with Service Manager. You can go directly to the database and build your own datasets in Microsoft SSRS or you can use the Microsoft SSRS report builder and build a dataset in Microsoft SSRS. For more information on installing the report builder, view the Microsoft website at http://www.microsoft.com/.
1.Log in to the application as a Report Manager.
2.Open the Report Templates workspace. The system displays a list of report templates.
3.Click New Report Template. The system opens the Microsoft SSRS report builder.
4.If this is the first time that you are using the report builder, enter your credentials by doing the following:
| a. | In the Application Run dialog box, click Run. The report builder starts to download. This might take a few minutes. |
| b. | In the Connect to Report Server dialog box, enter the following: |
| Field | Value |
|---|---|
| Username | Enter userID#tenant ID. |
| Password | Enter the application password. |
| c. | Click OK. The system displays the Microsoft SSRS report builder. |
5.From the left Report Data pane, from Data Sources, right-click SaaSAppmodel, then choose Add Dataset. The system displays the Dataset Properties dialog box.
Dataset Properties Dialog Box
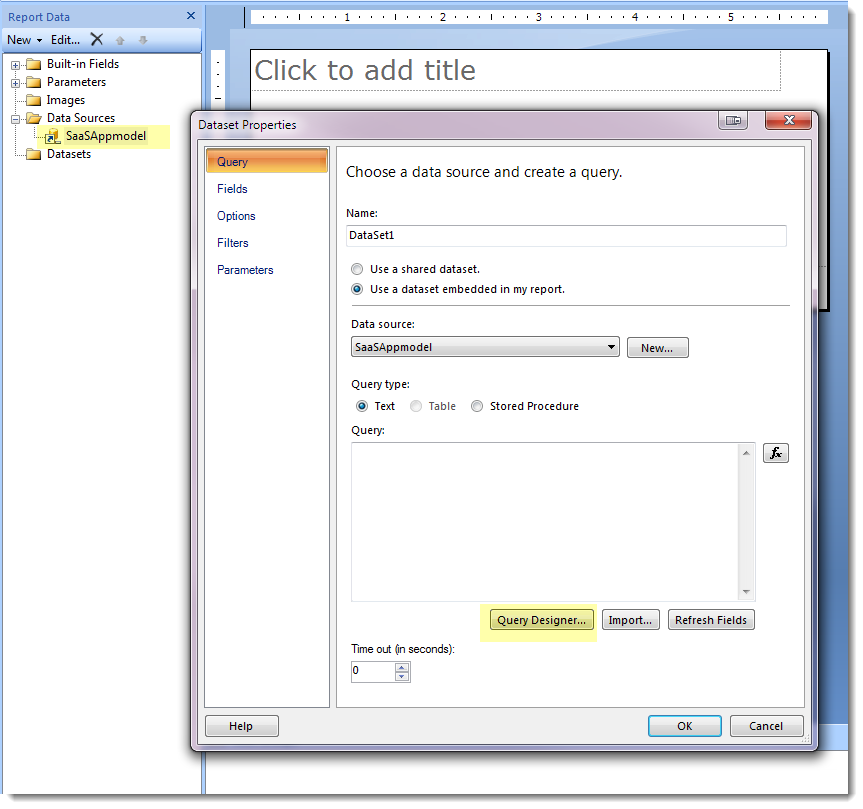
6.Click Query Designer. The system displays the Enter Data Source Credentials dialog box.
7.Enter your Microsoft SSRS user name and password, then click OK. The system displays the Query Designer dialog box.
8.Right-click the Parameters folder and choose Add Parameter.
9.Enter the report template parameters.
Report parameter values do not support angle brackets (<>). Microsoft has implemented this feature in Microsoft SSRS for security reasons. See About Data Security for Report Templates. Click Help on the window for more information on how to create a parameter.
10.Select the fields for the report template and then design the appearance of the template.
| a. | Click to expand the Tables folder, select the fields that are to appear on the report template, then click OK. |
| b. | Click OK to close the Dataset Properties dialog box. |
| c. | Design the template by dragging and dropping the fields you selected to the right pane. |
| d. | Click the field that you dropped so that its edges are highlighted, right-click and select Insert, then insert any of the design items. |
| e. | Click Run to preview the template. |
11.When you have finished designing the template, click Save As and save the template locally.
Do not click Save; click Save As.
Step 2: Uploading a Report Template
After creating a report template, upload it to the Report Templates workspace.
1.Log in to the application as a Report Manager.
2.Open the Report Templates workspace. The system displays a list of report templates.
3.Click Upload Report. The system displays the Upload Report Template dialog box.
4.For the Report Template Name field, enter the report name.
5.For the Report template parameter, select the report template file.
6.Click Save.
7.In the message dialog box, click OK. The system displays the newly uploaded report template in the Template Name column.
Step 3: Creating a Report
After creating a custom report template, you are ready to create a report.
1.Log in to the application as a Report Manager.
2.Open the Reports workspace. The system displays a list of reports.
3.Click New Report. The system displays a blank report form.
4.Enter information into the fields.
| Field | Description |
|---|---|
| Report template | The name of the report template to base this report on. Choose from the drop-down list. The template that you imported should automatically appear in the list. |
| Display Name | A descriptive name that appears on the reports list. |
| Description | A brief description of the report. |
| Category | The category. Choose from the drop-down list. |
| Publish Report to | The roles that can view and use this report. |
| Report Options | |
| Allow run now | Enables users to run the report immediately. |
| Can run from Run Report quick action | Enables the report to be run from the Run Report quick action. |
| Can run from Export Data quick action | Enables the report to be run from the Export Data quick action. |
| Parameter Information |
Automatically populated from the report template. Not all reports have parameter options, and they vary for each report. Under the Hidden column, specify if the parameter is hidden from users. If you select No, the parameter field is visible to the user to select when they run the report. If you select Yes, the parameter field is hidden to the user, although the report will run according to the parameter you set up. For example, to limit a user to viewing only their incidents, create a report template that includes a parameter that limits the results to incidents where the incident owner is the logged-in user or owner = $(CurrentloginId()). If you select Yes for this parameter, a user cannot change this filter when running the report.
The value of the CurrentBrowserCulture parameter must be the same as the value of this same parameter on the report server.
See About Using Last 1 Year vs Last 4 Quarters for more information about the parameters. |
| Schedule Information | |
| No Schedule | Does not run the report on a schedule. |
| Run once on | See Scheduling Reports for information on using the scheduler. |
| Time zone | See Scheduling Reports for information on using the scheduler. |
|
Daily at |
See Scheduling Reports for information on using the scheduler. |
|
Weekly on |
See Scheduling Reports for information on using the scheduler. |
|
Monthly (by week) on |
See Scheduling Reports for information on using the scheduler. |
| Monthly (by day) on | See Scheduling Reports for information on using the scheduler. |
| Start | See Scheduling Reports for information on using the scheduler. |
| End | See Scheduling Reports for information on using the scheduler. |
| Time zone | See Scheduling Reports for information on using the scheduler. |
| Distribution Information | |
| Report Format |
The format of the report. Choose from the drop-down list. Available formats are: Acrobat (PDF file) CSV (comma delimited) XML file with report data Embedded HTML Microsoft Excel TIFF file Microsoft Word |
| No Distribution | Does not automatically distribute this report. |
| Download | Makes this report available for download from the report link in the workspace of the user. |
| Sends the report by email. Enter the email addresses, subject line, and descriptive text. | |
5.Click the preview  icon to preview the report.
6.Click the save ![]() icon. The system displays the report on the report list.
icon. The system displays the report on the report list.
About Using Last 1 Year vs Last 4 Quarters
If you are using a report template, such as the Executive Scorecard report template, in the Parameter Information section, there are fields where you can specify the time.
Report Template with Time Parameters

The system returns different results based on the values that you enter. For example, entering 1 in the Last field and selecting year from the second field is not the same as entering 4 in the Last field and selecting quarters in the second field. The system calculates quarters and years differently.
Whenever you choose last year, last quarter, last month, last week, or last day, the system ignores the current year, quarter, month, week, or day.
Example 1: If you run the report on January 8, 2014, then entering 4 in the Last field and selecting quarters in the second field displays information from 4/1/2013 to 1/8/2014.
Last 4 quarters =
[Current quarter (1/1/2014 - 1/8/2014 (today) [1st quarter]]
+
[Quarter 10/1/2013 - 12/31/2013 (2nd quarter)]
+
[Quarter 7/1/2013 - 9/30/2013 (3rd quarter)]
+
[Quarter 4/1/2013 - 6/30/2013 (4th quarter)]
Example 2: If you run the report on January 8, 2014, then entering 1 in the Last field and selecting year in the second field displays information from 1/1/2014 to 1/8/2014.
Last 1 year =
Current year 1/1/2014 - 1/8/2014 (today)
Creating a Time-Based Report Template
1.Log in to the application as a Report Manager.
2.Open the Report Templates workspace. The system displays a list of report templates.
3.Click New Report Template. The system opens the report builder.
4.Make the parameters that govern the time ranges visible by doing the following:
| a. | From the Report Data pane, click the Last parameter. This is the parameter that governs report intervals. The system displays the Report Parameter Properties dialog box. |
| b. | For the Select parameter visibility field, select Visible. When running the report, this parameter detects the report runtime defined in the query. |
| c. | Click OK. |
| d. | Repeat steps a-c for the DataRangeOptions and BrowserTimeZoneOffset parameters. |
5.Create the interval report query, including the date ranges (start and end date). For example, create the following query: select incidentnumber,createddatetime from incident where createddatetime>(@startdate) and createddatetime <(@enddate).
6.From the Dataset Properties Parameters pane, set the expressions for the values:
| Value | Expression |
|---|---|
| @startdate |
=Code.getStartDateTime( Parameters!DataRangeOptions.Value, Parameters!BrowserTimezoneOffSet.Value, Parameters!Last.Value ) |
| @enddate |
=Code.GetEndDateTime( Parameters!DataRangeOptions .Value, Parameters!BrowserTimezoneOffSet.Value ) |
7.Complete the template design, and click OK.
When you run the report, the startdate and enddate query parameters return the dates in the format defined by the user (year, month, quarter, etc.).
Modifying a Report Template
After creating a report template, you might want to edit it or create a duplicate report template.
1.Log in to the application as a Report Manager.
2.Open the Report Templates workspace. The system displays a list of report templates.
3.Click the edit  icon next to the report template to edit. The system launches the report builder.
4.Log into the report builder and select the report template to modify.
5.Make changes as needed.
6.Click Save As to save your report template locally.
Do not click Save; click Save As.
•To overwrite the existing report template, click Save As.
•To create a duplicate report template, enter a new name, then click Save As.
Downloading and Uploading a Report Template
You can save a report template from one instance of Service Manager to use in another instance. For example, if you create report templates in your staging environment, you can easily save the templates to your local machine and upload them to your production environment without logging into Microsoft SSRS.
1.Log in to the application as a Report Manager.
2.Open the Report Templates workspace. The system displays a list of report templates.
3.Click the download icon  next to the report template to save. The system downloads the report template to your downloads folder.
4.Log into a new instance of Service Manager and open the Report Templates workspace again.
5.Click Upload Report. The system displays the Upload Report Template dialog box.
6.For the Report Template Name field, enter the report name.
7.For the Report template parameter, select the report template file.
8.Click Save.
9.In the message dialog box, click OK.
The system saves the report template and it is ready to use.
About Data Security for Report Templates
When creating a report template, you can add parameters to the template to make the report data secure or to give users options in selecting the data that they can view. When you use the report template to create a report, you can make these parameter fields hidden or visible.
•For reports with restricted data, you can hide the parameter fields. For example, the Owner =$(CurrentLoginId()) parameter restricts the report data to the logged-in user, so the user can only view a report of records where the logged-in user is the owner. If you hide this parameter, the user cannot change it. In the same way, you can restrict reports to generate data limited to the team or organization unit of the logged-in user.
•For reports where users can make selections to the report data, make the parameter fields visible. For example, make the Start Date and End Date parameters visible to allow users to select a date range for the report data.
Parameters that specify context (for example, logged-in user) do not work for scheduled reports.
Was this article useful?
Copyright © 2019, Ivanti. All rights reserved.