Service Manager
Report Examples
The following use cases are provided as examples to help you create a report template with parameters, upload it to Service Manager, publish it, and then run it.
•Example: Creating a Report Where Users Select Incident Categories and View Owners by Category
•Example: Creating a Report That Filters Incidents by Owner Teams and Owners Within the Teams
•Example: Using a Field in a Report that Stores Both HTML and Text
•Example: Restricting Report Data Based on Login ID
Example: Creating a Report Where Users Select Incident Categories and View Owners by Category
This example shows how to create an incident report with category as a parameter.
•Step 1: Logging into the Report Builder
•Step 2: Creating the Dataset for the Report
•Step 3: Creating the Dataset for the Parameter
•Step 4: Creating the Parameters
•Step 6: Uploading and Publishing the Report
Step 1: Logging into the Report Builder
1.Log in to the application as a Report Manager.
2.Open the Report Templates workspace. The system displays a list of report templates.
3.Click New Report Template. The system opens the report builder.
4.In the Connect to Report Server login window, enter the following:
| Field | Description |
|---|---|
| Username | Enter userID#tenant ID. |
| Password | Enter the application password. |
5.Click OK.
Step 2: Creating the Dataset for the Report
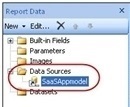
1.From the left Report Data pane, click Data Sources > SaaSAppmodel.
Create Dataset for the Report
2.Right-click SaaSAppmodel, then select Add Dataset. The system displays the Dataset Properties dialog box.
3.Click Query Designer....
4.In the Enter Data Source Credentials window, enter your Microsoft SSRS user name and password, then click OK. You only have to enter your Microsoft SSRS credentials once during a session.
The system displays the Query Designer dialog box.
5.Click Edit as Text.
6.Enter your query. For example, a simple query to get all incidents by categories, showing the incident number and owner is as follows: Select incidentnumber,category,owner from incident where category in (@category). In this example, @category is taken by Microsoft SSRS as a parameter. When running the query, the system prompts you for the value. You can provide any value to test the query. The system automatically creates the category parameter and automatically maps it to the dataset.
7.Click !.The system displays the Define Query Parameters dialog box.
8.Enter a value in the Parameter Value field, (for example, enter category) and click OK.
9.View the report columns, then click OK. The system displays the Dataset Properties dialog box.
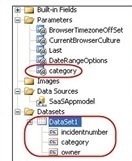
10.Click OK to close the window. The system creates the dataset, as shown under Datasets. The system creates the category parameter, as shown under Parameters.
Category Parameter
Step 3: Creating the Dataset for the Parameter
1.From the left Report Data pane, click Data Sources > SaaSAppmodel.
2.Right-click SaaSAppmodel, then select Add Dataset. The system displays the Dataset Properties dialog box.
3.Click Query Designer.... The system displays the Query Designer dialog box.
4.Click Edit as Text. Use the text-based query designer to specify a query using the query language supported by the data source, run the query, and view the results at design time.
5.Enter your query. For example, a simple query to get all incident categories is as follows: select distinct category from incident where category !=''. The query should always have a value after select and not just select * because doing so not only causes performance issues, but it might also create an error when upgrading if a field is deleted.
6.Click !.
7.View the incident categories that are created, as queried in this example, then click OK. The system displays the Dataset Properties dialog box.
8.Click OK to close the window.
9.Click OK to close the Dataset Properties dialog box. The system creates the second dataset, for the parameter.
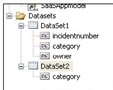
You have now created two datasets: one for the report and one for the parameter.
Two Datasets
Step 4: Creating the Parameters
1.From the left Report Data pane, under Parameters, select the parameter that you created, then right-click and select Parameter Properties. The system displays the Report Parameter Properties dialog box.
2.Enter a name in the Name field or accept the default that you entered in the Parameter Value field earlier. You cannot use any spaces in this field. Users do not see this name.
3.In the Prompt field, enter a prompt for the user, (for example, Select a Category) or leave the default value. Users see this prompt.
4.Select Allow multiple values. This allows users to select multiple value selections from the Category menu.
Allow Multiple Values

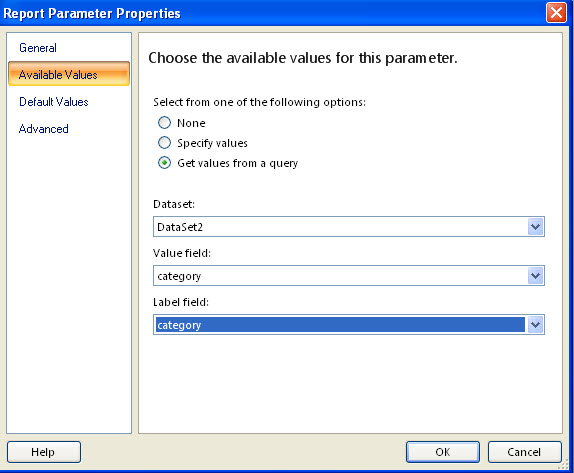
5.From the left pane, click Available Values.
6.Select Get values from a query.
7.Select the dataset that you created from the Dataset field.
8.Select the category value from the Value field field.
9.Select the category label from the Label field field.
Available Values
10.Click OK.
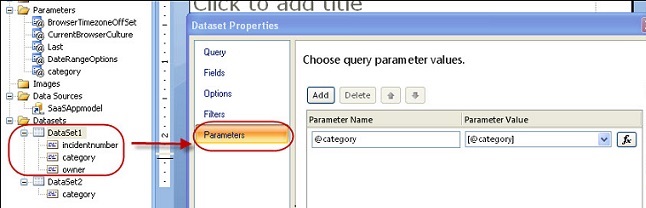
11.Right-click the dataset that you created for the report (as described in Step 2: Creating the Dataset for the Report), and select Dataset Properties.
12.Click Parameters and make sure that it is using the appropriate parameter.
Parameters
13.Click OK.
Step 5: Designing the Report
1.In the report designer, right-click and select Insert. You can insert charts, graphs, tables, and so on when designing your report. In this example, the report data is displayed in a table.
2.Select Table.
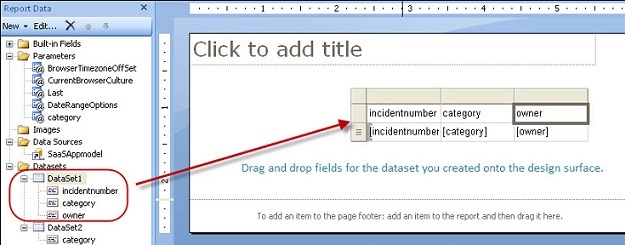
3.Drag the values from the dataset that you created and drop them into the header fields.
Creating a Report
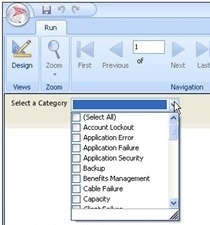
4.Click Run to view the report. View the incident categories in the menu and the prompt value that you defined.
Viewing a Report
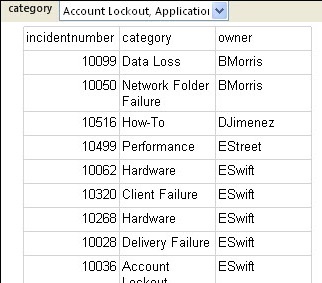
5.Select the categories to run the report for or click Select All, then click View Report.
Categories for a Report
6.Make sure that you are satisfied with the report before uploading it to Service Manager.
7.Click Save As and save the report to your local machine.
Step 6: Uploading and Publishing the Report
1.Log in to the application as a Report Manager.
2.Open the Report Templates workspace. The system displays a list of report templates.
3.Click Upload Report.
4.In the Report Template Name field, enter a descriptive name for the report. For example, enter Incident Categories by Owners.
5.Browse to select the template that you saved, then click Save.
6.Click OK.
Step 7: Running the Report
1.Log in to the application as a Report Manager.
2.Open the Reports workspace. The system displays a list of reports.
3.Click New Report.
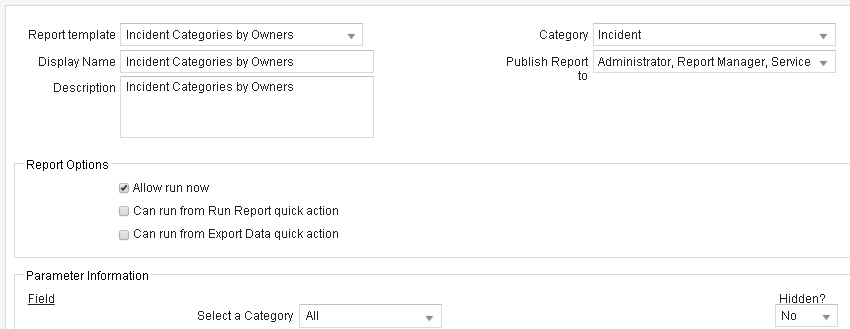
4.In the Report template field, select the report that you created. In this example, select Incident Categories by Owners.
5.Enter a display name and a description.
6.Select a category to group the report by. For example, select Incident.
7.In the Publish Report to field, select the roles to publish this report to, such as Report Manager, Service Desk Analyst, or Service Desk Manager.
8.In the Parameter Information section, select some of the incident categories or select All.
Whichever value you select is the default value when users run the report. However, they can select other values from the menu and run the report again.
9.To allow users to select the categories, leave the Hidden field as no.
10.Select Allow run now.
Running the Report
11.Click Save.
12.Select the new report to view it.
Ensure that your web browser is enabled to allow pop-ups.
Users can select multiple categories or view all categories.
Example: Creating a Report That Filters Incidents by Owner Teams and Owners Within the Teams
In this example, you create an incident report showing all the incidents filtered by owner teams and then by owner. The list of owners that you see after you select the owner team is constrained by the team.
Users can select one or more owner teams, select an owner from the team, and view the incidents where the selected employee is specified as the owner.
•Step 1: Creating the Dataset for the Report
•Step 2: Creating the Datasets for the Parameter
•Step 3: Creating the Parameter for the Owner Teams
•Step 4: Creating the Parameter for the Owners Constrained by Owner Teams
•Step 6: Uploading and Publishing the Report
Step 1: Creating the Dataset for the Report
1.Log into the report builder. See Step 1: Logging into the Report Builder.
1.From the left Report Data pane, click Data Sources > SaaSAppmodel.
2.Right-click SaaSAppmodel, then select Add Dataset. The system displays the Dataset Properties dialog box.
3.Click Query Designer....
4.In the Enter Data Source Credentials window, enter your Microsoft SSRS user name and password, then click OK. You only have to enter your Microsoft SSRS credentials once during a session.
The system displays the Query Designer dialog box.
5.Click Edit as Text.
6.Enter your query. For example, a simple query to get all the incidents by owner team, showing the incident number and owner is select incidentnumber,ownerteam,owner from incident where owner= (@owner). In this example, @owner is taken by Microsoft SSRS as a parameter. When running the query, the system prompts you for the value. You can provide any value to test the query. The system automatically creates the owner parameter and automatically maps it to the dataset.
7.Click !. The system displays the Define Query Parameters dialog box.
8.Enter a value in the Parameter Value field (for example, enter admin) and click OK.
9.View the report columns, then click OK. The system displays the Dataset Properties dialog box.
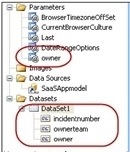
10.Click OK to close the window. The system creates the dataset, as shown under Datasets. The system creates the owner parameter, as shown under Parameters.
Owner Parameter
Step 2: Creating the Datasets for the Parameter
You need to create two datasets for the parameter: the first dataset is for showing the list of owner teams for incidents, and the second dataset is for showing the list of owners constrained by the selected owner team.
1.From the left Report Data pane, click Data Sources > SaaSAppmodel.
2.Right-click SaaSAppmodel, then select Add Dataset. The system displays the Dataset Properties dialog box.
3.Click Query Designer.... The system displays the Query Designer dialog box.
4.Click Edit as Text. Use the text-based query designer to specify a query using the query language supported by the data source, run the query, and view the results at design time.
5.Enter your query. For example, a query to get all the incident owner teams is select distinct ownerteam from incident. Your query should always have a value after select and not just select * because doing so not only causes performance issues, but it might also create an error when upgrading if a field is deleted.
6.Click !.
7.View the incident owner teams that are shown, as queried in this example, then click OK. The system displays the Dataset Properties dialog box.
8.Click OK.
9.Click OK to close the Dataset Properties dialog box. The first dataset for the parameter is now created.
Now, create the second dataset for the parameter.
10.From the left Report Data pane, click Data Sources > SaaSAppmodel.
11.Right-click SaaSAppmodel, then select Add Dataset. The system displays the Dataset Properties dialog box.
12.Click Query Designer.... The system displays the Query Designer dialog box.
13.Click Edit as Text.
14.Enter your query. For example, a query to get all the incident owners from the selected owner teams is select distinct owner from incident where ownerteam in (@ownerteam).
15.Click !.
16.In the Define Query Parameters dialog box, enter a parameter value. For example, enter Admin, then click OK.
17.View the incident owner that is shown, as queried in this example, then click OK. The system displays the Dataset Properties dialog box.
18.Click OK.
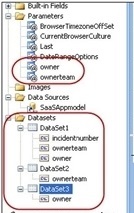
You have now created three datasets: one for the report and two for the parameters, as shown below:
Three Datasets
Step 3: Creating the Parameter for the Owner Teams
1.From the left Report Data pane, under Parameters, select the owner team parameter you created, then right-click and select Parameter Properties. The system displays the Report Parameter Properties dialog box.
2.Enter a name in the Name field or accept the default that you entered in the Parameter Value field earlier. You cannot use any spaces in this field. Users do not see this name.
3.In the Prompt field, enter a prompt for the user, (for example, Select an owner team) or leave the default value. Users see this prompt.
4.Select Allow multiple values. This allows the user to select multiple value selections from the owner team menu.
5.From the left pane, click Available Values.
6.Select Get values from a query.
7.Select the dataset that you created from the Dataset Field menu. For this example, select Dataset2.
8.Select the owner team value from the Value field field.
9.Select the owner team label from the Label field field.
10.Click OK.
Step 4: Creating the Parameter for the Owners Constrained by Owner Teams
1.From the left Report Data pane, under Parameters, select the owner parameter that you created, then right-click and select Parameter Properties. The system displays the Report Parameter Properties dialog box.
2.Enter a name in the Name field or accept the default that you entered in the Parameter Value field earlier. You cannot use any spaces in this field. Users do not see this name.
3.In the Prompt field, enter a prompt for the user, (for example, enter Select an owner from the selected owner team) or leave the default value. Users see this prompt.
4.From the left pane, click Available Values.
5.Select Get values from a query.
6.Select the dataset that you created from the Dataset Field menu. For this example, select Dataset3.
7.Select the owner value from the Value field field.
8.Select the owner label from the Label field field.
9.Click OK.
10.Right-click the dataset that you created for the report (as described in Step 2: Creating the Dataset for the Report), and select Dataset Properties.
11.Click Parameters and make sure that it is using the appropriate parameter.
12.Click OK.
Step 5: Designing the Report
1.In the designer, right-click and select Insert. You can insert charts, graphs, tables, and so on when designing your report. In this example, the report data will be displayed in a table.
2.Select Table.
3.Drag from the dataset that you created and drop the values into the header fields.
Designing the Report
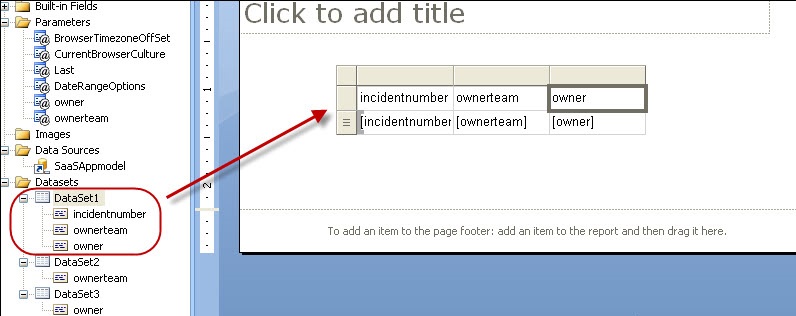
4.Go to the Parameters folder and select ownerteam, then press Ctrl + keyboard up arrow to move ownerteam above owner.
5.Click Run to view the report. View the incident owner team and owners in the menu and the prompt values that you defined.
View the Report
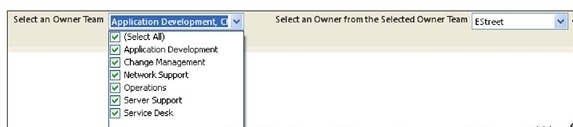
6.Select the owner teams to view or click Select All. Select an owner from the selected owner teams, then click View Report.
7.Make sure that you are satisfied with the report before uploading it to Service Manager.
8.Click Save As and save the report to your local machine.
Step 6: Uploading and Publishing the Report
1.Log in to the application as a Report Manager.
2.Open the Report Templates workspace. The system displays a list of report templates.
3.Click Upload Report.
4.In the Report Template Name field, enter a descriptive name for the report. For example, enter Incidents by Owner by Teams.
5.Browse to select the template that you saved, then click Save.
6.Click OK.
Step 7: Running the Report
1.Log in to the application as a Report Manager.
2.Open the Reports workspace. The system displays a list of reports.
3.Click New Report.
4.From the Report Template field, select the report. In this example, select Incident by Owner by Teams.
5.Enter a display name and a description.
6.Select a category to group the report by. For example, select Incident.
7.In the Publish Report to field, select the roles to publish this report to.
8.In the Parameter Information section, select an incident owner team or select All. Select an owner.
Whichever value you select is the default value when the user runs the report. However, they can select other values from the menu and run the report again.
9.To allow users to select categories, leave the Hidden field as no.
10.Select Allow run now.
11.Click Save.
12.Select the new report to view it.
Ensure that your web browser is enabled to allow pop-ups.
View the New Report
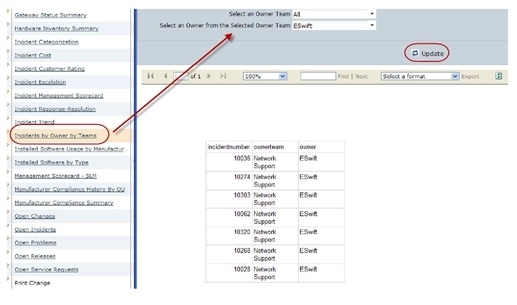
Users can select multiple teams or view all the teams, and then select an owner from the teams.
Example: Using a Field in a Report that Stores Both HTML and Text
This example describes how to create a report template that uses both HTML and text-based fields from the business objectAny key business component that you want to track and manage. Examples include incidents, tasks, configuration items, attachments, audit history, contacts, and notes. records. For example, your email body might use HTML and text elements, which might not render the line breaks correctly in the generated report. For your reports to render correctly, you need to add an expression to the field that uses HTML and text elements.
1.Log in to the application as a Report Manager.
2.Open the Report Templates workspace. The system displays a list of report templates.
3.Click the edit icon  next to a report template. The system opens the report builder.
4.From the View menu, ensure that Properties is checked. The system displays the Properties pane on the right.
5.Select the form field to create the expression for. For example, select Email Message.
Create Expression

6.In the Properties pane, for the Markup Type field, select Expression. The system displays the Expressiondialog box.
7.Enter the following expression: =if(Code.checkhtml(Fields!EmailBody.Value) = true then "HTML" else "None").
8.Click OK.
Example: Restricting Report Data Based on Login ID
1.Log in to the application as a Report Manager.
2.Open the Report Templates workspace. The system displays a list of report templates.
3.Click the edit icon next to a report template. The system opens the report builder.
4.In the Report Parameter Properties dialog box, click General on the left.
5.Enter information into the fields.
| Field | Description |
|---|---|
| Name | A descriptive name for the parameter, for example, Login ID. |
| Prompt | The prompt that users see. Use a Service Manager expression. For example, enter $(CurrentLoginId()). |
| Data type | The data type. Select Text. |
| Select parameter visibility | The visibility of the parameter. Select an option. If you select Hidden, users cannot change the parameter when running the report. |
6.Click OK.
Was this article useful?
Copyright © 2019, Ivanti. All rights reserved.