Service Manager
Configuring Editable and Cancellable Service Requests
You can allow users to edit or cancel specific service requests. You can also configure service requests to not be editable or cancellable beyond a certain point (for example, after approval or notification). Service requests that are set to a status of cancelled, closed, or fulfilled are by default not cancelable or editable.
•Configuring Editable or Cancelable Service Requests
•Disabling the Cancel Service Request Button
•Enabling the Cancel Service Request Button
•About the Cancel Service Request Button in the Self-Service Portal
•Preventing Editable or Cancellable Service Requests
Configuring Editable or Cancelable Service Requests
Designate specific services to be edited after they have been submitted.
1.Log in to the application as a service owner.
2.Open the Request Offerings workspace.
3.Open the service request to designate as cancelable or editable. The Request Offerings wizard appears.
Request Offerings Wizard
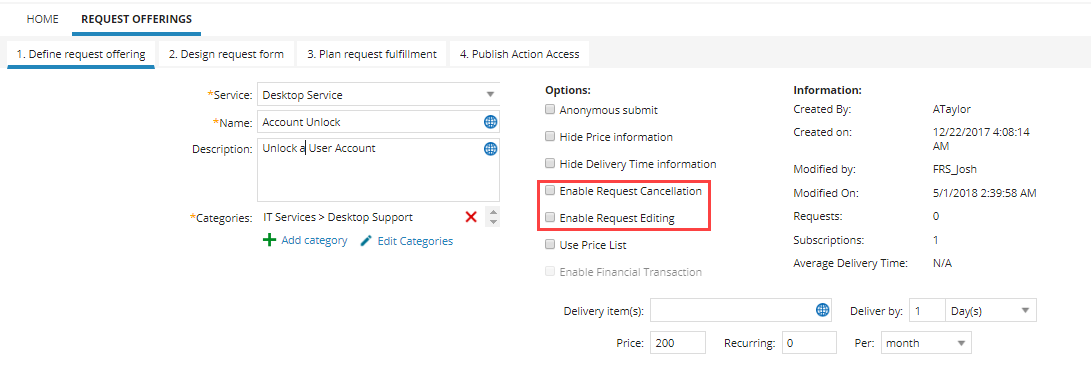
4.Under the Define Request Offering tab, check Enable Request Editing or Enable Request Cancellation.
5.Click Save. Users can now cancel or edit a service request once it has been submitted.
Disabling the Cancel Service Request Button
Users (except for users in the Self-Service Portal) have Cancel button ( ) in the service request toolbar. They can click this to set the status to canceled.
This procedure describes how to disable the Cancel Service Request button for users who are not in the Self-Service Portal.
1.From the Configuration Console, click Build > Business Objects to open the Business Objects workspace.
2.Click Service Request. The Service Request details page appears.
3.Click the Layouts tab, then select ServiceReqLayout.New. The Layout Editor appears.
4.Click formView. The Form View Editor appears.
5. To the right of the toolbar area, click Edit. The Toolbar Editor appears.
Toolbar Editor
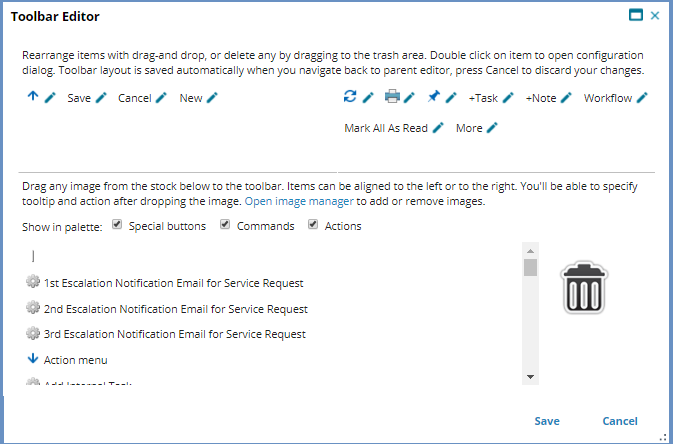
In the Toolbar Editor, the Cancel Service Request button appears in the white area. If the button does not appear, then it has already been disabled.
6.Drag Cancel Service Request over the trash can icon. This removes the button from the layout. The Delete Confirmation window appears.
7.Click OK.
8.Click Save to close the window.
9.Click Save to save the layout.
The Cancel Service Request button no longer appears on the user workspace.
Enabling the Cancel Service Request Button
If the button does not appear in the Service Request workspace, administrators can add it.
1.Within the Toolbar Editor, drag Cancel Service Request from the list to the toolbar area. The Toolbar Button Editor window appears.
2.Enter the following parameters:
| Parameter | Description |
|---|---|
|
Action |
Select Button Invokes Action > Cancel Service Request. |
|
Display |
Select Image and Text. |
|
Image |
icon_task_cancel.png |
|
Text |
Default (changes automatically) |
|
Tooltip |
Enter Cancel Service Request |
3.Click Save. The button is now on the toolbar.
4.Click Save. The toolbar editor window closes.
5.From the toolbar, click Save. The button is saved to the layout.
About the Cancel Service Request Button in the Self-Service Portal
Users in the Self-Service Portal do not have a toolbar like other users, so the Cancel button appears within the form interface.
Service owners must define the Cancel Request quick action within the request offering workflow.
Preventing Editable or Cancellable Service Requests
Set the properties ForceNotEditable and ForceNotCancelable in the Update workflow block to True to make a service request offering not editable or not cancelable at a certain point in your workflow.
For example, you can set a request offering to allow users to cancel or edit a service request. However, you do not want them to be able to do this once the service request has passed the approval block in the workflow.
1.Log in to the application as the service owner.
2.Open the Request Offerings workspace.
3.Double click the request to modify. The Request Offerings wizard appears. Under the Plan Request Fulfillment tab, the Fulfill option should be set to Workflow. The workflow appears.
4.Drag the Update block onto the Workflow Designer, then double click the block header to open the block properties window.
5.Set the following parameters under ServiceReq > Fields (you can set either item or both items):
| Field | Description |
|---|---|
| Force Not Cancelable | Set the value to True to not allow this request item to be canceled. |
| Force Not Editable | Set the value to True to not allow this request item to be modified. |
Prevent Editable or Cancellable Service Requests

6.Click Save.
7.Connect the block to the desired area of your workflow. For example, to prevent cancel or edit after approval, connect the Approval block going to the Update block, then connect the Update block to the next block in the workflow (such as Stop).
Approval Block in Workflow
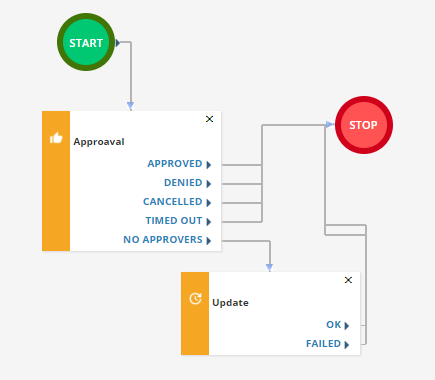
This request can not be modified or canceled after it has been approved.
8.Click Save.
Was this article useful?
Copyright © 2019, Ivanti. All rights reserved.