Service Manager
Using the Address Book
•Adding the Address Book to a Form
•Creating Users or Teams for a Quick Action Email
About Using the Address Book
The address book enables you to select multiple email recipients or senders without having to enter their individual full email addresses. It automatically obtains names and email addresses from the Employee and ExternalContact business objects.
You can access the address book from any email-related business object. For example, when defining a quick action that generates an email, the application displays the address book.
You can add contacts from your organizational unit user or team list.
Using the Address Book
1.Log into the Service Manager Application.
2.Open the Email workspace. The application displays a list of emails.
3.Double-click a record to view the details.
Email Workspace
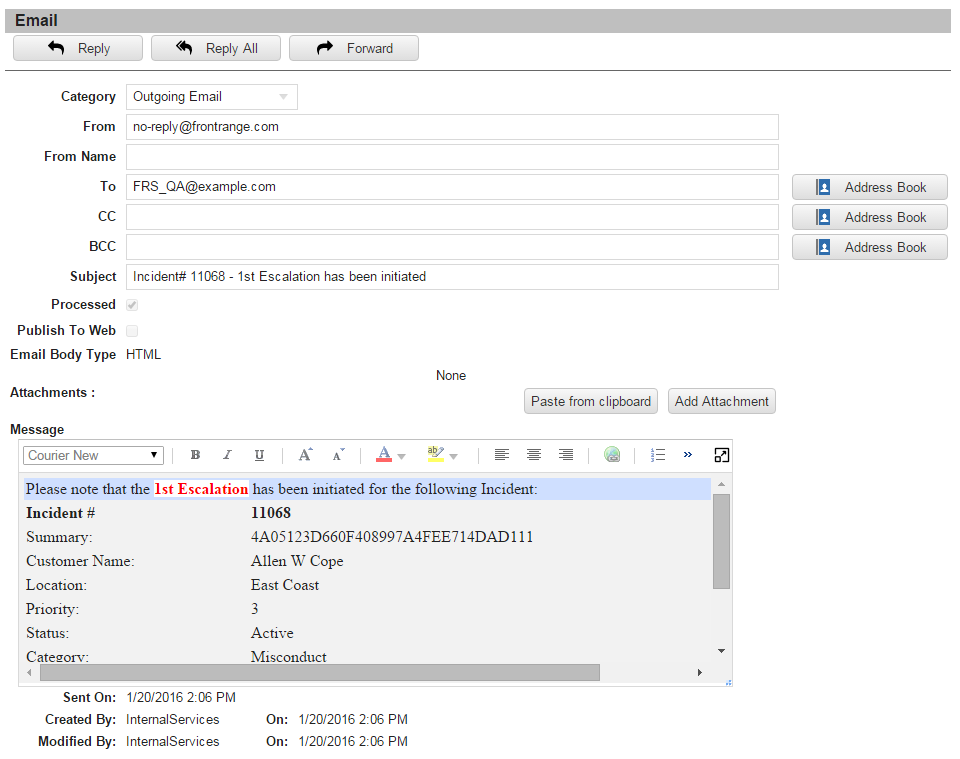
The application displays the following four address fields:
•From: This field can only contain one email address. By default, the owner is the sender. In some cases (such as when defining a quick action), you can designate a different sender.
•To: The primary email recipients
•CC: The secondary email recipients. (Literally means "carbon copy".)
•BCC: The secondary email recipients whose addresses are not seen by other recipients. (Literally means "blind carbon copy").
4.Next to the corresponding address field, click Address Book. The application displays the Select Email Addresses dialog box.
Select Email Addresses Dialog Box
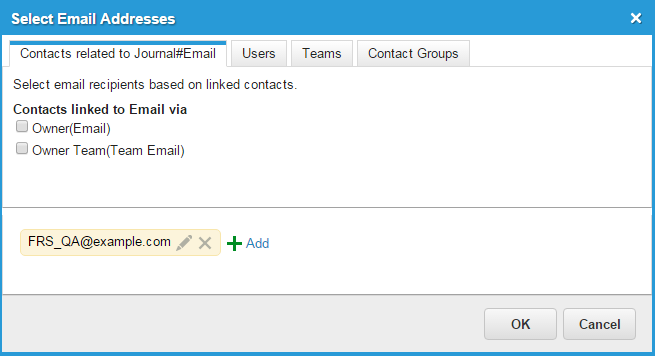
5.Click each tab (Contacts related to, Users, Teams, and Contact Groups) and select the email addresses to add. The application displays the selected options at the bottom of the dialog box.
6.Click OK. The application populates the corresponding address field with the email addresses that you selected.
Adding the Address Book to a Form
1.From the Configuration Console, click Build > Business Objects to open the Business Objects workspace.
2.Open the business object with the form to add the address book to.
3.Click the Forms tab. The application displays a list of forms.
4.Click a form name to open the form.
5.In the left pane, expand Other. The application displays a list of controls.
6.Add a cell to the form, then insert any text field (such as Category) into the cell. Ensure that the text field is not read-only. Each cell can only contain one field.
7.Drag the Address book control onto the cell with the text field. The Address book control appears on your form next to the text field.
Placing the Address Book Control on a Form

8.Click Save. The next time a user logs in, they will see the address book on the form.
Creating Users or Teams for a Quick Action Email
1.Open the Quick Action Configuration window. See .
2.Click the Create New Actions tab.
3.From the list of predefined quick actions, click Send Email. The application displays the quick action designer form.
4.In either the From or To field, click Address book. The application displays the Select Email Addresses dialog box.
5.To add users, click the Users tab. To add teams, click the Teams tab. The application displays a list of users or teams.
6.At the bottom of the window, click Add. The application displays a blank field.
7.Enter the user or team email address, then click the add  icon.
icon.
8.Click OK. The application adds the new email address.
9.Add other information to the quick action as needed, then click Save.
Using Expressions
You can also include expressions for the To and From fields:
•From: Enter an expression to indicate the sender of the email. For example, enter $(GetGlobal("ListenerEmailAddress")).
•To: Enter an expression to indicate the recipient of the email. For example, enter $(OwnerEmail).
Was this article useful?
Copyright © 2019, Ivanti. All rights reserved.