Service Manager
Integrating with the SolarWinds® Log & Event Manager
•About Integrating with the SolarWinds Log & Event Manager
•Creating a Data Import Connection
•Configuring the Ivanti Email Listener
About Integrating with the SolarWinds Log & Event Manager
You can easily integrate the SolarWinds Log & Event Manager, an event management and monitoring tool, with Service Manager. Use the Service Manager email listener to perform the integration.
You can configure the SolarWinds Log & Event Manager with any type of alert, such as when a server goes down, when a Microsoft Windows service goes down, or even when a disk nears full capacity. Each of the alerts configured by the SolarWinds Log & Event Manager has an action that sends a notification to a specific email address.
The Service Manager email listener captures the alert email from SolarWinds and stores it as an event in the CI workspace on the Event tab for that configuration item. You can create an incident from that event by clicking Create Incident.
SolarWinds uses an IP range to discover devices on your network. You can see a list of these devices from SolarWinds and test that the alerts are being sent to the devices configured on Service Manager.
To integrate the SolarWinds Log & Event Manager with Service Manager you need to do the following:
•Select and test the data import connection. See Creating a Data Import Connection.
•Create and configure an inbox server. See Configuring the Ivanti Email Listener.
Creating a Data Import Connection
Service Manager includes a data import connection that is used when setting up the inbox configuration. Check that it is available and test the connections by using the following steps:
1.From the Configuration Console, click Extend > Integration Tools > Data Import Connections to open the Data Import Connections workspace.
2.Click Sample SolarWinds Integration from the list.
3.On the Settings page, click Test Connection. If successful, the application displays a success message.
4.Click Close.
5.Click Save.
Configuring the Ivanti Email Listener
Configure the email address for the alert by using the New Inbox workspace in the Email Configuration workspace. See Working with Email Inboxes. The following is a sample of the values to use.
Inbox Server Configuration for SolarWinds
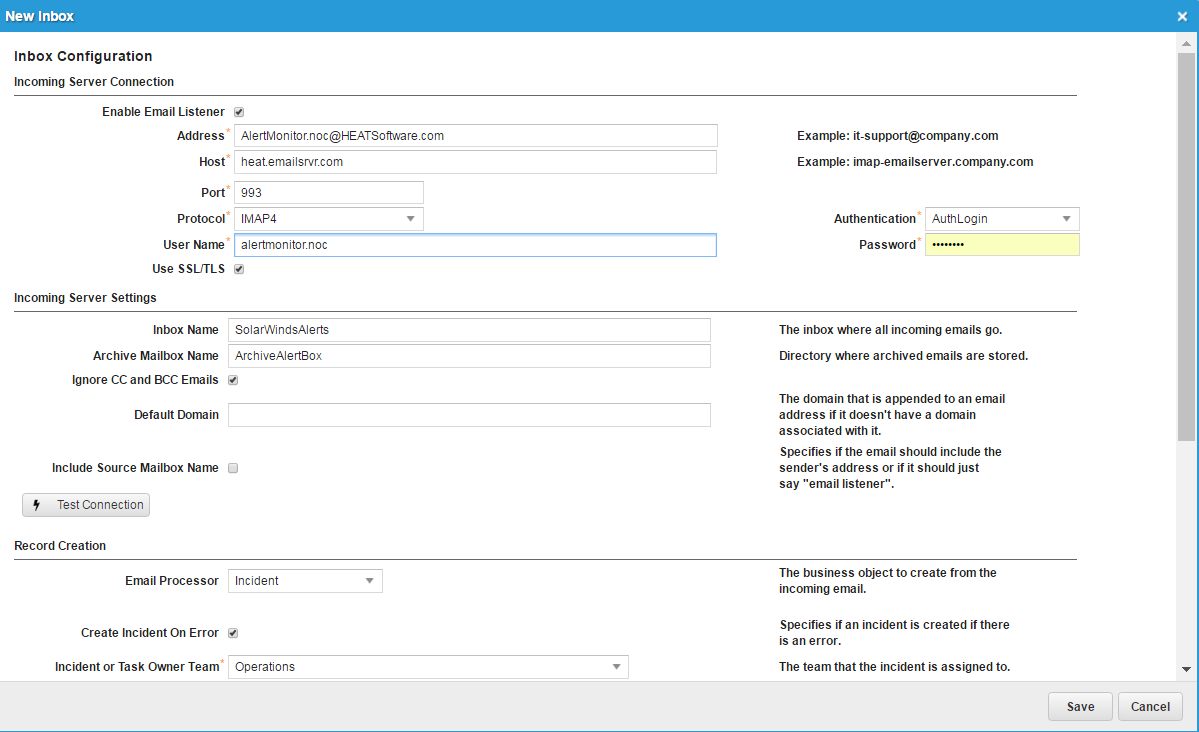
Create a new inbox for the email listener and configure the settings as described below. Consult your IT department for the specific parameters used by your organization.
1.From the Configuration Console, click Configure > Email Configuration > Servers to open the Servers workspace.
2.Scroll to the bottom and under the Inbox tab, select New to create a new inbox configuration for the incoming server.
3.Enter the following information using parameters specific to your organization.
| Field | Description |
|---|---|
| Incoming Server Connection | |
| Enable Email Listener | Turns on the email listener to catch emails and create a business object. |
|
Address |
The email address that receives the alerts from SolarWinds. |
|
Host |
The host name or group that handles emails from the email address. An example is pop.emailsvr.com. |
|
Port |
(Only shown if you select POP3 or IMAP4 for the Protocol field.) The corresponding port number for the selected protocol. The default email port for POP3 is port 110 and the default port for IMAP4 is port 143. |
|
Protocol |
The protocol used to retrieve emails. The options are POP3, IMAP4, and Exchange Web Services. |
|
Authentication |
(Only shown if you select POP3 or IMAP4 for the Protocol field.) The authentication method for incoming messages. |
| User Name | The user name required to access the inbox on the email server. Usually the same as the address. |
| Password | The password required to access the inbox in the email server. |
| Use SSL/TLS | (Only shown if you select POP3 or IMAP4 for the Protocol field.) Enables SSL and TLS security for incoming messages. |
| Incoming Server Settings | |
| Inbox Name | (Only shown if you select Exchange Web Services or IMAP4 for the Protocol field.) A directory for incoming emails. When the application processes an email, it creates or updates the business object record. If the email is incorrectly configured, the application moves it from the inbox folder to the archive folder. |
| Archive Mailbox Name |
(Only shown if you select Exchange Web Services or IMAP4 for the Protocol field.) A directory for storing archived or processed emails.
NOTE: Even though this field is called Archive Mailbox Name, this is not actually a mailbox, but is instead a folder. |
| Ignore CC and BCC Emails | Ignores emails addressed to this inbox when the email address is only in the CC or BCC fields. The application does not process these emails. |
| Default Domain |
Optional. A default domain. The application may not correctly process incoming emails without a domain. Use the default domain to construct a valid address, enabling emails to process as normal, including creating incident records. |
| Test Connection |
(Only shown if you select Exchange Web Services for the Mail Protocol field or if you select Advanced for the Email Component Type field on the Email Configuration workspace. See Configuring the Outgoing and Incoming Email Servers for more information.) Tests the Microsoft Exchange web services connection and displays the highest priority result of the most recent test.
After you click Test Connection, the application displays a confirmation message stating that the application will check the connection and then send an email to the specified user account. Click Yes to proceed. |
| Record Creation | |
| Email Processor |
The business object created from the incoming email. Incident: When the email is received, an incident record is created. This option is the default setting. Problem: When the email is received, a problem record is created. Other: You can select another business object. See Home . Export Email as XML: When the email is received, it is exported as an XML file. See Home .
For the SolarWinds integration, select Sample SolarWinds Integration. |
| Create Incident On Error |
Creates an incident when an error occurs in generating the record from an email (regardless of the business object specified). The application displays the fields in the Incident and Task Creation section if you select this option.
NOTE: The application only creates an incident upon error for cases other than create incident. That is, it creates an incident when there is an error updating an incident, or when there is an error creating or updating any other business object. |
| Sender / BO Identification and Matching | |
| Method 1 for Employee / External Contact / None) | Not needed for the SolarWinds integration. |
| Method 2 (for Custom Business Object) | Not needed for SolarWinds integration. |
4.Click Save.
Was this article useful?
Copyright © 2019, Ivanti. All rights reserved.