Service Manager
Using Web Services with External Messages
•About Using External Messages
•Security Features When Using External Messages
•Third Party Configuration Example
•Creating a Script for Ivanti to Process External Messages
•Configuring the Message Handler
•Setting the Trusted IP Addresses
About Using External Messages
This feature allows Service Manager to accept external messages, such as web service calls, that are generated externally. This allows different applications with different infrastructures to communicate with each other without either application having to change their internal structures and logic. For example, an external vendor such as SalesForce.com may trigger an event in Service Manager based on an action in their application. When a user in SalesForce.com updates an account status, their application sends a message to Service Manager to inform us of the account change.
Service Manager does not have control over the format of the external message and so must be able to accept messages in any format, in order to process the data in the message. Service Manager uses the message queue and scripts to transform the data in the external message and to send a response to the external application.
Security Features When Using External Messages
This features uses the following security measures:
•You can set the IP addresses, or a range of IP addresses, from which to accept external messages. You can also block IP addresses. Service Manager checks the IP address at both the application level and at the tenant level. See Setting the Trusted IP Addresses.
•Every external message must contain a valid API key in the URL. This API key must match the customer-defined API key in the Service Manager database. If there is no valid API key, Service Manager ignores the external message. See Configuring the API Key.
•You can optionally enable the script to limit the amount of data that it accepts in the external message.
Third Party Configuration Example
The following configuration information is an example only. It is described here for informational purposes only. This configuration is not part of Service Manager and is subject to change. Your third party integration may be completely different from the one described here. It is only included to help you understand the external message format and process.
The following example is for SalesForce.com. It shows how whenever an account number that starts with 3 is added or modified, SalesForce.com sends an external message to Service Manager that updates the corresponding record in the Service Manager application.
The user does the following:
1.Logs into a third party application; in this case, SalesForce.com
2.Creates a new workflow rule using the account object. The workflow rule is triggered whenever an account is created or edited, with the criteria of the account number starts with a 3.
3.Creates an action to send a message to Service Manager every time that the workflow rule runs. The message contains the account number change. This message must contain the Service Manager URL and the URL must contain the Service Manager API key. See Configuring the API Key.
4.Activates the workflow.
When an account that starts with 3 is created or updated, SalesForce.com sends an external message to Service Manager.
Creating a Script for Ivanti to Process External Messages
Follow these steps to configure Service Manager to process the external message.
1.From the Configuration Console, click Extend > Integration Tools > Web Service Connections (BETA) to open the Web Service Connection Manager (BETA) workspace.
2.Under Calls from external web services to System (Incoming), click New Service.
3.Enter information into the fields:
| Field | Description |
|---|---|
| Integration Name | A unique name for this integration. |
| Description | Optional. A description of the integration. |
| Response XML (optional) | Optional. Contains the XML-formatted response that Service Manager sends to the third party integration upon receipt of the external message. |
4.Click Next. The application displays the Script page.
5.In the Service Reference field, click Add new.... The application displays the Create Service Reference dialog box.
6.Enter information into the fields:
| Field | Description |
|---|---|
| Integration Name | Read only. The name of the integration. |
| Service Reference | A unique name for this service reference. |
| Service Address (URL) | The URL where the third party integration sends the external message. This URL must be the same as the URL used by the third party integration. An example is https://integration.saasit.com/company_name/AccountUpdate.asmx. |
7.Click Save.
The Script page does not show any request data until you receive a request from the third party integration.
8.Go to third party integration and send an external message to Service Manager. This populates the Script page with request data.
Now you need to create the script that Service Manager uses whenever it receives the external message from the third party integration. This script tells the Service Manager application how to process the external message.
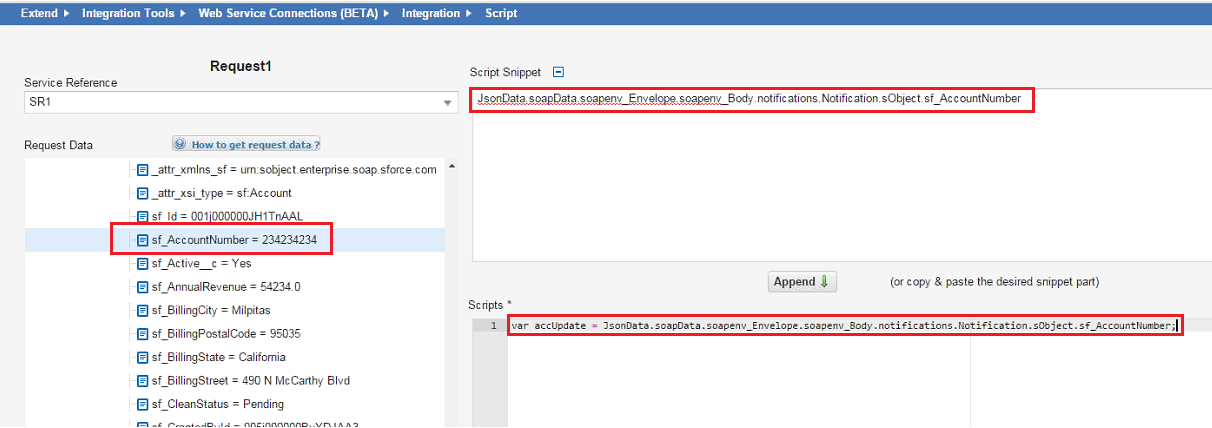
9.Browse the request data for the information to add to the Script Snippet section. For example, if you configured the the third party integration to send an external message whenever the account information changed, you might add the variable information for the account variable (shown in the Request Data section) to the Script Snippet section. Click the variable name in the Request Data section to generate the variable information and add it to the Script Snippet section.
10.Click Append to move the script snippets to the Scripts section.
Relationship Between Data
11.Update the code in the Scripts section until you have created your script.
12.Click Save.
Whenever Service Manager receives an external message, it executes the script on the external message to process it.
Configuring the API Key
1.From the Configuration Console, click Configure > Security Controls > API Keys to open the API Keys workspace.
2.Click Add Key Group to create a new API key group.
3.Enter a name and optionally a description for the new API key group.
4.Click Save Key Group and then click Back to return to the API Keys workspace.
5.Under Key groups, highlight the new API key group that you created.
6.Click Add API Key to generate an API key. The application displays the New API Key page with a reference ID already populated.
7.Click Save Key and then click Back to return to the API Keys workspace. The application displays the new API key.
All external messages must contain this API key; otherwise Service Manager will not process the message.
Configuring the Message Handler
You need to configure a message handler to handle the external message.
1.Log into the Service Manager Configuration Database (ConfigDB).
2.Open the Message Queue Handler workspace.
3.Click New Message Queue Handler.
4.Enter information into the fields, noting the following:
• The value in the Endpoint field must be the URL of the integration service. For example, enter http://your_IP_address/IntegrationService.svc.
•The value in the Dispatch Method field must be set to HandleWebServiceMessage. The name must match exactly.
5.Click Save.
See the Configuration Database Guide for Ivanti Service Manager for more information about using the Service Manager Configuration Database.
Setting the Trusted IP Addresses
The application only processes external messages from IP addresses that are on the trusted IP address list. Before you proceed, ensure that you have the list of IP addresses for your third party integrations.
1.Log into the Service Manager application.
2.Open the Integration Trusted Host workspace.
3.Click New Integration Trusted Host.
4.Enter information into the fields.
| Field | Description |
|---|---|
| Name | A unique name for this trusted host. |
| Description | (Optional). A description of this trusted host. |
| Start IP | The first IP address in a series of IP addresses to allow. |
| End IP | The last IP address in a series of IP addresses to allow. |
5.Click Save.
Was this article useful?
Copyright © 2019, Ivanti. All rights reserved.