Service Manager
Feature Preview: Ivanti Cloud Connector
This topic includes the configuration details for Ivanti Cloud Connector (ICC).
To access the ICC settings page:
1.From the Configuration Console, click Extend > Integration Tools > Data Import Connections, to open the Data Source Manager page.
The page lists all the connections that are already defined for your installation.
2.Click Add New... to add a new connection and to open the Settings page.
Connection Settings Page
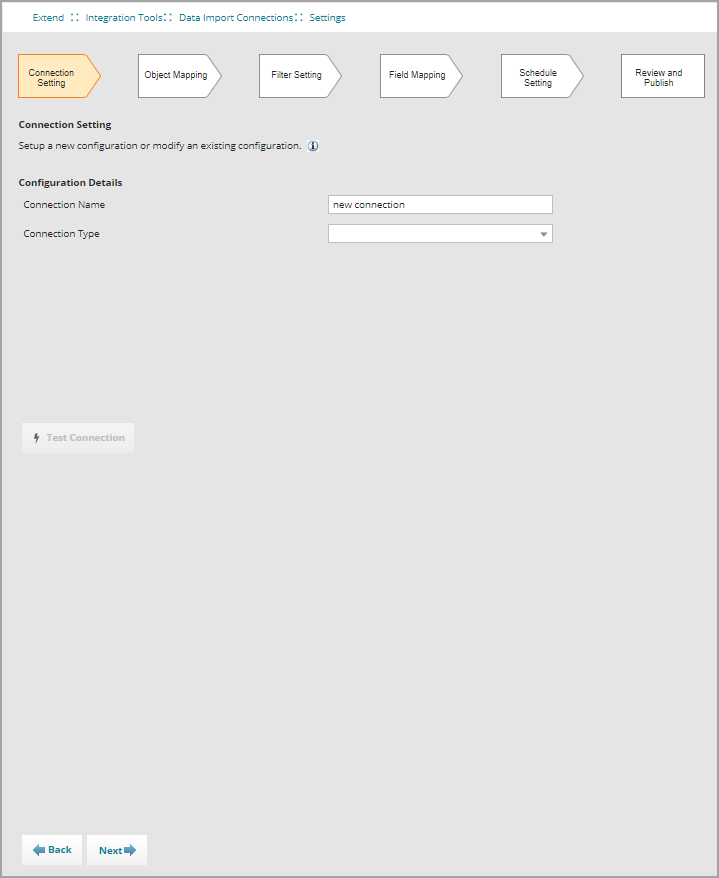
Connection Setting
Prerequisite:
For this feature to work, you must link the tenant with Ivanti Cloud tenant. To do this, contact Operations.
- In the Connection Name field, enter a unique name for the connection.
- From the Connection Type drop-down list, select Ivanti Cloud Connector.
- The following two fields appear:
- Cloud Connector API Path: The default path appears as api/discovery/v1/. However, this can be modified, if required.
- Cloud Connector Object: Enter the name of the business object for which you want to fetch data.
- Click Next. The Object Mapping page opens.
Object Mapping
- Enter information into the fields.
Field Description Mapping Select Add new... from the drop-down list. The application creates a clone of the mapping, which you can then modify.
This button is only enabled if you select an existing mapping.
Name Use the default name or modify the name to and click Save as new.
Source Mapping Tables A list of tables that is populated based on the Cloud Connector Object, as defined in step 3b of the Connection Setting phase. Root Table Select the primary table containing the master data that uniquely defines the computer systems in your organization. Unique Key Select the field that is primary in identifying your records, which can be used to retrieve additional information. This field lists the fields containing keys that uniquely identify your record. The fields that appear in the list are taken from the first record in your source file. Target Business Object Use the Target Business Object field to enter a few letters of the target business object, and then click Filter by Name or Filter by Object to narrow your search. For example, if you are importing a list of employee records into Service Manager, the primary business object you need to map to is the Employee business object.
Highlight the business object in the list. This field is the primary business object in Service Manager into which the data is imported.
The list shows all the business objects in Service Manager.
Exclude Validation Objects
Select this check box if you want to exclude the validation objects that are part of the target business object.
- Click Next. The Field Mapping page opens.
Field Mapping
This page is used to define the field-level mapping and transformation. The left column shows the source file name and the right column shows the target business object field name. It is assumed that the Source mapping names are known or identified in advance.
- If appropriate, select a transformation function from the middle column.
- Select the field names to map the source file and the target business object in Service Manager.
For example: Invoice.InvoiceNumber would map to the ISM ivnt_InvoiceNumber asset identifier.
- Select a transformation function from the second column, if required by your organization.
Overview of functions
Function Name
Category
Description
Input
Output
-->
None
Returns the source value (does nothing).
Abs Math The absolute value of input value. Double Double Avg Math The arithmetic mean or average of all the input values. Double Double Cbrt Math The cube root of the input value. Double Double Ceiling
Math
Smallest integer value less, greater than, or equal to the given value.
Double
Double
Century DateTime Returns the century part of the input date time value. DateTime Double Concat
String
Concatenates string values together.
String Array
String
ConvertToLocal
DateTime
Converts a DateTime value to a local DateTime value.
DateTime
DateTime
ConvertToUTC
DateTime
Converts a DateTime value to a UTC DateTime value.
DateTime
DateTime
DayOfMonth DateTime Returns the day of the month of the input DateTime value. DateTime Double DayOfWeekNo DateTime Returns the day number of the week of the input DateTime value.
0: Sunday
1: Monday
2: Tuesday
3: Wednesday
4: Thursday
5: Friday
6: Saturday
DateTime Double DayOfWeekStr DateTime Returns the day string of the week of the input DateTime value.
Sunday
Monday
Tuesday
Wednesday
Thursday
Friday
Saturday
DateTime String DayOfYear Returns the day of the year of the input DateTime value. DateTime Double Diff
Math
Subtracts all the values from the first value.
Double Array
Double
Div
Math
Divides the first value by the remainder of the values.
Double Array
Double
Floor
Math
Largest integer value less, greater than, or equal to the given value.
Double
Double
Hour DateTime Returns the hour part of the input DateTime value. DateTime Double IsoWeek DateTime Returns the ISO week number of the input DateTime value. DateTime Double Leap Length String The length of the string. String Double Max Min Minute DateTime Returns the minute part of the DateTime value. DateTime Double Mod
Math
Remainder after dividing first value by the second value.
Double,
Double
Double
Month DateTime Returns the month part of the input DateTime value. DateTime Double Pow Math The number raised to the power. Double Double Product
Math
Product of all values.
Double Array
Double
Quarter DateTime Returns the quarter of the input DateTime value. Quarter ranges from 1 to 4. DateTime Double RegexMatch String Returns a matched value from the input value for a pattern in a position (zero-based). String RegexReplace String Returns a string that has been replaced with a string that matches a pattern in the input string. String Replace
String
Replaces the part of a string with given value.
String
String
Round
Math
Rounds a double-precision floating-point value to the nearest integer.
Double
Double
Second DateTime Returns the second part of the DateTime value. DateTime Double Select
Special
Return the first item in the list where the corresponding predicate is equal to a given value.
String String SelectNotNull Special Returns the first input value that is not empty or not null for the group of items. String String Split
String
Returns a specific part of a string split using a separator.
String
String
Sqrt Math The square root of the input value. Double Double Substring
String
Returns part of a string.
String
String
Sum
Math
Sum of given values.
Double
Double
Switch Special Returns the string based on the input value and corresponding mappings (delimiter is ':') String String TimeDiff
DateTime
Returns the period between two DateTime values.
DateTime, DateTime
TimeSpan
ToLower
String
Converts to lowercase text.
String
String
ToProper
String
Converts to proper case text.
String
String
ToUpper
String
Converts to uppercase text.
String
String
Trim
String
Removes all leading and trailing white spaces.
String
String
TrimLeft
String
Removes the leading white spaces.
String
String
TrimRight
String
Removes the trailing white spaces.
String
String
Truncate Math The integral part of the value. In other words, rounds up or down towards zero. Double Double Week DateTime Returns the standard week number of the input DateTime value. DateTime Double Year DateTime Returns the year part of the input DateTime value. DateTime Double
- If the target field is a link field, determine the name of the field to use. See Mapping Fields.
- (Optional) Click Auto Map to map the source file column header to the target field name. Remapping the source column header does not change your existing mapping.
- Click Next. The Schedule Setting page opens.
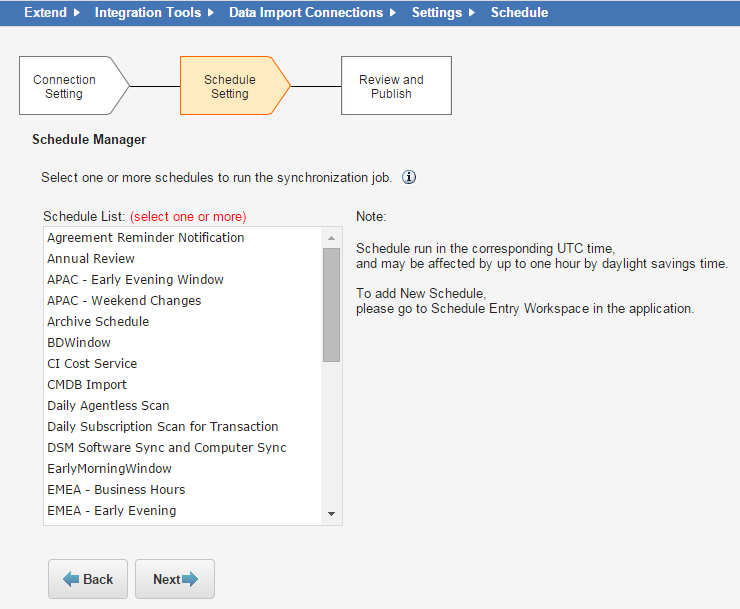
Schedule Setting
After mapping the fields you must schedule the import and associate the mapping with one or more existing or previously created schedule entries.
As noted in Setting Up a Data Import Connection, the schedule options are defined and can be viewed in the Schedule Entry workspace . See About the Schedule Entry and Scheduled Jobs Workspaces for more information.
Schedules determine when the import or data connection is added to the queue for processing. You can create multiple entries in the Schedule Entry table to run multiple imports of the same data each day.
1.Select one or more schedules from the schedule list. (Use the Ctrl key to select more than one schedule.)
The application displays information about each schedule that you select at the bottom of the page.
If you are not the owner of a schedule that you have selected, and the schedule is changed by the owner, your import time might be affected.
The supported schedule types are: Daily, Weekly (once per week), or Monthly (once per month with a date).
2.Click Next. The Review and Publish page opens.
Data Import Schedule
This option only appears if you select one of the following connection types: Discovery 9.x, File on Shared Folder, FTP, SCCM, EPM Connector, Ivanti Cloud Connector or Secure FTP (SSH), or if you create a new web service connection.
Review and Publish
You have four options to review or publish your import data:
•Publish: Activates the connection so that it can run according to the schedule. The application only shows this option if there is a schedule involved, like with the File on Shared Folder, FTP, Secure FTP (SSH), and Ivanti Cloud Connector connection types.
•Publish & Run Now: Runs the import immediately and places it on the import schedule.
•Publish & Test Run: Runs the import with only the first batch of records. A batch is 200 records. If errors or problems occur in this job, you can go back to your data and troubleshoot before running the entire job.
The application automatically saves all field mappings even if they are not immediately published. After you publish the data, the job runs based on the schedule/s you selected.
Viewing, Changing or Deactivating a Published Connection
1.Log in to the Service Manager application.
2.Open the Integration workspace.
3.Select a record to open and view the settings.
4.To deactivate a Published connection, clear the Active check box. and then click Save.
You can resume the imports by selecting the Active check box, if needed.
Was this article useful?
Copyright © 2019, Ivanti. All rights reserved.