Service Manager
Configuring LDAP Settings
•About the LDAP Content Synchronization Protocol
•Selecting the Directory Information to Synchronize
•About Expression Functionality
•Completing the Synchronization
About LDAP Settings
Service Manager supports the use of LDAP, including Active Directory as well as other LDAP servers that implement LDAP.
Configure and synchronize employee profiles from your LDAP Active Directory server to the Service Manager Employee business object. The Data Import Wizard imports users from selected nodes in a directory server, allowing for attribute mapping. It also maps profiles to linked business objects such as managers and organizational units. You can use the wizard to perform manual and scheduled synchronizations.
User passwords are stored in the LDAP server, from where it is retrieved instead of from Service Manager.
Before Setting Up LDAP
We strongly recommend using HTTPS or IMAPS to connect. If using VPN to connect, contact your Ivanti Software service representative.
Before setting up any LDAP synchronization actions, first set up an LDAP/LDAPS authentication provider. See Working with ADFS/SAML.
•The Service Manager data center must be able to connect to your LDAP server.
•Use a standard LDAP browser tool outside your network to confirm that LDAP/LDAPS works with the standard ports (port 389 for LDAP or port 636 for LDAPS).
•Ensure that the appropriate ports are open (port 389 for LDAP or port 636 for LDAPS).
•You must have knowledge of certificates and be able to configure them in your LDAP server.
•To open LDAP only, we can provide an IP address for configuring your firewall.
•Have your LDAP login credentials ready for testing import and authentication.
•If you have issues connecting, call Ivanti Support to troubleshoot connection issues.
Synchronizing LDAP Settings
Synchronization only happens from the LDAP server to Service Manager, not from Service Manager to LDAP. The synchronization process only occurs when changes are made to the LDAP source (such as the active directory).
•About the LDAP Content Synchronization Protocol
LDAP Port
For LDAP Active Directory, use port 389, or port 636 for LDAPS. The protocol is TCP.
About the LDAP Content Synchronization Protocol
Service Manager uses the LDAP Content Synchronization Protocol (CSP), as described in RFC 4533 (https://tools.ietf.org/html/rfc4533) to implement incremental synchronization of LDAP server entries. The LDAP server must be configured to support this protocol. For example, if the protocol is provided by an optional component or plugin, you must install that component or plugin. The identity used to access the LDAP server must also have any required permissions to the sub-tree of the directory being synchronized. The required components and permissions depend on the type of LDAP server that you use.
The LDAP CSP supports replication of any sub-tree of the directory for which the user running the synchronization has permission. However, Active Directory supports replication of root-level directory trees only. Because of this, we have also retained the older method of synchronizing LDAP based on version stamps in each record. Check Enable Incremental Updates to enable this. If you need to synchronize an entire directory root, we recommend using the new synchronization protocol. However, if you need to synchronize a sub-tree of your directory or your server does not support the LDAP CSP, you may continue to use the older method.
OpenLDAP has been tested to support the replication of both root-level directories and sub-trees of those directories. Other LDAP implementations may or may not support the CSP and might impose restrictions on what level of directory sub-tree can be synchronized. The older Active Directory synchronization method is specific to Active Directory and cannot be used with other LDAP servers.
Connecting to Directory
You can test your server connection with selected credentials.
1.From the Configuration Console, click Extend > Integration Tools > LDAP Settings to open the LDAP Settings workspace.
2.Click Add New. The LDAP Wizard appears.
LDAP Settings - Connect to Directory Page
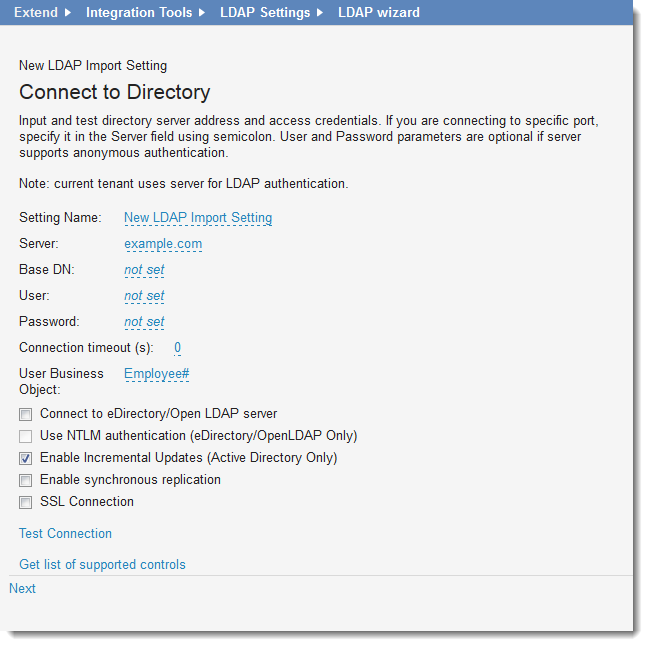
3.Enter information into the fields.
| Field | Description |
|---|---|
|
Setting Name |
A unique name for this LDAP server connection. |
|
Server |
A valid LDAP server name or IP address (such as 10.34.25.21). When connecting to a specific port, add it to this entry, separated by a semicolon; for example, servername:portnumber. |
|
Base DN |
Optional. The distinguished name for the LDAP object in the LDAP server. This value is not case sensitive. |
|
User |
If the server requires authentication, enter a user name. |
|
Password |
If the server supports anonymous authentication, enter a unique password. |
|
Connection timeout |
Specifies the timeout period (in seconds) for the LDAP server connection. The application continues attempts to connect until the timeout period is reached. If a connection is not made after the timeout period expires, an exception message appears. |
|
Create records of type |
The type of records to create. Choose from the drop-down list to create records of the customer type (employee or external contact). |
|
Connect to eDirectory Open LDAP Server |
Connects to eDirectory and the Open LDAP server. |
|
Use NTLM authentication |
If you selected Connect to eDirectory/Open LDAP server, you must also select this option. Open LDAP requires NTLM authentication. |
|
Enable Incremental Updates |
Optional. If you did not select Connect to eDirectory/Open LDAP server, you can enable incremental updates through Active Directory by selecting this option. |
|
Enable synchronous replication |
Optional. Enables synchronous replication. Synchronous replication is an optional feature of LDAP. See http://www.openldap.org/doc/admin22/syncrepl.html for more information on this feature. |
|
SSL Connection |
Provides a secure socket layer connection, if you are using LDAPS. |
4.Click Test Connection to test your connection. A connection test results (successful or unsuccessful) message appears.
5.Click Next.
Selecting the Directory Information to Synchronize
Enter user locations or organizational units to synchronize. If you change an email address for a user after the initial synchronization, any subsequent sync attempt will fail.
LDAP Settings - Select Directory Info to Sync
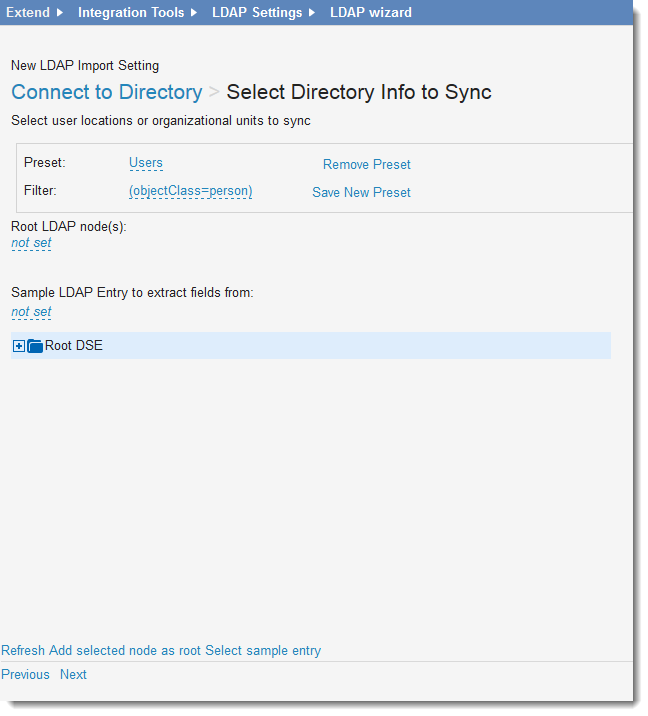
1.Enter information.
| Field | Description |
|---|---|
|
Preset |
Defines the LDAP object filter by selecting a default search filter from the drop-down list. The default is users. |
|
Filter |
Optional. To add a filter string, enter a valid string and click Save New Preset. The application adds the value to the Preset drop-down list. Click Remove Preset to delete the current value. |
|
Root LDAP node(s) |
Do one of the following: To restrict LDAP searches, enter one or more valid root nodes. Use the LDAP directory browser to locate a directory, then click Add selected node as root. |
|
Sample LDAP Entry to extract fields from |
Do one of the following: Each LDAP entry belongs to an LDAP class and contains a set of fields. Use this option to add a sample LDAP entry containing fields to be retrieved in a fetch operation. Use the LDAP directory browser to locate a sample entry, then click Select sample entry. The entry shows the LDAP entry syntax, such as: CN=Class Name, OU=Organizational Unit, DC=domaincomponent1 (derived from company DNS domain components), DC=domaincomponent segment2 For example: CN=Barnard Jeffries,OU=Users,OU=Pleasanton,DC=companyX,DC=com |
2.Click Refresh to update the window.
3.Click Next. The application test the selected options.
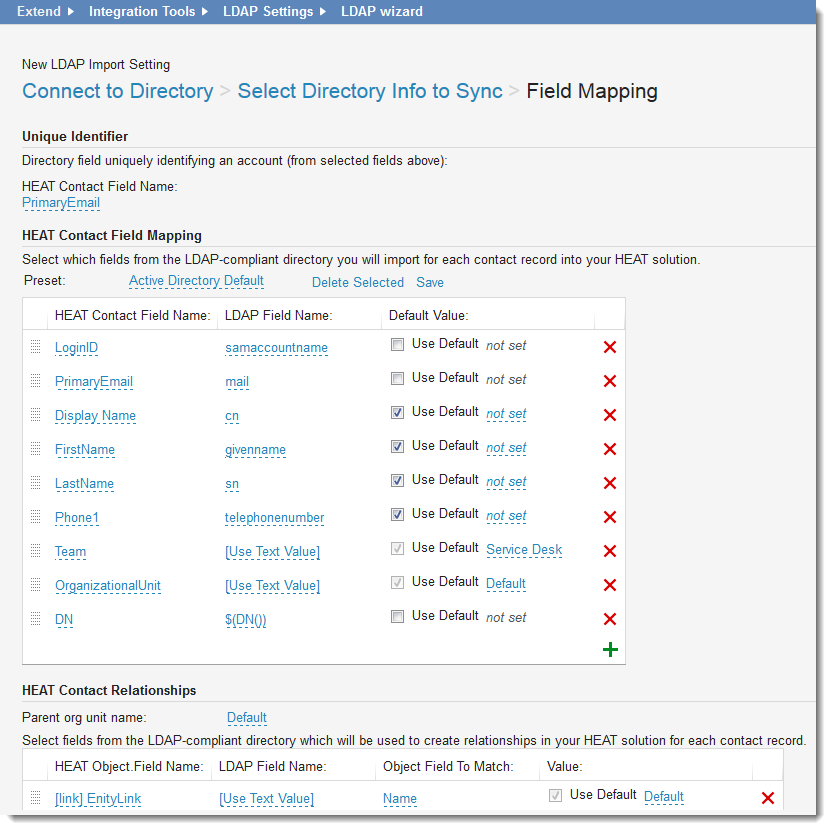
About Field Mapping
The Record Settings workspace enables field mapping, relationship mapping, role access, and advanced settings. The application only shows the fields based on the selections made in the previous step.
LDAP Field Mapping Page
About Expression Functionality
You can use expressions for field mapping. Select an attribute, map it on the business object field, and use an expression with all functions supported by Service Manager functionality to transform the resulting value or run some complex logic.
•Examples of Field Mapping Using Expressions
•Expressions for Field Mapping
•Expressions for Relationship Mapping
•Examples of Mapping Expressions
Examples of Field Mapping Using Expressions
1.Directory emails end in @domain.com. It must be transformed in Service Manager to end with @tenant.com.
The mapping expression is PrimaryEmail = $(if(Find('@domain.com', mail) > -1 then samaccountname + '@tenant.com' else mail)).
2.Map the Department field based on the distinguished name component.
If you call the DN() built-in function without parameters, the whole distinguished name is returned.
For CN=John Doe, OU=Developers, OU=Personnel, DC=Company LDAP entry, the mapping expression is Department = $(if(DN(1) == 'Developers' then 'Research & Development' else 'IT').
Expressions for Field Mapping
To enable expressions for field mapping, select [Use expression] in the LDAP field name control:
LDAP Field Name Control
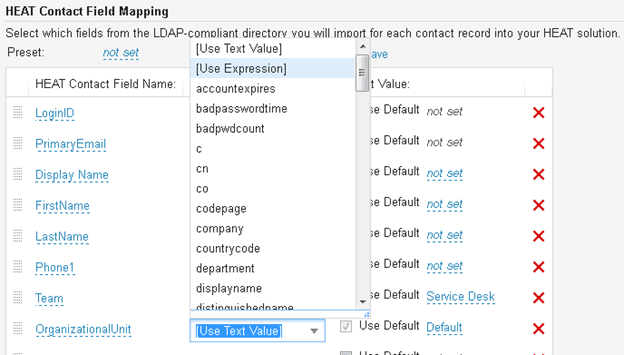
This invokes the Expression Editor. See About Expressions.
Edit your expression using LDAP entry fields and other functions from the properties and functions tree.
If an LDAP field name already contains an expression, the Expression Editor automatically appears. Selecting [Use Text Value] from the properties tree removes expression from the mapping. The expression is also disabled if $( symbols are not used in the beginning of the expression text.
Expressions for Relationship Mapping
This expression functionality is also enabled for relationship mapping.
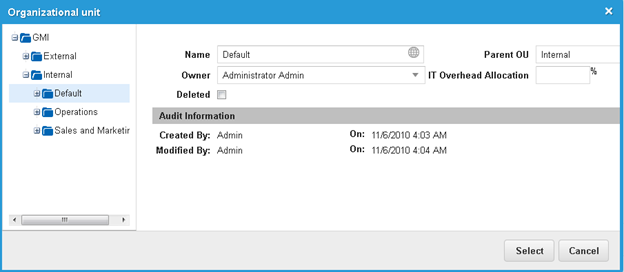
LDAP synchronization can create an organizational unit if the required organizational unit does not exist. All new organizational units are created with a parent organizational unit selected in the parent organizational unit name control.
LDAP Parent Organizational Unit Name - Organizational Unit

The parent organizational unit name control is a tree list selector where you can select organizational units in a user friendly form.
Parent Organizational Unit Name Control
Examples of Mapping Expressions
The mapping expression $(if(DN(1) == 'Developers' then 'Research & Development' else 'IT')) says that two organizational units are required for the import: Research & Development, and IT.
These organizational units are created (if they did not exist before the import) and placed under the organizational unit in the tree which is selected as parent.
If the organizational unit already exists, it is used for import.
The application uses the default organizational unit by default.
Mapping Fields
1.Click the Service Manager Contact Field Name field and choose the field to use as the primary contact field. The default is PrimaryEmail.
2.Under Service Manager Contact Field Mapping, from the Preset drop-down list, choose a mapping file. The default list is Active Directory. Service Manager supports Active Directory, eDirectory, Lotus, OpenLDAP, generic, and many others. When selected, the tables on this page are populated with default values. You can retain the defaults or add custom values.
You must map the LoginID field to the LDAP user ID, or LDAP external authorization will not perform correctly.
3.Enter information into the field mapping table. You can use an expression for the LDAP field name.
•Fields represent field names in Service Manager. Directory fields are the field names in Active Directory.
•You can enter the attribute directly in the Directory field. If you enter a new attribute in the Directory field, you must select Use Default for the corresponding Value field.
•Creating new records using the LDAP import process works only for simple validation lists; for example, pick lists that are not constrained (such as department).
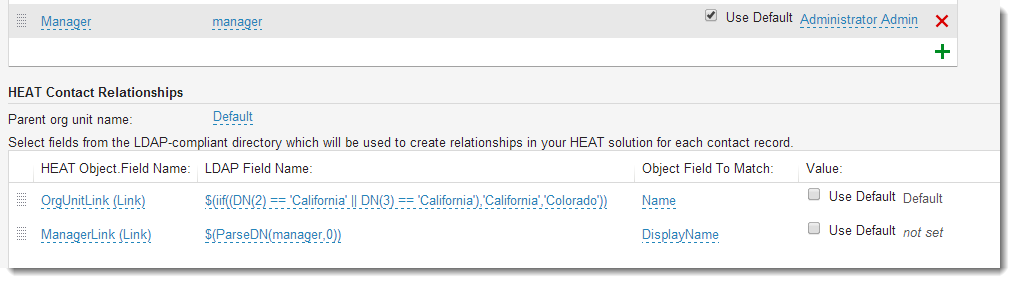
Field mapping expressions using comparison with if are case sensitive. For example, use the following expression for organizational unit: $(if((DN(2) == 'California') then 'California' else 'Colorado')).
If you used "california" (lower case "C"), then the return data is Colorado. To receive the correct data, in this case, use "California."
To map the Manager field, you can use the ParseDn() built-in function (See ParseDn).
Example Using the ParseDn() Built-In Function
4.Click the add icon  to add a new entry (a table row).
•If you select [Use Text Value], the Value field becomes active. The text entered in this field is saved in the profile.
•If you select an LDAP field, the Use Default field becomes available. By default, this value is unchecked. During import, if the LDAP field is not found, the Value field is used.
•If you select an LDAP field, which is not in the menu, then you can enter that field name and click Check Default.
5.Under Service Manager Contact Relationships, choose the parent organizational unit name, or choose Default. Select fields from the LDAP-compliant directory which will be used to create relationships in your Service Manager solution for each contact record. This relationship must match exactly.
For example, if you attempt to use the Manager field in Active Directory, the import will fail because this field includes an LDAP distinguished name instead of a simple user name or email address.
6.Click the add icon to add a new entry (a table row).
7.Under Service Manager Contact Roles, add roles that can be imported using this connection. The default role is Self Service. Click Self Service to show the role list, then check the roles to include.
LDAP - Ivanti Contact Roles
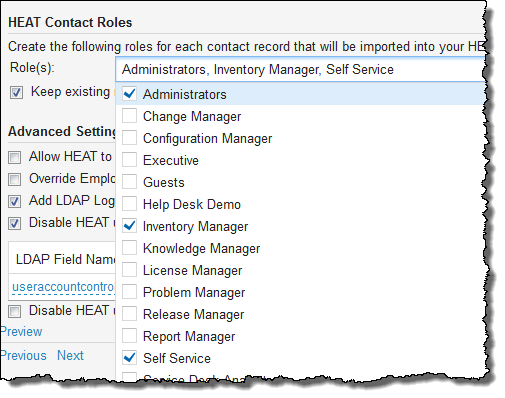
To retain the existing roles, check Keep existing roles. If checked, the import process keeps all assigned roles for existing contacts and then creates roles defined in the current record settings. If unchecked, the existing roles are deleted and the selected roles are added.
By default, Service Manager contacts that already exist before the import process runs keep their current roles and add the roles you have defined as part of the current record settings.
8.Under Advanced Settings, select any of the following:
| Option | Description |
|---|---|
| Allow Ivanti to access LDAP directory when certificate is non-trusted. | Connects through SSL to the LDAP-compliant server even if the certificate is not trusted. |
| Override Employee Login | Overrides the employee login settings. |
| Add LDAP Login and Server to imported accounts. | Automatically adds the LDAP settings into the user profile record. |
| Disable Ivanti users who have been disabled in the LDAP-compliant directory using the value of the fields: | Disables existing Service Manager contacts during the import process when they have been disabled in your LDAP-compliant directory. Enter the field values to check for disabled users. |
| Disable Ivanti users who have been expired in the LDAP-compliant directory | Disables existing Service Manager contacts during the import process when they have expired in your LDAP-compliant directory. |
9.Click Preview to see your data.
•From the Profile drop-down list, choose defined LDAP entries to be used during synchronization according to the root LDAP nodes and filter parameters.
•Select a defined LDAP entry from the displayed list. LDAP entry field values are shown according to fields mapping settings.
•Close the window when finished.
10.Click Next.
Excluding Items
1.Input any specific users that you do not want to synchronize.
•Put each DN regular expression on a separate line.
•Enter a list of regular expression patterns used to exclude LDAP entries from being imported during the synchronization.
For example, the pattern .*OU=Development.* excludes all entries with a DN containing the OU=Development substring.
•Add the patterns to the Exclude Items field, with each value listed on a separate line.
2.Click Next.
Completing the Synchronization
1.Click Synchronize now to start synchronization. The application imports the data and records the information in the LDAP import log.
2.Click Save. The data is stored in table format on the main LDAP Synchronization page.
3.Click Sync Now to run the synchronization again.
You can create a scheduled LDAP synchronization workflow in the workflow editor using the LDAP sync workflow block. See LDAP Sync Workflow Block for more information.
4.Check Save plain LDAP password to database to save the LDAP password to the Service Manager database for internal authorization use within Service Manager. This action takes place during the synchronization process.
Was this article useful?
Copyright © 2019, Ivanti. All rights reserved.