Service Manager
Using Pick Lists
•Modifying Values in a Pick List
•Using Validation Business Objects
About Pick Lists
A pick list is a list of values shown on a drop-down list or combo box. Pick lists supply other business objects with field values and are stored as child business objects in a relationship.
Pick lists are used by validation business objects to filter data. See Using Validation Business Objects.
Pick lists can include business objects that are standalone records. For example, the StandardUserTeam and Employee business objects control the Team and Owner drop-down lists in many business objects.
Each value in a pick list is obtained from a table row in a business object. For example, the Active Employee List by Full Name pick list derives its values from the Full Name table row in the Employee business object.
When using a combo box in the Service Catalog that gets data from a pick list, ensure that the pick list is validated. Otherwise, you might see the red invalid value indicator in the field.
Accessing a Pick List
1.From the Configuration Console, click Build > Pick Lists to open the Pick Lists workspace. The application displays a list of pick lists.
Pick Lists Workspace
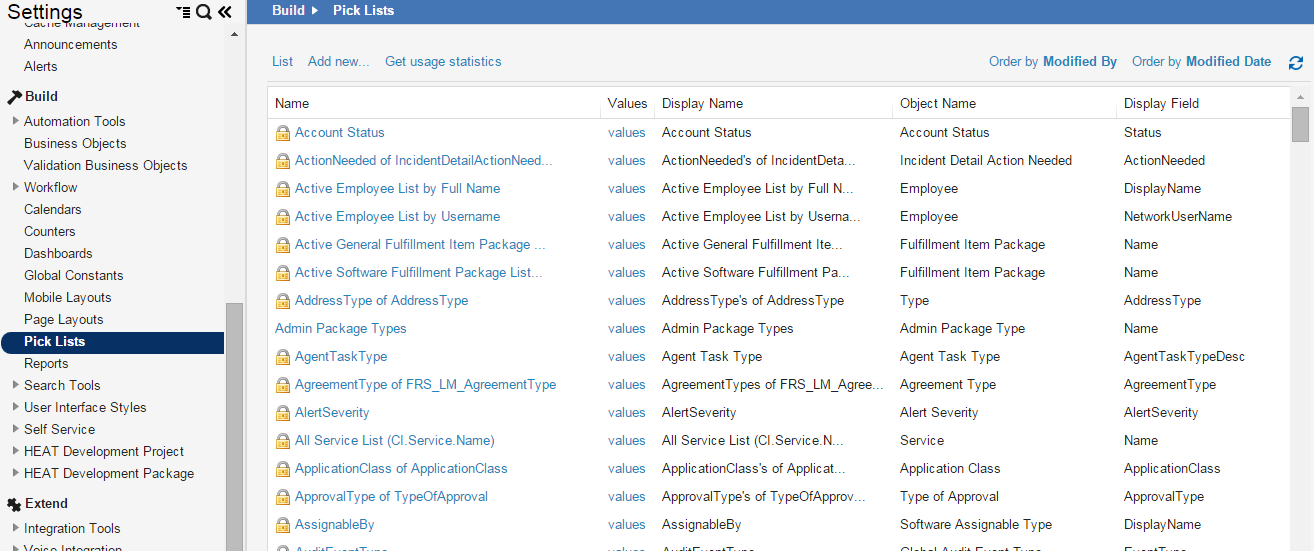
2.Click an item from the list to view specific details, including associated business objects and fields.
You can also access all pick lists for a business object by doing the following:
1.From the Configuration Console, click Build > Business Objects to open the Business Objects workspace.
2.Open a business object. The application displays the workspace for that business object.
3.Along the top, click Pick Lists. The application lists all of the pick lists associated with that business object.
Creating a Pick List
1.From the Configuration Console, click Build > Pick Lists to open the Pick Lists workspace. The application displays a list of pick lists.
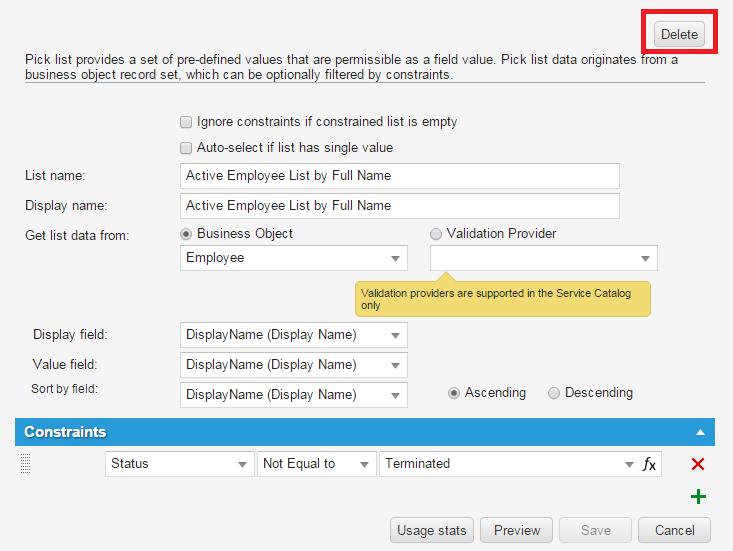
2.Click Add new.... The application displays the Pick List: New record page.
Pick List: New Record Page

3.Enter information into the fields.
| Field | Description |
|---|---|
|
Ignore constraints if constrained list is empty |
Applies to pick lists with constraints only.
If you apply a constraint to a pick list and the resulting pick list is empty, then show all of the pick list values. |
| Auto-select if list has single value |
Applies to pick lists with constraints only.
If you apply a constraint to a pick list and the resulting pick list has just one entry, then automatically select that value. |
|
List name |
The name of the pick list. |
|
Display name |
The display name of the pick list. |
|
Get list data from |
Specifies where to get the pick list data from: Business Object: Select a business object, then select a value from the drop-down list. Validation Provider: Supported in the Service Catalog only, and used only for the Ivanti DSM legacy integration . For the Ivanti DSM legacy integration, select an item from this list and the application generates a pick list based on the hard-coded logic in the code. |
|
Display field |
The visible field name to be displayed in the pick list. |
|
Value field |
A stored field name. Select from the drop-down list.
This entry frequently differs from the Display field selection. For example, the Owner field in many business objects contain pick lists of DisplayName entries derived from the Employee business object, such as Bernard Jeffries. However, you can select a Value field entry that is based on the corresponding login ID of the Employee business object, such as Bjeffries. This allows the value of the login ID to be stored in the database when the pick list item is selected. In this case, it is a practical choice because many Service Manager business rules and application functions use login ID values. |
|
Sort by field |
Specifies the field to sort by.
Choose how to sort the data: Ascending Descending |
4.Add constraints to the pick list to restrict the data presented.
| a. | Click the Add new condition icon  to activate a constraint formula. This formula is based on the business object that you selected in the Get list data from field. to activate a constraint formula. This formula is based on the business object that you selected in the Get list data from field. |
| b. | Use constraints to restrict or filter the amount of values that the application shows, based on previously selected values. To use such a pick list (such as within a request offering), enter a field in the first area, enter equals to in the second area, and enter {0} in the third area. |
Pick List Constraints
As another example, to add a constraint to the Active Employee List by Full Name pick list to include all active employees, enter Status in the first area, enter not equal to in the second area, and enter Terminated in the third area.
You can select Begin with, Contains, and Does Not Contain in the second area.
You can also enter an expression in the third area. Click the function icon  to open the Expression Editor.
| c. | Click the Remove this condition icon  to delete a constraint. to delete a constraint. |
5.(Optional) Click Preview to see what the pick list looks like, before saving it.
6.Click Save.
Modifying a Pick List
1.From the Configuration Console, click Build > Pick Lists to open the Pick Lists workspace. The application displays a list of pick lists.
2.Click the pick list to modify.
3.(Optional) Click Usage stats to view the business objects where the pick list is used and the name of its linked field.
4.(Optional) Click Preview to view what the pick list looks like.
5.Modify the information as needed.
6.Click Save.
Modifying Values in a Pick List
1.From the Configuration Console, click Build > Pick Lists to open the Pick Lists workspace. The application displays a list of pick lists.
2.Click values next to the pick list to modify. The list of values appears.
3.To add a value, do the following:
| a. | Click Add. |
| b. | Enter the new value. |
| c. | Click Save. |
4.To modify a value, do the following:
| a. | Select the value row. |
| b. | Click edit at the far right end of the row. |
| c. | Edit the value. |
| d. | Click Save. |
5.Click Close.
Translating a Pick List
You can create translated values for each item in the pick list. You can only translate pick lists that contain fields with localized values. (To determine if a pick list has localized fields, go to the Validation Business Objects workspace, select the validated business object, click the Fields tab, click the field name, and see if Localized is checked.)
See About Localization for more information.
1.From the Configuration Console, click Build > Pick Lists to open the Pick Lists workspace. The application displays a list of pick lists.
2.Click values next to the pick list to translate. The list of values appears.
3.Select the value row, then click edit at the far right end of the row.
Pick List Values

The application displays the Edit Type dialog box.
4.Click the translate icon ![]() .
.
Edit Type Dialog Box
![]()
The application displays the Translate dialog box.
Translate Dialog Box
![]()
5.Enter the translation.
6.Click Save.
The application displays the value based on the locale that they choose. See Setting Up Languages.
Deleting a Pick List
You cannot delete default pick lists, which the application displays with a lock icon  .
.
Use caution when deleting a pick list. Business objects using this pick list might no longer function as expected.
1.From the Configuration Console, click Build > Pick Lists to open the Pick Lists workspace. The application displays a list of pick lists.
2.Open the pick list to delete.
3.Click Delete.
Deleting a Pick List
The application displays the Delete validation list dialog box.
4.Click Yes.
5.Return to the List View and refresh the window. The application no longer displays the pick list.
Was this article useful?
Copyright © 2019, Ivanti. All rights reserved.