Service Manager
Customizing the Responsive User Interface
•Accessing the Responsive User Interface
•Customizing Pages in the Responsive User Interface
•Adding Filters to the Responsive User Interface
•Creating a Self Service Mobile Role
•Working With Templates and Blocks in the Responsive User Interface
•Working with the Color Picker
The Responsive User Interface enables users to access the features of the Self Service User role on mobile devices and tablets. When configuring the interface, administrators can use the flexible drag-and-drop features to modify the content of the Home page, and use the Preview option to emulate how the pages will display on a laptop, tablet, or phone.
You must be an administrator to view the interface options, icons, and buttons, and to configure or customize the Responsive User Interface.
Accessing the Responsive User Interface
There are two ways to access the Responsive User Interface:
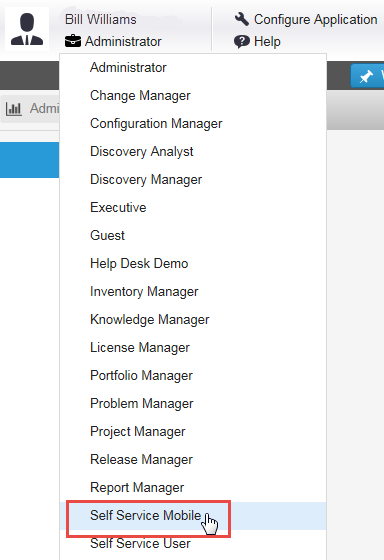
•If you are logging into Service Manager, choose Self Service Mobile from the Select Role list.
•If you are already logged into Service Manager, change your role to Self Service Mobile by looking under your login name, clicking Administrator, and then selecting Self Service Mobile from the drop-down list.
Changing Role to Self Service Mobile
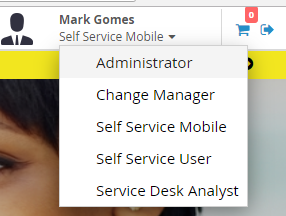
After you have accessed the Responsive User Interface, you need to change your role back to an administrator so that you can configure the Responsive User Interface. Do the following:
1.Click the drop-down arrow beside the name of the role and select Administrator from the list.
Changing Role to Administrator
2.In the confirmation dialog box, click Yes to change the role.
3.To pin the left pane so that it remains open, click the pin icon  .
.
The pin icon  will be unavailable to customers using Service Manager of version 2018.1 or higher.
About Basic Options
You can customize and configure the Responsive User Interface for your location. You can select the items to view on the Home page so that it provides an overview of the available choices.
The basic interface options for administrators are:
| Icon | Description |
|---|---|
|
|
Configure. Provides access configuration options for the Responsive User Interface. |

|
Reposition. Repositions the block on a page. See Working With Templates and Blocks in the Responsive User Interface. |

|
Delete. Deletes a block from the Home page. |

|
Settings. Modifies settings for a block. See Working With Templates and Blocks in the Responsive User Interface |
|
|
Cart. To review all the incidents that are added to the shopping cart. See Using the Save For Later and Cart Features in the Responsive User Interface. |

The following list provides a quick overview of where to find configuration and customization information:
•Customizing the Responsive User Interface (this section): Explains how to use settings to customize the application for your installation.
•Working With Templates and Blocks in the Responsive User Interface: Contains detailed information on how to work with parts and blocks to customize the Home page.
•Creating a Self Service Mobile Role: Implementation information for customers using versions of Service Manager prior to Release 2015.2.
Customizing Pages in the Responsive User Interface
If you have not already done so, access the Responsive User Interface and click the Configure icon ![]() . See Accessing the Responsive User Interface.
. See Accessing the Responsive User Interface.
You can configure or customize the following pages:
•Home. This page provides a dashboard for Self Service Mobile users. You can customize the display and then configure or optimize it so that it can be viewed on mobile devices.
The page provides the following buttons:
| Button | Description |
|---|---|

|
Opens the Parts pane. Use parts to customize the Home page. Select and drag a part onto the page to use it. Click the button to close the pane. To position a part, to customize and configure a part, or to use the Add or Settings icons to create a new part template, see Working With Templates and Blocks in the Responsive User Interface. |

|
The default view for the Home page. This drop-down list allows you to configure Desktop layout settings. |

|
Displays how the home page renders on a tablet. The drop-down allows you to configure tablet layout settings. Change the layout by customizing this view. |

|
Displays how the home page renders on a phone. The drop-down list allows you to configure phone layout settings. Change the layout by customizing this view. |

|
Allows you to toggle the display and view the page as a user. |

|
Saves your layout changes. |

|
Reverts to the last saved version of the layout. |
•Service Catalog: Lists the services that can be accessed by a mobile user. Use the Enable Filters drop-down list to show or hide them. The following filters are available as defaults but you can configure new filters for your installation. See Adding Filters to the Responsive User Interface for more information.
Search field: Create new default searches from this page by clicking the add icon  .
.
Category: Select from the options to filter your search. Displays categories available to Self Service users in Service Manager.
Owner and Team: Allows you to filter by owner and by team.
•Knowledge Base: Loads the Service Manager Knowledge Base.
•FAQ: Displays FAQ available to Self Service users in Service Manager.
•My Items: Displays the items available to a Self Service user in Service Manager.
•Alerts: Displays the same application alerts available to Self Service users in Service Manager.
The Alerts button will be unavailable to customers using the 2018.1 version of Service Manager.
•Announcements: Displays the same announcements available to Self Service users in Service Manager.
•Search: Searches the list of FAQs and the Knowledge Base for the term entered in the search field.
•Settings: This option allows users and administrators to change their default settings.
Administrators must use a laptop or desktop to change default settings, since these settings cannot be changed from mobile devices.
| Section | Description |
|---|---|
| Personal settings |
Enables you to set your language (locale) and change your role. |
| Application Settings | Select a default Language and Header title for Mobile pages. |
| Active Workspaces |
Select the check boxes to display the workspaces on the left pane. All workspaces are selected by default. |
| Service Catalog |
Select the check box to enable the following options: Save for Later - Saves Service Requests as drafts for later use.
Shopping Cart - Enables the Shopping Cart function. Show Responsive Business Object Form - Displays form offerings in responsive user interface. Note: Form offerings will be displayed in static view even when the Show Responsive Business Object Form option is selected, if the form uses one or more components that are not supported for responsive user interface view. |
| My Items |
Set the following defaults for your installation: Filter Select from: All, Approval or Request. Sort By Select the default sort by selecting from: ID, Summary, Type, Status, Created On, Modified On. Sort Dir Select the default sort direction from: Asc (ascending) or Desc (Descending). Items per page Enter a value or use + (plus) or - (minus) to change the number of items that appear on the page. The default setting is 20. |
•Logout: Logs you out of Service Manager.
Adding Filters to the Responsive User Interface
You can enhance the searches available from the Service Catalog by adding filters that allow users to refine their searches and to narrow the list of items that they see on the page. The Service Catalog in the Responsive User Interface lists service requests, such as requests for software, computers, or email, similar to what a user would see in Service Manager. A default filter category is available to filter searches when using the Responsive User Interface. Users can combine filters to create their own searches. This section describes how to use the different types of searches and how to create filters.
•About Searching in the Service Catalog
•Creating a Search with Default and Customized Filters
About Searching in the Service Catalog
You can use two types of search or filter by category to find a service request. You can search by:
•Search field: Enter text to search for a service request by a word or phrase in its title or description.
•Searches field: Lists preconfigured searches based on filters. Select a search from the drop-down list to find matching service requests.
•Category filter: Looks for a service request based on one or more filter categories selected by a user.
Creating a New Filter Search
The Service Catalog provides a selection of default filter searches, but you can also create your own filters.
For a filter search to appear in the Service Catalog, it must be based on the ServiceReq template. There are two parts to creating a new filter search for the Responsive User Interface Service Catalog:
•Creating Filters and Setting Filter Criteria, describes how to create the filters and set the filter criteria.
•Enabling the Filter Search in the Responsive User Interface describes how to enable the filter search criteria in the Responsive User Interface.
Creating Filters and Setting Filter Criteria
Administrators must set up the filters from the Configuration Console in Service Manager. You should have a clear idea of the types of filters you want to create. It is helpful to name both the Condition (or category) and the Filters so that they are easily identifiable by your users. Setting up a Cost filter is used as an example in the following steps:
•Selecting or Adding the ServiceReqTemplate Business Object
•Adding a Filter Condition to the ServiceReqTemplate Business Object
•Adding a Filter Criteria to the Filter Condition
Selecting or Adding the ServiceReqTemplate Business Object
1.From the Configuration Console, click Build > Search Tools > Filter Searches to display the Filter Searches workspace.
2.Do one of the following:
•If the ServiceReqTemplate business object is already available, click it to open the Edit Business Object Filter: ServiceReqTemplate# workspace.
•Add the ServiceReqTemplate business object by doing the following:
| a. | Click Add. |
| b. | From the Business Object drop-down list, select ServiceReqTemplate. |
| c. | Click Save. |
3.Click Back to return to the the Filter Searches workspace.
4.Click ServiceReqTemplate to add or edit its filters.
Adding a Filter Condition to the ServiceReqTemplate Business Object
From the Edit Business Object Filter: ServiceReqTemplate# workspace, do the following:
1.Click Add Filter. The application displays the Condition Filter dialog box.
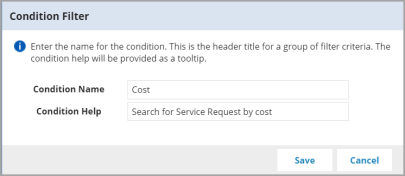
2.Enter a condition name. The name should describe what the condition does. The application displays this condition name as a category in the Responsive User Interface.
3.Enter text in the Condition Help field. This text becomes a tool tip.
4.Click Save.The application displays the new filter condition in the ServiceReqTemplate list.
ServiceReqTemplate List
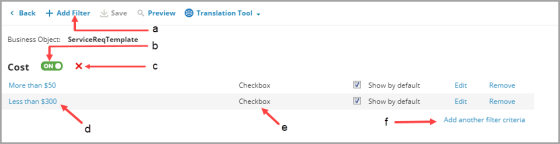
| a. | Add Filter. To add a filter condition. |
| b. | Toggle. To turn the filter condition ON or OFF. |
| c. | Delete. To delete the filter condition. |
| d. | Criteria labels. |
| e. | Criteria controls. |
| f. | Add another filter criteria. To add a filter criteria to the condition. |
5.Click Save.
Adding a Filter Criteria to the Filter Condition
Do the following from the Filter Condition list:
1.Click Add filter criteria. The application displays the Filter Criteria dialog box.
2.Enter a label. The label is a name that describes what the criteria does. Be as specific as possible so that users understand the intent of this search filter.
3.From the Control drop-down menu, choose Checkbox.
This control selection specifies how the filter is displayed in the Responsive User Interface. Using a checkbox control allows users to check or uncheck the filter, especially when enabling the Responsive User Interface for mobile devices. The type of control that you choose also affects the available expression choices. Other choices available are None, Calendar, Pick List, and Textbox but they are not appropriate for the Responsive User Interface.
4.Complete the expression by choosing items from drop-down lists. Also see About Expressions. The cost filter example seen below is constrained to find service requests that cost less than $200. You can add additional AND or OR expressions as required.
Cost Filter Example
![]()
| a. | AND OR. To add additional AND OR expressions to a filter criteria. |
5.Click Save. The new filter criteria appears under the filter condition.
6.When you are done adding filter criteria, click Save. The new filter search appears under Everything Else in the Filter Search list.
New Filter Search
![]()
| a. | User-defined searches appear here. |
| b. | Search condition. |
| c. | Business object. |
To create another filter condition, do so under the ServiceReqTemplate business object. Do NOT click the add icon  above the Filter Searches list. The resulting searches would use a different business object that does not work in the Responsive User Interface or Self Service roles.
Enabling the Filter Search in the Responsive User Interface
•Viewing and Implementing the Filter Switch
•Setting up the New Filter Search
Viewing and Implementing the Filter Switch
1.Access the Responsive User Interface. See Accessing the Responsive User Interface.
2.Change your role to administrator.
3.Click the customize application icon ![]() .
.
4.Click Service Catalog to open the Service Catalog.
Setting up the New Filter Search
1.Click the Enable Filters drop-down list.
Enable Filters Drop-Down List
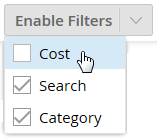
2.Look for the items whose names match the filter condition that you created in Adding a Filter Condition to the ServiceReqTemplate Business Object.
3.Check item to enable it. In the example above, Cost is the new item. If you created multiple items, you can check them all or check only the ones to enable. The new filter search appears below the Category part.
4.Click Save to save your changes.
You can also enable or disable all parts in the Service Catalog or drag them to a new location. See Working With Templates and Blocks in the Responsive User Interface.
Creating a Search with Default and Customized Filters
There are two ways to create a search:
•Combining Criteria from Different Conditions: When you create a search by combining criteria from different conditions, the application assigns an AND operator. For a service request to appear in the workspace, it must meet the criteria from both conditions.
•Combining Criteria from the Same Condition: When you create a search by combining multiple criteria from the same condition, the application assigns an OR operator. For a service request to appear in the workspace, it must meet just one of the criteria.
Follow these steps to create a new search:
1.Access the Responsive User Interface. See Accessing the Responsive User Interface.
2.Click the customize application icon ![]() .
.
3.Click Service Catalog.
4.Click the add icon to add a new default search to the Searches field.
5.In the Search Name field, enter a name for the new search. The name should relate to what the search looks for.
6.Check any boxes under Category or any other condition parts that you created.
7.Click Save. The application adds the new saved search to the Search list. Services that do not meet the search criteria disappear from the workspace.
Service Catalog
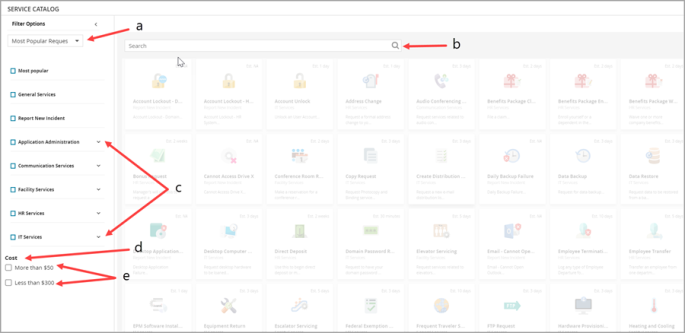
| a. | Saved Searches drop-down list |
| b. | Text Search field |
| c. | Default filter search criteria |
| d. | User-created search condition |
| e. | User-created search criteria |
Was this article useful?
Copyright © 2019, Ivanti. All rights reserved.