Service Manager
Working with Audits
An audit collects software and hardware configuration information from the computers and network devices in your organization. Discovery Managers and Discovery Analysts can view the audit results.
An initial full audit is performed immediately after an agent is deployed. Subsequent recurring delta audits are performed as defined by the Audit Frequency parameter in the Inventory Settings workspace. You can change the frequency of audits. For example, you may like to audit daily or weekly.
After the auditing is completed, the Audit Source field is populated.
The audit source is the result of deploying an agent and then auditing. Audit sources can also be manual, import, WMI (or agentless), LanProbe, and SCCM.
As you perform more audits, the results build up as an audit history, so that you have a picture of changes over a period of time.
Viewing Discovered Assets and Changing the Type
Service Manager obtains device details by a variety of means, including agent scan, WMI, SNMP, Netscan, and Active Directory.
Depending on the amount of detail that is obtained, the application can also identify the device class. When using SNMP and Active Directory, the application can usually identify workstations and server based on the operating system, but to identify virtual machines (and therefore virtual workstations and virtual servers) you must use an agent or WMI scan.
If the application does not find any relevant data, it classifies the devices as CI.UnknownDevice.
On the CI.UnknownDevice record, use the Change Device Type quick action to convert the CI.UnknownDevice to the correct one, as described Viewing Unknown Devices and Changing Their Type.
If a workstation or server record is not correctly identified, you can go to the workstation or server record and change the device type, as appropriate.
Only Discovery Managers can change a device type.
Viewing Unknown Devices and Changing Their Type
1.Log in to Service Manager as a Discovery Manager.
2.Open the CI workspace.
3.Sort by Type:UnknownDevice to view all of the unrecognized devices.
4.Select one or more devices to change, then click Action Menu > Configuration Management > Change Device Type.
5.From the Select Type menu, select the device type.
6.Click OK to save your change.
Discovered servers and workstations as well as unknown devices can be further classified into its associated business objects after a remote scan or audit on the device.
Viewing Applications Installed by DSM
Ivanti Desktop and Server Management (DSM) aids IT organizations automate, regulate, and simplify how desktops and servers are managed.
DSM features are only available to those Service Manager customers who have purchased the DSM product. The DSM client must be installed on the client machine.
As a Discovery Manager, you can view the software deployed by NetInstall so that you can quickly view the installed software that is managed by DSM, which might not be found in the Add/Remove Programs folder.
1.Log in to the Service Desk console as a Discovery Manager.
2.Open the Software Inventory workspace. The software list is displayed.
3.Expand a manufacturer name, then double-click a software record. The Software Identity workspace opens.
4.Select the Installed On tab for a list of machines the software is installed on. If the software has been installed by DSM, the DSM Installed column flag is set to yes. Otherwise, the column is blank.
5.Open the CI workspace. The list of configuration items is displayed.
6.Double-click to open a server, virtual server, workstation, or virtual workstation record.
7.From the Software tab, view a list of software that is installed on the configuration item.
If the software has been installed by DSM, the column flag is set to yes.
Viewing Remote and Virtual Software Execution
To view remote and virtual software execution and terminal server guest-host relationships, open the Inventory Settings workspace and make sure that Collect Software Usage and Collect Thin Client Sessions are checked on the Details tab. See Inventory Settings.
Select these settings to show the guest-host relationships and the software execution environments in the guest or host machines.
Generating Reports and Exporting Data
You can define and publish reports to specific roles such as Discovery Managers or Service Desk Managers. Certain reports, such as Agent Deployment and Audit Summary, Gateway Status Summary, or Hardware Changes, are useful for Discovery Managers or Discovery Analysts. You can view a list of reports and the roles to which they apply in the Reports workspace.
The Asset Details report displays the complete information about a specific asset (configuration item). You can run this report for a selected configuration item from the CI workspace by going to Quick Action > Configuration Management > Asset Details. The report can be printed to a variety formats including to Microsoft Excel.
Access reports using the following procedure:
1.Log in to Service Manager.
2.Open the Report workspace.
3.Click the Category column to sort by category.
4.Click a report name. The report in the Report Viewer window opens.
5.Select a date and time from the Start Date and End Date menus.
6.Click the navigation arrow to view the reports if you have selected multiple reports.
7.To export the report to another application, do the following:
| a. | From the Select a format menu, select a format to view the report. |
| b. | Use the arrow keys, if necessary, to page through the report data. |
| c. | Click Export. You can view, save, or print the output file. |
8.To print the report, do any of the following:
•If you are using Microsoft Internet Explorer, click Print.
When printing from Internet Explorer, make sure to add the website to your trusted sites; otherwise, the application might unexpectedly close. From the Tools menu > Internet Options, click the Security tab, click Trusted Sites, click Sites, and click Add to add the current website to your trusted site.
•If you are using Mozilla Firefox, select a format and click Print.
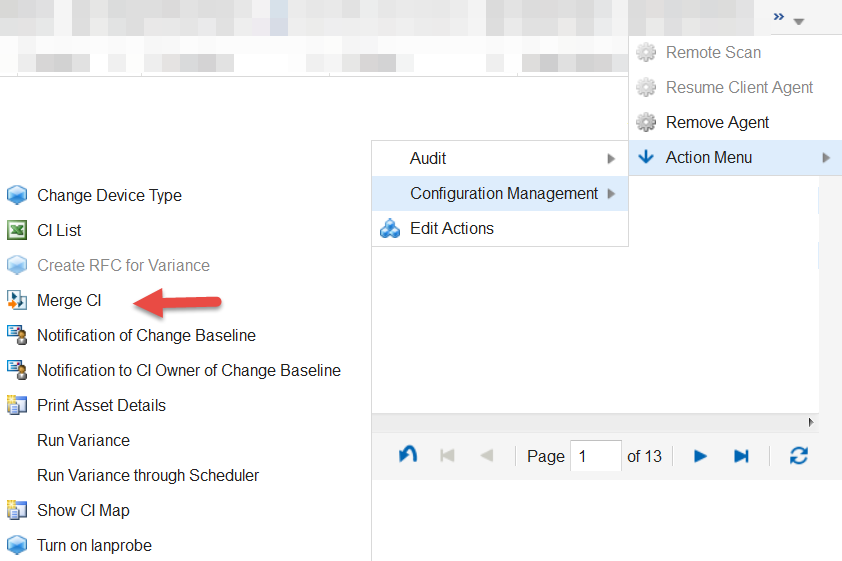
Using the Merge CI Quick Action
You can merge two configuration items if they are duplicates but contain different information. During the merge process you need to assign precedence to one of the configuration items so that it is recognized as the master business object. Information from the other configuration item will be merged into the master. Existing data in the master configuration item is not overwritten. The action merges data from the secondary configuration item into empty data fields in the master. Once the configuration item data is merged, the secondary configuration item is marked as disposed and may no longer appear on the list.
Use the following procedure to merge configuration items:
1.Log in to Service Manager as an Administrator or Discovery Manager.
2.Open the CI workspace to view the records.
3.Search for and select two configuration items by using Ctrl-click. You can sort by any column such as Type or Status.
4.After you select the configuration items, click the workspace toolbar drop-down arrow (on the right), and select Action Menu > Configuration Management > Merge CI.
Merge CI Quick Action
5.Select a master or primary configuration item. By default, the first configuration item is selected.
6.Click Submit.
Requesting an Additional Inventory Audit
An audit automatically runs when the agent is first deployed, and then by the schedule specified by the Audit Frequency parameter in the Inventory Settings workspace.
Perform the following steps to request an additional audit:
1.Log in to Service Manager.
2.Open the workspace for a configuration item.
3.Select the device to audit.
4.Click Audit Inventory. The Audit Inventory quick action is only available for the following types of configuration items: Server, VirtualServer, VirtualWorkstation, Workstation, and Computer.
5.Click Yes to proceed.
The application creates an audit task. It can take a while for the agent to receive the task and act on it (up to 30 minutes with the default settings), and then a while longer for the resulting data to be processed into the configuration management database. When the audit has finished, any changes since the last audit are recorded. If there are no changes since the last inventory, no additional information is recorded.
You can continue to work while the audit is being processed.
6.To check the progress of the audit, click the Agent Task tab and view the Status field for the relevant task.
Viewing Agent Tasks
1.Log in to Service Manager.
2.Open the Agent Task workspace to view a list of agent tasks.
Tasks that are in a status of pending or in progress are set to expired if not processed within the default expiration time (7 days).
Canceling an Agent Task
Many of the tasks you perform within inventory management are scheduled as agent tasks, for example updating gateway settings. You may choose to cancel an agent task if it has not yet started or in pending status.
1.Log in to Service Manager.
2.Open the Agent Task workspace.
3.Select the task that is currently pending.
4.Click Cancel Task.
5.Click Yes to confirm cancellation of the task.
If you confirm after the task has been picked up by the agent, the task will still be performed.
Was this article useful?
Copyright © 2019, Ivanti. All rights reserved.