Service Manager
Working with Project Management
•Accessing the Project Workspace
•About the Project Calendar Workspace
About Project Management
The Project Management module allows you to initiate, plan, and manage projects within your organization. Log in as a Project Manager to view the Project dashboard for your day-to-day project activities. The dashboard displays an overview of the status for all projects owned by you. The dashboard parts are:
•Project Health: Displays a color coded status of the health, schedule, and budget for all projects. If the project is associated with a portfolio, displays the portfolio name.
•Project Assessment: Displays the project, due date and the number of escalations, issues, and risks associated with the project.
•Project Overview: Displays the project ID, a color-coded progress bar that displays the percentage of consumption for schedule and budget, and the project status.
Project Managers can access the following workspaces:
•Project workspace: Use this workspace to create new projects.
•Project Calendar workspace: For all of your projects, displays projects, phases that have a status of active, and tasks that are assigned to a resource. After you set a project, phase, or task to active status, it remains on the list even if it is put on hold or completed. This allows you to track the progress of the phase or the task.
Accessing the Project Workspace
Create projects and associate them with phases, then associate each phase with tasks. You can manage costs through the project phase. Therefore, any task associated with a phase can consume against the allocated budget.
To view the Project workspace, do the following:
1.Log in to the application as either a Project Manager or Portfolio Manager.
2.Open the Project workspace. The system displays a list of all projects.
3.Open a project.
You can view or edit any of the project parameters, although Portfolio Managers may have limited rights to edit project parameters.
Creating a New Project
1.Log in to the application as either a Project Manager or Portfolio Manager.
2.Open the Project workspace. The system displays a list of all projects.
3.Click New Project.
4.Enter the information into the tabs as follows:
| Tab | Description | |
|---|---|---|
| Overview |
Enter basic project information.
Click Journal to display any items entered from the Status tab, and to create ad‑hoc notes. This space is useful for a quick overview of conversations about the project as it progresses.
Click Attachments to display any attachments entered from the Attachments tab. You can also attach items by clicking Attach file. |
|
|
||
|
||
|
||
|
||
| Phase | Lists the phases that you created for the project. Open a phase to view its details or to edit it. Click New Project Phase to add a new phase. See also Adding or Editing a Phase . | |
| Schedule | Displays all active phases (and associated tasks) in a Gantt chart. The system continues to display phases with a status of active even if the status later changes. | |
| Status Updates | The project status. The status is listed on the Overview tab under Latest Updates. Status updates also appear in the Activity History tab. | |
| Tasks | Lists the phase and the associated tasks. | |
| Attachment | Use this tab to attach a file or insert an URL. The URL must be fully qualified. | |
| Risk | Use this tab to add a risk. Enter a subject and a description of the risk. Select the type of risk that might impact the project and the severity and status of the risk. Assign an owner if needed. Enter contingency plan information. Check Escalated to email people on the linked distribution list. The severity and escalation status may impact the overall status of the project. You can also attach files or create comments. | |
| Issue | Use this tab to add or view an issue. Check Escalated to email people on the linked distribution list. The severity and escalation status may impact the overall status of the project. You can also attach files or create comments. | |
| Project Change | Allows you to manage change control. Enter change requests to the project from this tab. Setting the urgency and impact sets the priority of the change to a value between 1 and 5. The system automatically assigns changes to the Change Management team. You can set dates for approval and review. | |
| Activity History | Displays a record of all notes or emails created and sent by the Project Manager. Select an item from the list and click Go to. | |
| Incident |
Links to an incident. You can also remove a link to an incident or view its details by clicking Go to. |
|
| Problem |
Links to a problem. You can also remove a link to a problem or view its details by clicking Go to. |
|
| Change | Links to a change. You can also remove a link to a change or view its details by clicking Go to. | |
| Service Request |
Links to a service request. You can also remove a link to a service request or view its details by clicking Go to. |
|
| Knowledge | Attaches a Knowledge Base article to the project. | |
| Audit History | Displays a record of entries and changes made to the project. |
Adding or Editing a Phase
Phases of a project have defined start and end dates. This allows Project Managers to manage whether or not the project is on track.
1.Log in to the application as either a Project Manager or Portfolio Manager.
2.Open the Project workspace. The system displays a list of all projects.
3.Click New Project Phase to create a new project phase or open an existing phase.
4.Enter information into the fields.
| Field | Description |
|---|---|
| Title | Title of the phase. |
| Description | Describes what this phase will accomplish. |
| Project |
Connects the phase to a project. You can enter a partial name and click Search or click Search to let the system find and list all available projects. |
| Phase # | The phase number. You must manually enter this number. This allows you to change the phase number in case you need to insert a new phase between existing phases. |
| Status | The phase status. Select from the list. Only phases with an active status are listed on the project calendar. |
| Schedule Status | The schedule status. Select from the list. The status affects the color codes for the portfolio and the project. |
| Start Date | The phase start date. |
| End Date | The phase end date. |
| Actual End Date | When the phase is complete, lists the actual end date. |
| Completion (%) | The percentage of completion for the phase. This impacts the Consumed field. |
| Cost | The information in this field is updated as and when Task > Percent Complete (%) information is entered. |
5.Click the Task tab.
6.Click New Task and enter information into the fields:
| Field | Description |
|---|---|
| Service | The service associated with the task. |
| Team | The team associated with the task. |
| Owner |
The owner associated with the task. |
| Summary | A summary of the task. |
| Details | Details of the task. |
| Priority | The priority of the task. |
| Estimated Effort | The number of minutes allocated for completing this task. |
| Actual Effort | The actual number of minutes needed to complete this task. |
| Percent Complete (%) | The completion percentage. Updating this field through the project tracks the progress of both the task and the phase, and also impact the consumed budget figures. |
| Resource |
The name of the resource who the task is assigned to. |
| Start Date | The start date for the task. |
| Planned End Date | The planned end date for the task. |
| End Date | The actual end date. |
| Acceptance Target | The amount of time remaining for the task to be accepted. The system automatically updates the graph based on task details. |
| Completion Target | The amount of time remaining before the task is escalated. The system automatically updates the graph based on task details. |
| Created By | The name of the person creating the task. |
| Accepted By | The name of the person accepting the task. |
| Last Mod By | The name of the person modifying the task. |
| Completed By | The name of the person completing the task. |
7.Click the Cost Item tab to enter cost items. A cost item amount impacts the allocated budget for both the project and for the portfolio. See Working with Financial Management, About Team Costing, and Working with Cost Items for more information.
8.To enter cost items, do one of the following:
•Method 1:
| a. | Click New ITFM Cost Item to enter a new cost item for the project or phase. |
| b. | Click New ITFM Cost Item. |
| c. | Enter information into the fields: |
| Field | Description |
|---|---|
| Item Description | A title for the phase. |
| Price List Item | The price list item. |
| Unit Cost | The cost of a single unit. |
| Qty. | The quantity. |
| Unit of Measure | The a unit of measure |
| Total Cost | The system calculates the cost based on the unit cost and quantity. |
| Cost Driver | The department responsible for the cost item. |
| Vendor | The vendor. |
| Expense Type | Select from the choices: Billable, Capital Expense, Fixed Cost, Direct Cost, depending on the type of cost. |
| Notes | Notes about the cost item. |
| d. | Click Save to save the item. |
•Method 2:
| a. | Click New from price list item. |
| b. | Select an item from the list. The system displays the selected item and adds it to the cost of the project. |
9.To email a distribution list or to enter notes for the project, do the following:
| a. | Click New Record Menu. |
| b. | Click New Email to send an email. You can send email to a number of recipients using the distribution list and later forward or reply to the email. |
| c. | Click New Notes to create notes. Select a note category from the list and the source used to receive the information. You can create a summary then add a descriptive note. Click Save to save the note in the list. |
10.To add attachments or a URL related to the project phase, do any of the following:
•Click New Attachment to add an attachment. Browse and click Open to attach the file. Once an attachment is listed, you can select it and click Go to to enter more information about the attachment.
•Click New URL and enter an URL. You must enter a fully-qualified domain name.
•Click Delete to delete a URL or attachment.
Editing Sub-Budgets
If you created a sub-budget plan for a project, you can edit it by opening the project and using the following procedure:
1.Log in to the application as a Project Manager.
2.Open the Project workspace. The system displays a list of projects.
3.Open a project.
4.Click the Overview tab.
5.In the Plan field, click the right arrow and select Go To. The system opens the Project Budget Plan workspace.
6.Edit the information in the tabs as follows:
•Details: The system automatically populates the Information on this tab when you create the sub-budget plan. You can edit the name, owner, sub-budget type, planned amount, budget start date, and budget end date.
•Budget Item: Click New ITFM Budget Item and enter information as required.
•Budget Requirement: Click New ITFM Budget Requirement and enter information as required.
•Activity History: Send email to a distribution list or to enter notes for the project.
•Attachment: Allows you to attach documents or other items including URLs as needed.
•Audit: Displays a log of changes to the plan.
For more information, see Creating a Sub-Budget Plan.
About the Project Calendar Workspace
Use the Project Calendar workspace to open a calendar-based view of the phases and related tasks for any projects that you own and manage. The Project Calendar workspace only lists projects or tasks that have a status of active.
The following options are available for viewing projects:
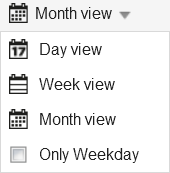
•To view a different time frame: Click the link to select a different time frame such as day view, month view, week view. Check Work week to eliminate weekends from the display.
Project Calendar Options
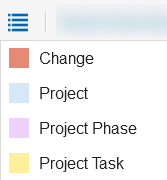
•To view a list of the color codes: Click the menu icon.
Project Calendar Colors
•To view different dates of the time frame: Click the time frame link to change the dates or the year, or use the forward and back icons to scroll through the week or month.
Selecting a Date in the Project Calendar

About Project Templates
Project Managers can use a project template to help set up new projects. Currently, there is one project template called Waterfall Model for Software Project. It contains a project plan based on the waterfall methodology for software development. The project template has project information available in the Overview tab and phase information, available in the Phase tab. The phase information contains 12 phases that are typically seen within a software development project. These can be used when setting up a new project. You can change the names and add tasks as required.
Follow these steps to use the project template:
1.Log in to the application as a Project Manager.
2.Open the Project workspace. The system displays a list of projects.
3.Click New Project > Waterfall Model for Software Project.
4.Change the project name to create a new project.
5.Add and edit the information in the project to quickly set up your own project.
6.Click Save.
Was this article useful?
Copyright © 2019, Ivanti. All rights reserved.