Service Manager
Working with Service Requests
•About Creating a Service Request
•About Linking a Source Incident to a Service Request
•Creating an Incident from a Service Request
•Updating the Service Request Status
About Creating a Service Request
Self Service users typically create their own service requests from the Self-Service Portal. However, a Service Desk Analyst or Change Manager can create a new service request on behalf of a requester using the Service Request workspace. The Request Offering workspace is available to the Change Manager.
From the Service Request workspace, you can create an incident or a request for change. See Creating an Incident from a Service Request.
After you enter the customer name, the templates listed are filtered to show only the request templates in which the organizational unit of the customer is entitled.
Creating a Service Request
1.Log in to the Service Desk console.
2.Open the Service Request workspace.
3.From the toolbar, click New Service Request. A blank service request record appears with the following tabs:
•Parameters: See Service Request Parameters.
•Resolution Details
•Activity History
•Approval: See About Approving Service Requests.
•Task: See Working with Tasks.
•External Task: Using External Tasks.
•Fulfillment Item: See Working with Fulfillment Items.
•Cost Item: See Working with Cost Items.
•Attachment: To attach a file or URL, see Working With Attachments and URLs.
•Escalation Watch
•Workflow Instance: See Working with Workflow Instances.
•Survey Results
•DSM Task
•Audit History
4.Enter information into the fields.
| Field | Description |
|---|---|
|
Customer |
The customer name. |
|
Location Phone |
Automatically generated from the customer or employee record. |
|
Reported By |
The name of the reporting person. |
|
Status |
The status. The service request is set to active by default. Choose another status from the drop-down list, if needed. |
|
Urgency |
Set to low by default. |
|
Team |
Automatically set to the team of the current logged in user. |
|
Owner |
Automatically set to the ID of the current logged in user. |
|
Comments |
Comments about the service request. |
Service requests are automatically created in the active state.
5.Link the configuration item under the CI tab at this time, if needed.
6.Link the service request to a change (under the Change tab) or release (under the Release tab) at this time, if needed. Once linked, the service request is accessible from the change or release records.
7.Click Save.
Service Request Parameters
The Parameters tab shows customer information according to which service level agreements are valid. When you enter the customer name in the service request, Service Manager finds only those service offerings that are valid for that customer. These service level agreement parameters are managed by templates. Templates provide only those fields that are needed to comply with the service level agreement.
From the Parameters tab, check Use Logged in user access rights to allow a Service Desk Analyst to submit a request on behalf of a customer or another user.
Service Offering Parameters List
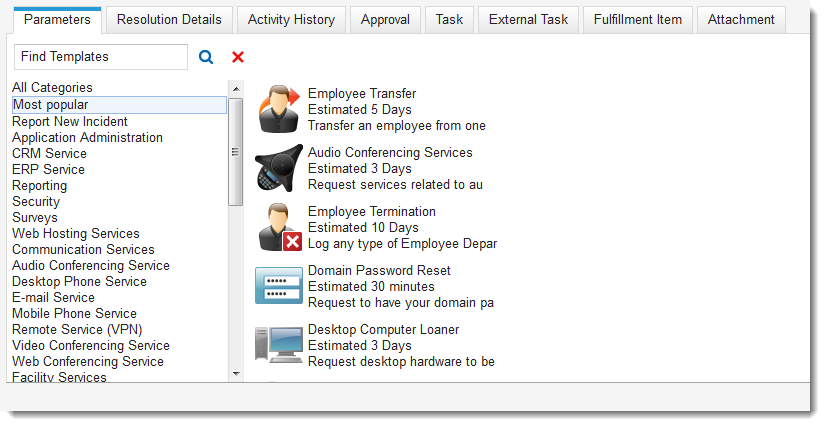
Under the Parameters tab, select a template. Each template has different required fields, depending on what issues it addresses. The template fields appear under the tab. For example, you could choose All Categories from the left list and All Eligible Service Level Agreements in the main area.
•When you enter the information into the template fields and save the record, the status of the service request becomes active.
•The customer is notified that a service request has been created.
•The service request is fulfilled according to the request fulfillment workflow.
•An approval is generated to the manager of the requester team if the catalog request item needs approval.
•Tasks are created if they are defined for the request. If approval is required, the task is created after the request is approved. Check the Task tab to view any task records for the request.
About Linking a Source Incident to a Service Request
You can link an existing incident to a service request you are creating through Related Items. See Using Related Items and Object Matching for more information on how to do this.
Creating an Incident from a Service Request
Use this procedure to create a new incident record, as opposed to linking to an existing incident record.
1.Log in to the Service Desk console.
2.Open a service request.
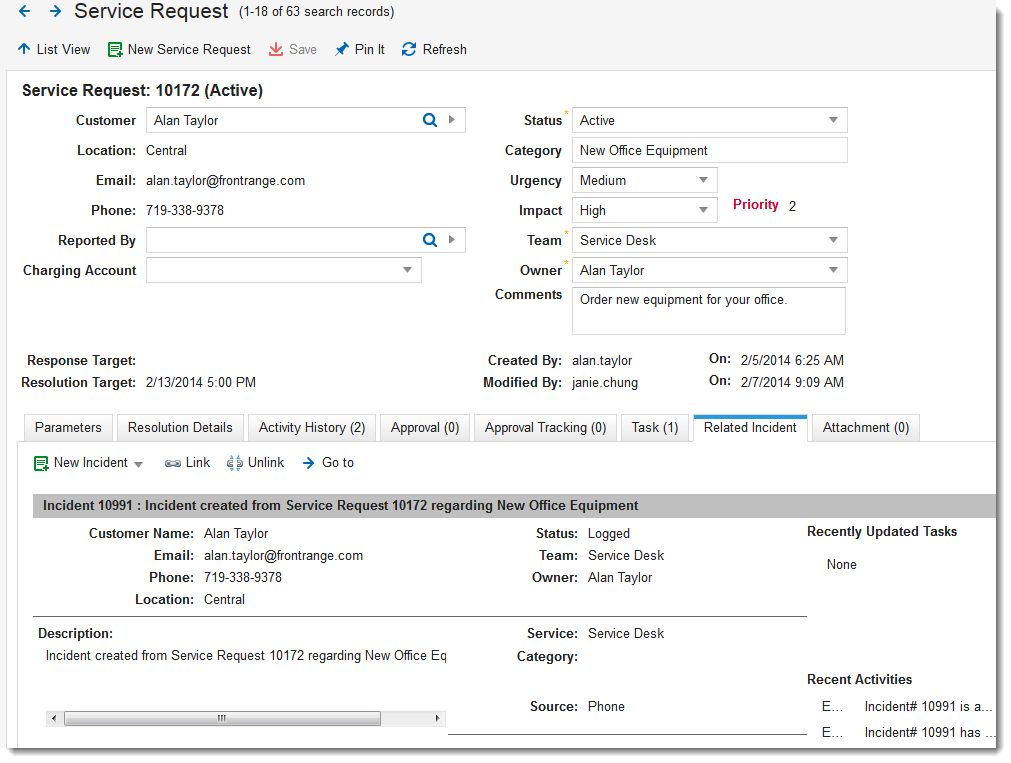
3.From the Action Menu, go to System > New Incident from this Service Request. The application creates the incident and places it under the Related Incident tab.
Service Request Related Incident
Updating the Service Request Status
1.Log in to the Service Desk console.
2.Open a service request.
3.From the Status menu, select the status that best meets the current state of the service request.
4.If you are canceling a service request, check to make sure that all associated tasks are canceled and the workflow is stopped.
| a. | Click the Task tab, and select all tasks records that are not in complete or rejected state. |
| b. | Click Complete Quick Action from the Task toolbar. |
| c. | Click the Workflow Instance tab, and select all the records that are in the waiting state. |
| d. | Click Abort Quick Action from the Task toolbar. |
5.Click Save.
Assigning a Service Request
The default owner team for service requests created from the Self-Service portal is Service Desk, while the default owner and owner team for service requests created from Service Manager is the login name and team of the logged-in user.
After a service request has gone through its approval process, make sure that the unassigned service requests are appropriately assigned.
1.Log in to the Service Desk console.
2.Open the Service Request workspace. The list of service requests appears.
3.Double click the service request to assign.
4.From the Team field, select the team from the drop-down list.
5.From the Owner field, select the owner from the drop-down list.
6.Click Save.
The owner is notified of the assignment through email. If the owner team is updated, the individual members of the team are also notified.
Was this article useful?
Copyright © 2019, Ivanti. All rights reserved.