Navigating the Self Service portal
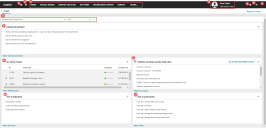
The Home workspace is the default view for the portal. Your portal may have a different look and feel from the image below, based on the settings provided by your administrator. For example, the colors and the exact modules might not be the same for all user roles.
The different areas of the portal's Home workspace are described below:
1. Workspace list - This icon is another way to access workspaces. Click the icon and select a workspace from the list.
2. What's new on Social Board - This icon is a shortcut to open unread messages and post new ones on the Social Board. The number displayed on the icon indicates the unread messages you have. If Social Board is not activated, you do not see a number. Click the icon to activate Social Board.
3. Workspaces - Use the portal workspaces (Home, Social Board, Service Catalog, and so on) to complete a variety of tasks. Click More to view additional workspaces for your user role.
4. Logged-in user and user role - Click your username to open a menu for changing the password, locale (language) for the application, or adding/updating your profile picture. Click your user role to switch to another user role you are assigned to.
5. Help icon - Click this icon to access the help documentation if you need information on any Service Manager feature.
6. Logout icon - Click this icon to log out of the application.
7. Full screen mode button - Click this icon to view the application in full screen. To switch back, click the Exit Full Screen ![]() icon .
icon .
8. Search panel - Use the fields and options in this panel to search and find FAQs, announcements, and knowledge articles by specific keywords. To refine your search to specific module, select the module in the in field.
9. Announcements - Announcements that your organization wants to communicate globally to employees.
10. My Open Items - Your submitted service requests and reported incidents. Select an item in the list to view its details. If the list is empty, you have no open items.
11. Report an Issue using Template - Report an issue using a pre-configured template. The templates auto-fill certain fields to make reporting a bit easier. To report an issue without using a template, click Report an Issue at the bottom of the section.
1.Under Report An Issue Using Template, select a template that matches your issue. A form is displayed with auto-filled fields.
2. Before modifying information in the fields, browse the Possible Solution panel on the right to see if you can resolve the issue on your own. If one of the solutions works, click Resolve (bottom right of panel) to close the incident.
3.If no solution works, ensure the Summary, Description, and Urgency fields are filled out correctly.
4.Click Save Incident to report the issue. Once saved, the issue becomes an incident with an ID that displays in your My Open Items list.
After an incident is closed, you may receive a survey email requesting feedback about how effectively your issue was solved. Your survey response will be stored with the incident.
12. Top 5 Requests - The most common service requests submitted by users. You can select from this list when submitting a request, or you can click More Services (at the bottom of the section) to open the Service Catalog and search all request categories.
1.Under Top 5 Requests, select the request that matches your need. A form is displayed; each form is different, depending on the request type you selected.
2. Enter information into the fields.
3.When finished, click Review & Submit to review the information for accuracy. To change any information, click Edit/Back and modify the information as needed.
4.Click Submit.
Track the request from your My Open Items list in the Home workspace.
13. Top 5 Questions - The most common questions asked by users. Select a question in the list to display a detailed answer. Click More FAQs (at the bottom of the section) to open the FAQ workspace and browse all published FAQs.
