Self Service Mobile Portal
If you are assigned the Self Service Mobile user role, you can view the Self Service Mobile portal on a variety of iOS and Android devices, such as smart phones and tablets. The Self Service Mobile portal is a web-based user interface that is similar to the classic application, except the pages are sized to display appropriately on a mobile device.
Google Chrome is the recommended browser for viewing the Self Service Mobile portal. The following browsers are not supported: Microsoft Internet Explorer 8 (IE8), Microsoft Internet Explorer 9 (IE9), or native/embedded Android browsers.
If you're using a smart phone to access the Self Service Mobile portal, you will first need to download the Ivanti Service Manager app for free on your device from either the Google Play Store or Apple App Store.
When you login to Ivanti Service Manager on your mobile devices including tablets, only mobile-based user roles are available. If you want to login to non-mobile based user roles, use your desktop or a laptop.
Accessing the Self Service Mobile Portal
When you log in to Service Manager as a Self Service Mobile user, the Enterprise Self Service Welcome page is the landing page. You will need to select a department to be able to access the Self Service Mobile portal. The Self Service Mobile portal will display content (Service Catalogs, Announcements, FAQs, My Items, and Knowledge Articles) specific to the department you selected.
For example, if you select Human Resources on the Enterprise Self Service Welcome page, you are redirected to the Self Service Mobile portal which displays content specific to Human Resources only.
When you log in to Service Manager as a Self Service Mobile user, the Self Service Mobile portal is the landing page. All Self Service content is available here without any department-based categorization, unlike when the Enterprise Self Service Welcome page is enabled.
Navigating the Self Service Mobile Portal
Once you are logged into the Self Service Mobile portal, you will notice that the interface may have a different look and feel from the image below. Based on how your administrator has setup and the device you're viewing it from, the colors and the exact modules might not be the same for all user roles.
All procedures described in the Self Service help also apply to the Self Service Mobile portal, with slight differences. For example, instead of clicking items and scrolling the window, you may need to tap and swipe the screen when performing actions.
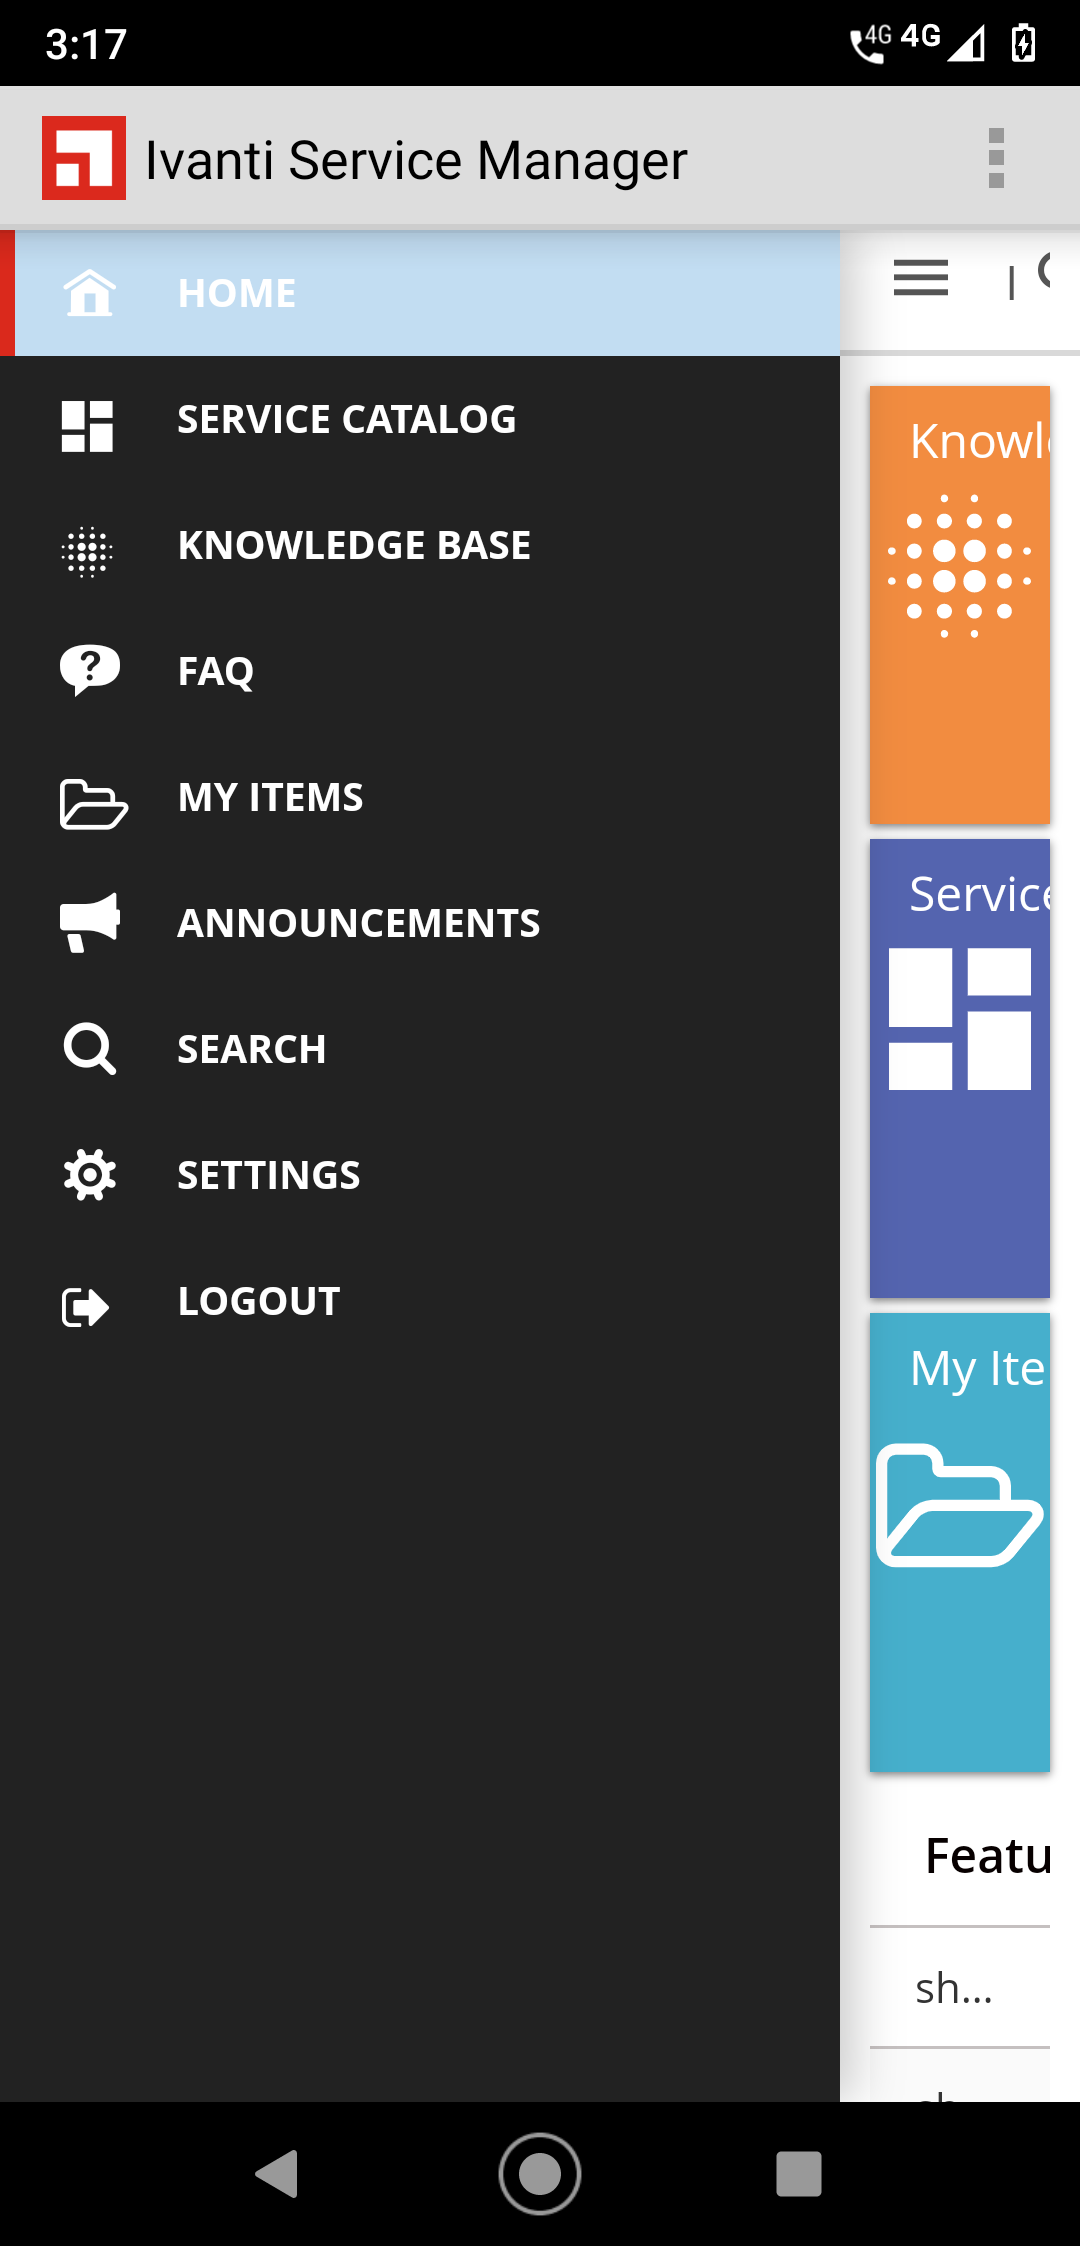
Navigate the portal using the left menu panel:
![]() – Expand or collapse the menu panel. On smart phones, the menu closes after you select an option.
– Expand or collapse the menu panel. On smart phones, the menu closes after you select an option.
![]() – The default page when you log in to the portal—use it to access the Service Catalog, browse knowledge articles, access your submitted incidents and requests, and so on.
– The default page when you log in to the portal—use it to access the Service Catalog, browse knowledge articles, access your submitted incidents and requests, and so on.
![]() – Open the Service Catalog to submit a service request or report an incident. For details, Service requests and incidents.
– Open the Service Catalog to submit a service request or report an incident. For details, Service requests and incidents.
![]() – View all published knowledge articles. Click Search
– View all published knowledge articles. Click Search ![]() icon to find specific titles or content by using keywords. Click
icon to find specific titles or content by using keywords. Click ![]() to focus the search by using one of the drop-down lists for filtering or sorting.
to focus the search by using one of the drop-down lists for filtering or sorting.
![]() – Find answers or solutions to FAQs before reporting an incident. Search
– Find answers or solutions to FAQs before reporting an incident. Search ![]() for specific titles or content by entering keywords. Focus the search by filtering from the All Categories drop-down list.
for specific titles or content by entering keywords. Focus the search by filtering from the All Categories drop-down list.
![]() – View all incidents or service requests created by you (and for some user roles, assigned to you). Search
– View all incidents or service requests created by you (and for some user roles, assigned to you). Search ![]() for specific incident titles or content by using keywords. Focus
for specific incident titles or content by using keywords. Focus ![]() the search by using one of the drop-down lists for filtering or sorting.
the search by using one of the drop-down lists for filtering or sorting.
![]() – View announcements, which are messages sent out to the entire organization. Click Search
– View announcements, which are messages sent out to the entire organization. Click Search ![]() icon to find specific announcements by using keywords.
icon to find specific announcements by using keywords.
![]() – Use keywords to search for items that are configured for your environment—these usually include announcements, FAQs, and knowledge articles. Focus
– Use keywords to search for items that are configured for your environment—these usually include announcements, FAQs, and knowledge articles. Focus ![]() the search by using one of the drop-down lists for sorting or filtering.
the search by using one of the drop-down lists for sorting or filtering.
![]() – Change your personal settings, as allowed by your administrator. You may have privileges to change the default language of the application, default login role, and so on.
– Change your personal settings, as allowed by your administrator. You may have privileges to change the default language of the application, default login role, and so on.
![]() – Log out of the application.
– Log out of the application.
Service Requests and Incidents
Use the Service Catalog workspace to submit a service request or report an issue (also known as an Incident). A service request is a request for a service, such as a conference room reservation, or a new email account. An issue is an interruption of service such as an account lockout, or printer not working.
On some devices, the Service Catalog is viewable as a list or in tiles. Toggle the view by tapping the list view icon ![]() or the tile view
or the tile view ![]() icon in the upper-right area of the page. Note that the tile view displays items in large tiles, which take up more space and list fewer items on the screen.
icon in the upper-right area of the page. Note that the tile view displays items in large tiles, which take up more space and list fewer items on the screen.
When filling out a service request, you have the option of saving it as a draft to complete and submit later. Un-submitted requests will appear as Drafts at the top right of the page.
1.Tap the Service Catalog ![]() icon.
icon.
2.Tap the drop-down list at the top of the page to view available categories. On smart phones, you may have to tap the filter icon in the upper right to access this list.
3.Select a category, then swipe through the listed offerings to find the one you want. Tap the offering, then tap Request. A form is displayed.
4.Fill in the form fields, then tap Review & Submit.
5.Review the accuracy of the information, then tap Save for Later, Submit, or Edit. Saving for later displays the request as a draft at the top right of the page. When you’re ready to submit the draft, open it and submit it at that time.
1.Tap the Service Catalog ![]() icon.
icon.
2.Tap the drop-down list at the top of the page, then tap Report New Incident. On smart phones, you may have to tap the filter icon in the upper right to access this list.
3.Swipe through the listed issues to find one that matches your problem. Tap the issue, then tap Request. A form opens.
4.Fill in the form fields. If it's configured, a Related Items panel will appear listing FAQs or articles related to your issue. Those documents may provide a solution—if so, tap Resolve. If not, close the panel, fill in the form, and tap Save Incident.
To help the Service Desk or Help Desk resolve an incident, you may need to add a note or attachment to it. You can only do so after logging the incident. Once you add a note or an attachment, it becomes a permanent part of the incident record that you can't delete.
From an iOS device, you can attach only one item. Depending on your application configuration, you may be limited to the types of files (such as .MOV) that you can attach.
1.Tap the ![]() icon to open My Items. A list of your open items appears.
icon to open My Items. A list of your open items appears.
2.Find the logged incident, then tap to open.
3.To attach a file or photo: In the Attachments section, tap Browse to find a file. Select the file and tap Save. Note that the attachable files you see will depend on your installed apps or the viewing capabilities of your device.
4.To add a note: In the New Notes section, tap the text box and enter a note. Once finished, tap Save.
Attaching a photo using an iOS device's camera
Privacy settings on iOS devices using Safari may prevent you from using the camera function. The camera opens, but the screen remains blank and only the Cancel button is enabled. If this occurs, re-enable the camera function by going to Settings > Privacy > Camera on your Apple device. Turn on access to the camera for Safari.
Chat with Support
You can either use Service Manager's in-build chat feature or use Microsoft Teams to instantly message the Support/Service Desk Analyst team to help solve issues or answer your questions in a one-on-one chat. You can also create incidents from the chat.
If this feature is not available for you, your administrator might not have enabled it for you. Reach out to your organization's administrator to get it enabled.
Using Service Manager built-in Chat
1.Tap the Chat with support icon  .
.
•A new chat window is displayed with the message "We are online" if Support staff is available. If not, the message "Chat is unavailable at this time!" is displayed.
•Once a Service Desk Analyst is assigned to your chat session, you will see the message "Connected to <Service Desk Analyst name>" in the chat window.
2.Type your query or the issue you are facing in the text box and tap the send icon  .
.
The Service Desk Analyst will reply to your query or issue. In case it cannot be solved through the chat, an Incident will be raised and the Incident number will be displayed on your chat window.
If you stay idle on the chat for a long time, you will be logged-off after two warnings.
Using Microsoft Teams
•You should have Microsoft Teams installed on your computer and have a client account created.
•You should have added the Teams app built for your organization to your Teams client account.
| a. | Log in to your Teams client account. |
| b. | Click Apps > select the Teams app your organization has built > Add to a chat. |
Your organization's Teams app is now added to your chat contacts which you can use to chat with Service Desk Analysts.
Sample Image of Teams app build for Ivanti
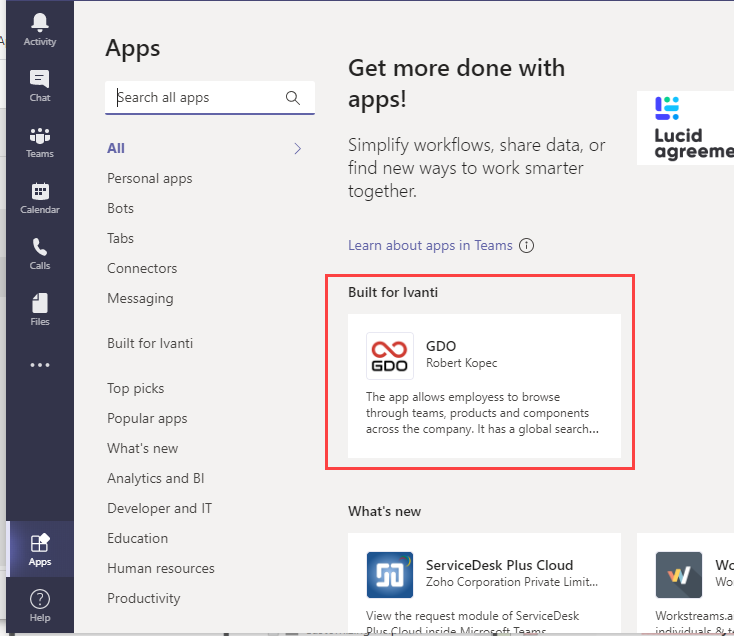
Sample Image of adding Teams app built for Ivanti to Teams chat

If you cannot find your organization's Teams app or have issues adding it to your Teams chat, reach out to your organization's administrator.
1.Log in to your Teams client account.
2.Click the Teams app of your organization that you added to your chat in the Prerequisites: section.
3.Send a message.
4.Select any of the following option.
•Chat with Analyst - a Service Desk Analyst is assigned with whom you can have a one-on-one chat to help with your issue.
•Create an Incident - an Incident dialog box is displayed. Enter the required information and click Save. An Incident is created for you which will be addressed by the Service Desk team.
•Check Incident Status - all Incidents created by or for you will be displayed. Click one to view its status.
The above options may vary based on how your organization's administrator has set it up.