Example: Setting an Escalation Schedule by Priority
This example shows how to set an escalation schedule to respond differently based on priority. See Default Priority Values.
For example, to define an exception based on the Priority field so that the incident remains open for a longer time if it has a priority of 1, you can modify the exception priority.
1.From the Configuration Console, click Build > Automation Tools > Escalation Schedules to open the Escalation Schedules workspace. The list of escalation schedules appears.
2.Click the schedule to modify. In this example, click Incident - Waiting. The Edit Escalation Schedule page appears.
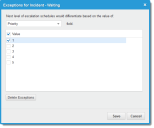
3.From the escalation toolbar, click Set Exceptions. The exceptions window appears.
4.Choose a business object, then check a value. In this example, choose the business object called Priority and the value 1.
Exception Based on a Priority Value of 1
5.Click Save. The window closes and a new line appears in the exception.
Updated Exception Schedule
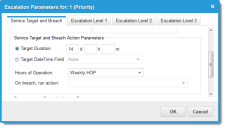
6.Select the newly created line, then click Set Thresholds from the toolbar. The Escalation Parameters window appears.
7.Change the Target Duration to 14 days.
Escalation Parameters
8.Click OK. The window closes and the new line is updated.
Escalation Schedule with Priority Exception


