Using the Run Program for the Remote Host
•Using Windows Remote Management (WinRM) Setup
•Using the Run Program / Export History Workspace
•Example: Starting or Stopping a Service Using the Run Program
About the Run Program
Remote connections are set up to connect to remote computers using the Run Program. The Run Program is a way to execute a Microsoft Windows application from Neurons for ITSM. This is useful when you need to execute a program to accomplish a task that cannot be automated within Neurons for ITSM itself. Some examples might include running PowerShell scripts to manage Active Directory user passwords, importing information from Neurons for ITSM into a third party application, or running an XSL transformation using Microsoft Excel.
Server performance can be severely affected if the Run Program job uses a lot of resources. We recommend that you have a separate remote host server and not run it on the application or database servers.
How the Run Program Works
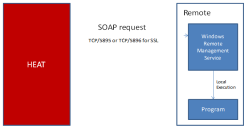
The Run Program uses the Microsoft Windows Remote Management (WinRM) protocol. This native service of Windows allows remote requests to run local applications. When enabled on a server, Neurons for ITSM can make a request to run the specified program on that server, using the credentials supplied in the remote connection. When the program is run, it can pass along details from Neurons for ITSM as command line parameters, and any output can be returned to the quick action to update Neurons for ITSM.
WinRM is not enabled by default. To enable this service in a secure manner, review http://msdn.microsoft.com/en-us/library/aa384372(v=vs.85).aspx. Secure connections use SSL certificates, either self-signed or from a trusted authority.
Using Windows Remote Management (WinRM) Setup
Before configuring WinRM, we strongly recommend that you review the security implications of each mode. You must have an account with sufficient permissions to use WinRM before starting the configuration.
•Running the Program on the Application Server
•Running the Program on Another Server
Running the Program on the Application Server
1.Check your application requirements. WinRM 2.0 and PowerShell 2.0 are required on the Neurons for ITSM application server or on the server where the Run Program is executed.
2.Check if PowerShell is installed on the Neurons for ITSM application server on which the Neurons for ITSM Software Integration Service is hosted. In Windows, go to Start > All Programs > Accessories and check to see if the Windows PowerShell folder exists. If not, install it per instructions from Microsoft.
Windows PowerShell Folder
3.Check to see if WinRM is running by doing the following:
| a. | Run the PowerShell command module as an administrator. |
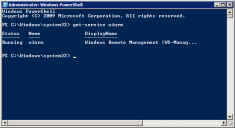
| b. | Enter get-service winrm. |
Windows PowerShell Command Module
| c. | The status should show running. If not, go to Services, change the Startup to automatic, then start the service. |
4.There are two modes: trusted and secure (using an SSL certificate).
•Trusted mode: Register the remote server as "Trusted Host". (NOTE: Do not copy and paste. Enter it manually.)
•Run the PowerShell command module as an administrator.
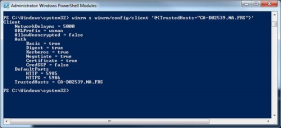
•Enter winrm set winrm/config/client '@{TrustedHosts="CA-D02539.NA.FRS"}'.
PowerShell Trusted Mode Setup
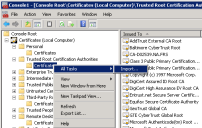
•Secure mode: (Using an SSL certificate) Register the remote server certificate using MMC (if necessary).
PowerShell Secure Mode Setup
Running the Program on Another Server
Use the following steps when using another program to execute the Run Program.
1.Check your application requirements. WinRM 2.0 and PowerShell 2.0 are required on the Application Server or on the server where the Run Program is executed.
2.Check if PowerShell is installed on the Application Server on which the Neurons for ITSM Software Integration Service is hosted. In Windows, go to Start > All Programs > Accessories and check to see if the Windows PowerShell folder exists. If not, install it per instructions from Microsoft.
3.In the PowerShell command module, enable the PowerShell remoting capability by doing the following:
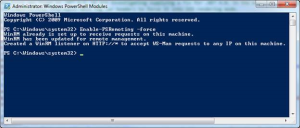
| a. | Enter Enable-PSRemoting -force. This initiates Windows to configure the machine for listener ports and firewall rules. |
Enabling the PowerShell Remoting Capability -- Example 1
Port 5986 is the default HTTPS port used by WinRM to receive the remote commands.
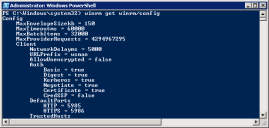
| b. | Enter Winrm get winrm/config to check the configuration. |
Enabling the PowerShell Remoting Capability -- Example 2
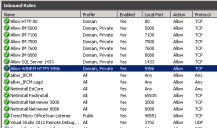
4.Create a firewall inbound rule for the port.
Firewall Inbound Rule
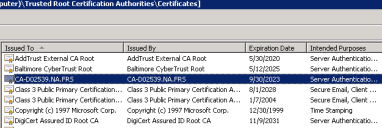
5.Get a server certificate for authentication purposes.
Trusted Root Server Certificate
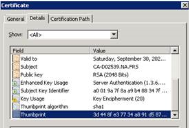
6.Get the certificate thumbprint to configure the WinRM listener (in the next step).
7.Export the public key to register it in the Integration Server.
Certificate Thumbprint
8.Configure the WinRM listener. Run the Windows command prompt as an administrator by doing the following:
| a. | Enter Winrm create winrm/config/listener?Address=*+Transport=HTTPS @{Hostname="CA-D02539.NA.FRS"; CertificateThumbprint="3d448fe37734a891d5876b5c51083c8a79ec0dcb"} |
If successful, the listener shows the port and certificate thumbprint.
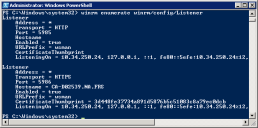
| b. | Enter Winrm enumerate winrm/config/listener to check the listener. |
Checking the WinRM Listener
Using the Run Program
1.Configure WinRM on a server.
2.Create a remote connection in the Configuration Console. (See Configuring the Run Program below.) The remote connection contains all the details necessary to connect to the remote server, including a valid user name and password to access resources on that server.
3.Create a quick action that specifies the details of the program to execute and the parameters to pass to it. (See Run Program Quick Action under default quick actions.)
Run Program Quick Action
As noted in the diagram, a TCP connection is required between the Neurons for ITSM server and the remote management server. If these two servers are separated across a wide area network or the internet (such as is the case for Neurons for ITSM Cloud), additional firewall configuration or a point to point VPN tunnel may be required.
Configuring the Run Program
1.Access the Data Integration Wizard by going to the Configuration Console and clicking Extend > Integration Tools.
1.Click Start next to Run Program - Remote Host. The Remote Host Connection Manager workspace appears. Any configured connections are listed.
2.Click Add New.... The Remote Host Connection Setting page appears.
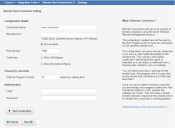
Remote Host Connection Setting Page
3.Enter information into the fields.
| Field | Description |
|---|---|
| Connection Name | A unique, descriptive name for this connection. |
| Remote Host | The fully qualified domain name or IP address. For example, pl_computer/NA or 101.12.204.155 |
| Secure Mode | Obtains a secure connection. When this option is selected, the certificate options appear. |
| Port Number | The default port number appears, based on whether secure mode is checked or not. To override, enter another port number. |
| Certificate | |
| Allow Self-Signed |
Bypasses the untrusted certificate notification and prevent an error message. |
| Allow Mismatched Name | Specifies a different remote host name than the HTTPS certificate is for (such as when connecting using an IP address instead of the host name on the certificate). You should not need to check this option if you are using a certificate from a trusted public authority, such as Verisign and use the fully qualified domain name. |
| Timeout (in Seconds) | |
| Wait for Program to finish | The number of seconds to wait for the program to respond. By default, this is controlled by the integration service client and is 60 seconds. To wait for an unlimited time, enter zero. If the wait time is exceeded, a timeout error occurs. |
| Authentication | |
| Login | The login user name to the remote host. |
| Password | The password to the remote host. |
4.Click Test Connection to see if you have a good connection.
5.Click Save. Your connection is added to the list.
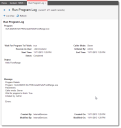
6.In Neurons for ITSM, open the Run Program / Export History workspace to view the Run Program log.
Sample Run Program Log
Using the Run Program / Export History Workspace
The Run Program / Export History workspace in the Neurons for ITSM application lists each time the Run Program quick action has been run and the result. It is a convenient way for you to determine if your exports are working.
1.From the Configuration Console, click Monitor > Application Logs > Run Program History to open the Run Program / Export History workspace.
The Log Level column shows the success or failure of the Run Program quick action.
2.Double-click an item from the list to view the audit history.
Example: Starting or Stopping a Service Using the Run Program
This example shows how to create a quick action that starts or stops a service.
1.Create a Run Program connection within the Data Integration Wizard. See Using the Run Program for the Remote Host.
2.Create a quick action that is triggered by a user to start or stop a service through the Run Program connection. See Run Program Quick Action.
The following are examples of the Power Shell scripts used to start and stop the services.
Start Script
#####################################################################
# StartService.ps1
#
# Starts service remote script
#####################################################################
if ($args.Length -eq 0)
{
return "Syntax Error: Please provide 'Service Name' that you want to start!"
}
else
{
Start-Service $args[0] -WarningAction:SilentlyContinue
return [string]::Format("[{0}] started.", $args[0])
}
Stop Script
#####################################################################
# Stop-Service.ps1
#
# Stops service
#####################################################################
if ($args.Length -eq 0)
{
return "Syntax Error: Please provide 'Service Name' that you want to stop!"
}
else
{
Stop-Service $args[0] -WarningAction:SilentlyContinue
return [string]::Format("[{0}] stopped.", $args[0])
}
1.Copy each script into a text editor and save them.
2.Enter the file name of the script in the Program with Path field of the quick action.

