Working with Price Lists
The Price List workspace allows you to set different prices for services based on the regional settings for a user. You can define prices for all items (including services and subscriptions) within a single global list.
This feature is only enabled when you select Use Price List from a request offering. See About Request Offerings.
Creating a Price List Item
1.Log in to the Service Desk console.
2.Open the Price List workspace. The lists of prices is displayed.
3.From the toolbar, click New Price List Item. A blank Price List Item form opens.
4.Enter information into the fields.
| Field | Description |
|---|---|
| Enabled | Enables the price variance feature for this item. |
| Item Name | A unique name for the item. |
| Item Revision | Optional. A revision code indicating the item version. |
|
Type |
Types include: Personal Hardware: Use for personal hardware, such as phones or computers. Network Hardware: Use for network hardware, such as cables or printers. Subscription: Use for recurring prices. Software License: Use for software purchases. Service: Use for services, such as shipping. Facility: Use for services provided on the customer's site. Allocation: Use to track time (cost) of a specific task. |
|
Recurrence Type |
The type of recurrence. |
|
Price |
The price value and currency type. The price is the amount charged to the customer or end user. When linking the price to a custom business object, ensure that the business object is linked to FRS_PriceItem. |
|
Cost |
The cost number and currency type. Cost is the value incurred by the service provider. |
|
Unit of Measure |
Unit value in days, hours, minutes, or years. |
|
Description |
A brief description describing the item. |
|
Vendor |
Choose from the drop-down list. See Creating a Vendor. |
|
Cost Driver |
Available cost drivers. |
|
Cost Driver Category |
Category of the cost driver. |
|
Direct, Fixed, Capital Expense |
Option selected if the price is direct, fixed, and a capital expense. |
5.Click Save.
Creating a Price Variance
Price variance allows you to offer service items at comparable prices based on the location settings of a user as defined in their employee record. The Service Catalog automatically shows the regional-specific pricing when the request is ordered.
The default price defined in the Price Item window automatically appears in the Price list. You can add as many variances as you need.
1.Log in to the Service Desk console.
2.Open the Price List workspace. The list of price items is displayed.
3.Open a Price Item record.
4.Under the Price tab, click New Price Variance. The New Price Variance window opens.
New Price Variance Window
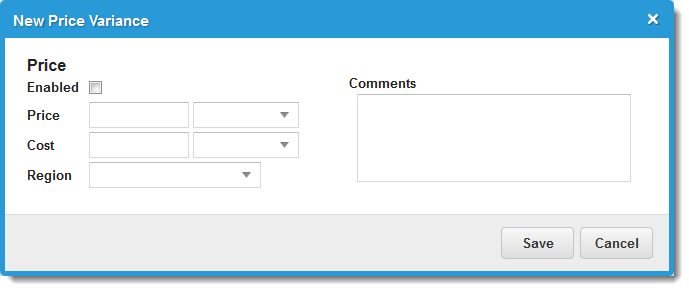
5.Enter information into the fields.
| Field | Description |
|---|---|
| Enabled | Enables the price variance feature. (You must also select Enabled in the Price Item window. |
| Price | The price number and currency type. |
| Cost | The cost number and currency type. |
|
Region |
The applicable region for this price. Regions are defined in the Location workspace. Users only see the appropriate prices for their location. |
|
Comments |
A brief description of the price. |
6.Click Save. The price is displayed in the list under the Price tab.
7.Repeat to add more variances. After you have defined the price variances, you can link price items enabling you to use the same price parameters for multiple items.
8.Within a Price Item record under the Price tab, click Link. A list of all defined prices is displayed.
9.Select a variance from the list, then click Select. To add a variance to the list, click Add.
10. Repeat as needed to add more price variances.
11. Click Save.
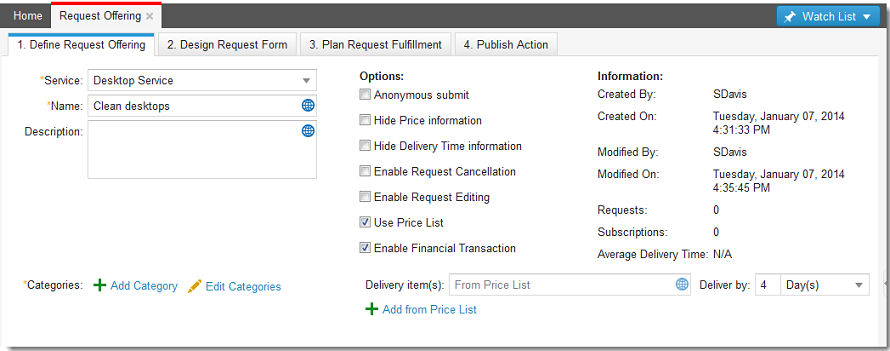
Adding Prices to a Request Offering
1.When defining a request offering (either new request offering or new form offering), check Use Price List. Enable Financial Transaction also becomes checked.
The Use Price List option tells the application to use the Price List workspace to obtain prices for your request offering options. The Enable Financial Transaction option saves a log of transactions that occur from end users.
Request Offering - Use Price List
2.Click Add from Price List. The Select Price List Items window opens. This adds a base price to your request offering.
Select Price List Items
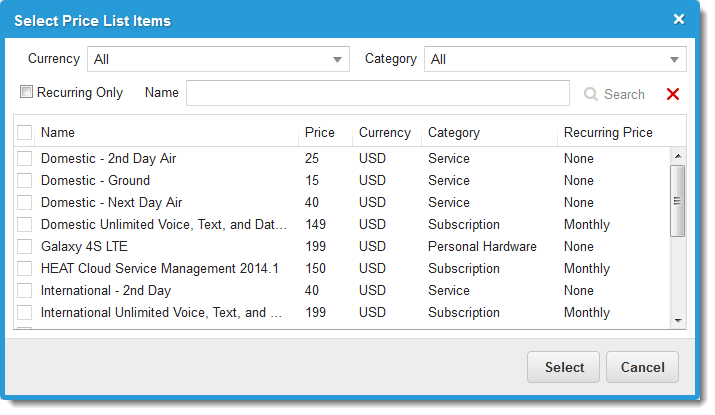
3.Choose an item from the list, then click Select. Repeat as needed to add more base items.
4.Click the Design Request Form tab. The request form opens.
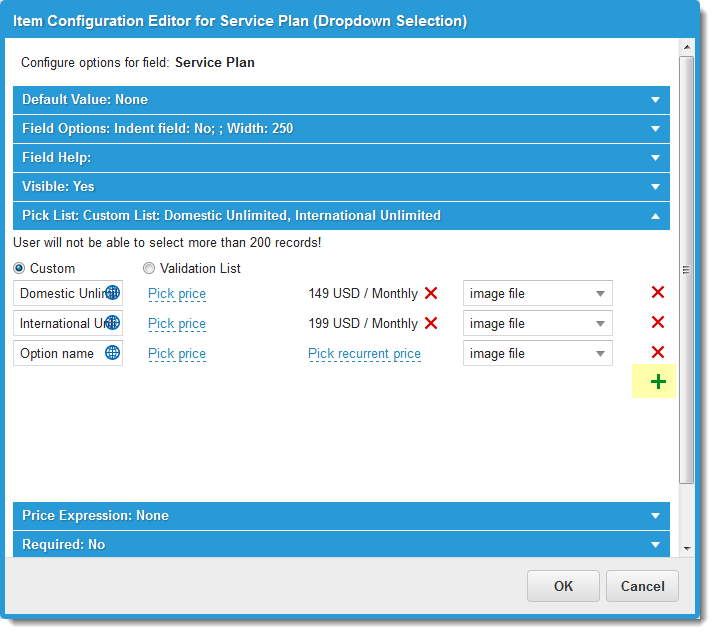
5.Click the edit icon  next to the field for which to designate a price. The Configuration Editor opens.
6.Designate the prices.
•If the field is a checkbox control, expand the Field Options area.
| Field | Description |
|---|---|
| Indent this field on the form | Shows the checkbox indented on the form to users. |
| Price | Cost of the request offering. |
| Recurrent Price | Recurrent cost of the request offering. |
•If the field is a drop-down selection control, expand the Price List area.
7.Do one of the following:
•Click Custom, then click the add icon  to add items and prices to the list. Use this option to create an ad-hoc list.
Configuration Editor - Custom Pick List
•Click Validation List to define the validation list items. Use this option to create a validation or cascading validation list.
Configuration Editor - Validation List
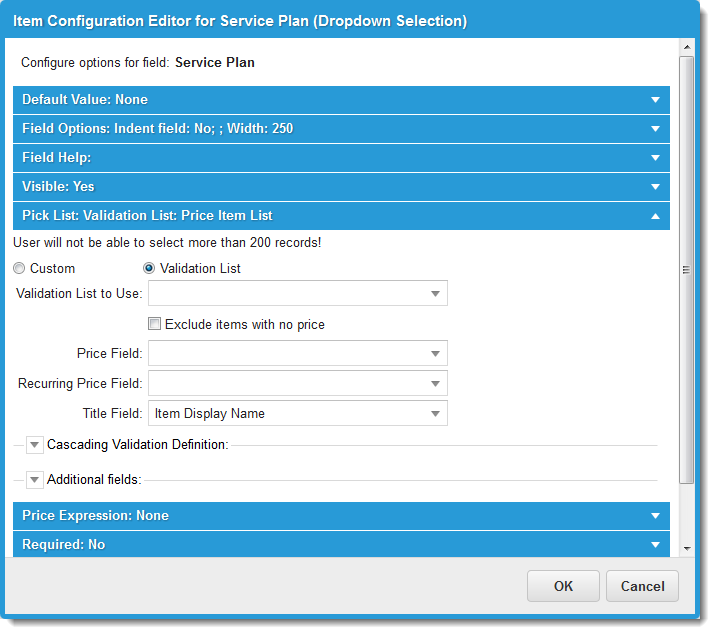
| Field | Description |
|---|---|
| Validation List to Use | A validation list that must be defined in the business object before it appears here. |
| Exclude items with no price | Does not include items without a price in the list that appears to users. |
| Price Field | Reflects the initial or base price. |
|
Recurring Price Field |
Reflects the recurring price. |
|
Title Field |
Shows the item title. |
|
Cascading Validation Definition |
Includes a cascading validation list. |
|
Additional Fields |
Additional business objects and fields used when creating a cascading validation definition. This section serves as a filter for the validation list. |
8.Click OK.
9.Continue editing the service request offering as described in Creating a Request Offering.
Modifying a Price Variance
Modifying a price variance applies to new requests and does not affect older linked records.
1.Double-click the price variance to modify. The Edit Price Variance window opens.
2.Change the values as needed.
3.Click Save.