Using Additional Search Features
This topic describes some of the additional features that you can use when searching for records.
You can create a saved search, as described in Using Saved Search. You can also create a search to use once and run right away, without saving it. The steps to create a saved search and a search to use once are very similar.
Creating and Running a Saved Search
To create a Saved Search, follow these steps:
1.Log into Neurons for ITSM.
2.Open a workspace.
3.Click the New saved search icon ![]() .
.
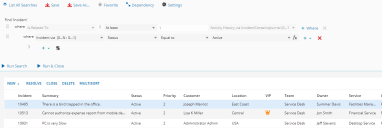
The application displays a blank search form.
The New saved search icon ![]() will be available only if you have the permission to create or edit Saved Search. If you have edit permission, you can publish to other roles. If you do not see the icon, contact the administrator.
will be available only if you have the permission to create or edit Saved Search. If you have edit permission, you can publish to other roles. If you do not see the icon, contact the administrator.
4.Enter or choose search conditions.
Search Conditions
5.Click the add icon  to add more search conditions.
•The AND operator finds a record if both conditions are true.
•The OR operator finds a record if either condition is true.
6.To delete a search condition, click the delete icon  .
.
7.To sort the search conditions, drag and drop the order indicator  to move a line to a new position.
See Reordering Search Conditions.
8.Click Run Search.
The application runs the saved search and displays the results below. The application adds the number of records found next to the name of the saved search. The search editor remains visible with the search criteria listed.
If you click Run & Close the application runs the saved search and displays the results below, but closes the search editor. Click the edit icon  to display the search fields again.
9.Optional.
•Click Dependency to see where the saved search is being used.
•Click Favorite to mark this search among your favorites. The application shows all saved searches that are marked as a favorite in the saved search drop-down list.
•Click Settings and enter the appropriate information as needed:
•In the Publish Action to field, click the drop-down menu and check the roles to be notified of your actions.
•In the Category field, enter a category name or click the drop-down menu and choose one of the default names. Category is a way to group searches into meaningful collections.
•Check the box to make this search your personal default. When you (the logged-in user) open this workspace, the search automatically runs and the results appear in the list.
•In the Default for roles field, click the drop-down menu and check the boxes of the roles to be notified of your actions. You can only designate roles to which you have write permissions.
10.Click Save and enter a name for this search.
Adding a Sort Order to Search Results
To sort the order of the search results, follow these steps:
1.Perform steps 1 through 9 of Creating and Running a Saved Search.
2.Click the multisort icon  .
.
3.The Multisort Column Picker appears.
4.In the Sort by field, select a field on which to sort the results. By default, the results are sorted in ascending order.
5.Click the arrow at the end of the Sort by field, to sort the results in descending order. Toggle the arrow to sort the results again in ascending order.
6.Optional.
•Click the add icon  to add a Then by field.
•Click the delete icon  to delete a Then by field.
7.To re-sort your search results, click Sort.
When you close the multisort column picker, it remembers your choices and displays them the next time you click the multisort icon.
Reordering Search Conditions
For any search with multiple conditions, you can drag and drop search conditions to reorder them.
When you select an order indicator and move it to another position, the application displays a green check mark when you can drop the search condition. When you release the mouse button, the search condition appears above the current search condition.
If you drag the search condition to a position where it cannot be dropped, the application displays a red circle with a line through it. When you release the mouse button, the search condition appears in its original position.
You can only drop a search condition onto another search condition that has the same immediate object. The immediate object changes when you create search conditions using the is related to feature.
You can change the order of the search conditions within nested expressions; however, moving a search condition out of a nest can result in changes to the search condition. For example, if you move an or search condition out of a nest, it becomes an and search condition.
1.Perform steps 1 through 9 of Creating and Running a Saved Search.
2.To sort the search conditions, drag and drop the order indicator to the new position.
Searching in Relationships
When you click the down arrow next to the business object field, you only see the business objects that have a one-to-one or many-to-one relationship.
1.Perform steps 1-4 of Creating and Running a Saved Search.
2.Enter or choose your search conditions.
In this example, "Service Request via IncidentAssociatedServiceReq (0...N : 0...1)" the "0...N : 0...1" notation means:
•Each incident is related to either 0 or 1 service requests, and
•Each service request can be related to any number of incidents, including 0
The table below expands on the same example.
| Notation | Each Incident is Related to | Each Service Request is Related to |
|---|---|---|
| 1 : 0...1 | 0 or 1 service requests | 1 incident |
| 0...1 : 1 | 1 service request | 0 or 1 incidents |
| 0...1 : 0...1 | 0 or 1 service requests | 0 or 1 incidents |
| 0...1 : 0...N | 0 to any number of service requests | 0 or 1 incidents |
| 0...N : 0...1 | 0 or 1 service requests | 0 to any number of incidents |
| 0...N : 0...M | 0 to any number of service requests | 0 to any number of incidents |
Searching for Related Business Objects in a Saved Search
This feature describes how to search for related business objects in a saved search. This action is not the same as the Related Items and Object Matching feature that is described in Using Related Items and Object Matching.
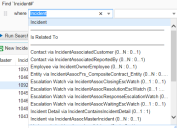
When you click the down arrow next to the business object field, in addition to seeing a list of business objects, you also see an option called Is Related To.
If you select Is Related To, the application displays the related object sub-query. You can enter values into the sub-query to search for business objects related to the original business object. The application adds parentheses to help you
1.Perform steps 1-4 of Creating and Running a Saved Search.
2.In the business object field, select Is Related To. The application displays a related object sub-query, with parentheses around it.
3.Enter or choose your search conditions.
Searching for Related Business Objects
| Operator |
Choose an operator from the drop-down list. |
| Number | The number of records to which the business object is related. |
| Relationship |
Choose a business object from the drop-down list. These are the business objects that have a one-to-many or many-to-many relationship to the business object being searched. |
See the following examples:
Related Search Example 1
In the example above, you are searching for all incidents that are related to at least three tasks. The application displays the results. For every incident in the result list, there are at least three tasks related to it.
Related Search Example 2
In the example above, you are searching for all incidents that are related to at least one task with a status of accepted. The application displays the results. For every incident in the result list, it has at least one task with a status of accepted related to it. In this example, the immediate object has changed from incident to task.
Using Search with Date Fields and Different Locales
Neurons for ITSM displays dates within searches in the format associated with the locale of the user. For example, if you use the English (United States) locale and enter a date of December 31, 2015, the date shows as 12/31/15. If you use the English (United Kingdom) locale, the date shows as 31/12/15. Saved searches are now locale-aware.
You cannot enter times in saved searches, but only dates. If you enter 12/31/15, for example, this tells the system to look for events that happen between 12:00 AM and 11:59 PM on that day. The date is stored without a time zone and runs according to the time zone of the user. A saved search for 12/31/15 can then return different results depending on the time zone in which it is run.
For example, if a user with the UK time zone runs the saved search, it looks for results from 00:00 GMT to 23:59 GMT, whereas if a user with a Pacific Standard Time time zone runs the saved search, it looks for results from 08:00 GMT to 07:59 GMT (which is 12:00 AM to 11:59 PM in PST).
If you use an expression as the value for a date field, then expression functions default to your local time zone and return an exact time. Many expression functions allow you to specify a different time zone. The only expression function that does not return an exact time is CurrentDate(). This will match any value that falls in the 24-hour period associated with the current date for your local time zone.

 .
. .
. .
.


