Configuring custom business objects for the Mobile Analyst portal
You can configure and use custom business objects for the Mobile Analyst portal. The list view of Incident, Task, Service Request, or any other page in the Mobile Analyst portal can be customized as needed so that your Mobile Analysts can view information that is most useful for them.
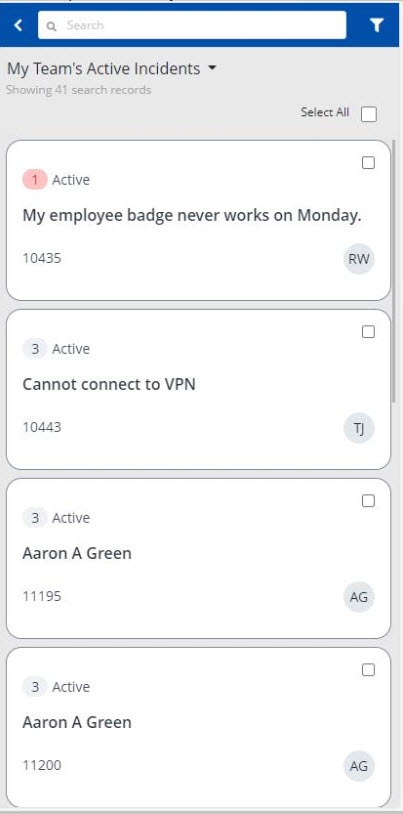
Sample scenario - customizing the Incident page
1.Log in to Neurons for ITSM as an Administrator.
2.Open the Configuration console > Business Objects > Incident > Lists.
3.Select the List that is applicable for the Mobile Analyst Incident business object.
4.Customize the List properties as needed. A sample of how and what elements you can customize is detailed below:
Only the first 5 columns can be customized and only these are displayed in the Mobile Analyst portal.
Change the columns order:
Choose the columns order as needed. Drag and drop the column header at the required position.
| a. | Drag the Priority column and drop it in the first position. |
| b. | Drag and drop Status column in the second position followed by Summary, Incident, and Customer. |
Define the column span:
Column span helps you to control the number of columns to be displayed in a line. Define the column range between 1-12.
For example, if you want 2 columns to be displayed in the same line - ensure the sum of the span of both the consecutive columns is equal to 12. It can be less than 12 but the sum of these 2 columns and the following columns should be higher than 12, else even those columns be displayed in the same line.
If you want only one column in a line then set the span as 12 or ensure the sum of the span of this column and the following columns are higher than 12.
| a. | Set the value of Span for Priority as 1, Status as 5, and Summary as 12. Priority and Status are displayed on the first line and Summary is moved to the second line. |
| b. | Set the value of Span for Incident as 8 and Customer as 4. Both these columns will be displayed on the third line. |
Define Style:
| a. | Choose the Style for Status, Priority and Incident as RAText. |
| b. | Choose the Style for Summary as RASummary. |
| c. | Choose the Style for Customer as RAUserProfile. |
• The RAText and RASummary, and are pre-defined styles provided out-of-the-box for easy styling text. To know the definition, from the Configuration console, navigate to User Interface Styles> Highlighter Styles > select the style element, the definition is displayed.
• The RAUserProfile is also a pre-defined style provided out-of-the-box for easy styling text. It is suitable for fields such as Customer or Owner or any other field which has names. When this style is used, the initials of the first name and the last name is picked and displayed in a circle.
5.Click Save.
Incident Page in the Mobile Analyst portal displayed as customized