Using the Mobile Client App
•About Accessing Neurons for ITSM from Mobile Devices
•Accessing the Mobile Client App
•Creating Records in the Mobile Client App
•Editing Forms in the Mobile Client App
•Using Quick Actions in the Mobile Client App
•About Saving Records in the Mobile Client App
•Sending Emails through the Mobile Client App
•Configuring the Log-In URL for On-Premise Mobile Client App Users
About Accessing Neurons for ITSM from Mobile Devices
There are three ways to use Neurons for ITSM with a mobile device:
•You can view Neurons for ITSM on mobile devices through a browser. All user functions operate the same as on a desktop browser. We recommend using as large a screen as possible; therefore, a tablet is more practical than a smart phone for using Neurons for ITSM in this way.
•A second option for viewing Neurons for ITSM on a mobile device is to use a browser using the Self Service Mobile role which has a device-enabled responsive view of Neurons for ITSM. For information about the role, the interface, and any limitations when using this option, see Using Self Service Mobile.
•The third option is to use Neurons for ITSM through the Neurons for ITSM Mobile Client app for iPads and iPhones. You can download the Neurons for ITSM Mobile Client app for free from the Apple app store. With the Neurons for ITSM Mobile Client app, you can view relevant records such as incidents, task assignments, employees, and change approval requests.
Touch devices do not support the double-click function. To select records from a list, either enable the link column in the list view definition, or place a Go To button on the list toolbar.
Many mobile devices do not support Adobe Flash. If the device being used does not support Adobe Flash, dashboard charts are not visible.
About the Mobile Client App
This topic covers how to set up and use the Neurons for ITSM Mobile Client app.
Ivanti Mobile Apps
![]()
Using the Neurons for ITSM Mobile Client app you can do the following:
•Create new records and view or edit information on these forms, if they are available to your role and defined in the layout permissions.
•Execute quick actions, and view related records and attachments.
•Make phone calls and send emails to contacts.
Accessing the Mobile Client App
You can access the Neurons for ITSM Mobile Client app from mobile devices, including iPhones and iPads, with business object information displayed in forms that are managed according to your role.
If you receive error or redirection messages, ensure that you are running the latest iOS version.
1.Log in.
2.Select the role to use. You might only have one role.
3.Swipe to view different workspaces, such as a list of records, record details, and related items.
4.Click a record to view its details.
5.Filter the number of records to view. Click the Filter icon in the upper right corner, then select the filters.
Creating Records in the Mobile Client App
By default, forms on a mobile device are read-only. However, administrators can give users the right to add new records.
1.Log into the Neurons for ITSM Mobile Client app.
2.Select a role.
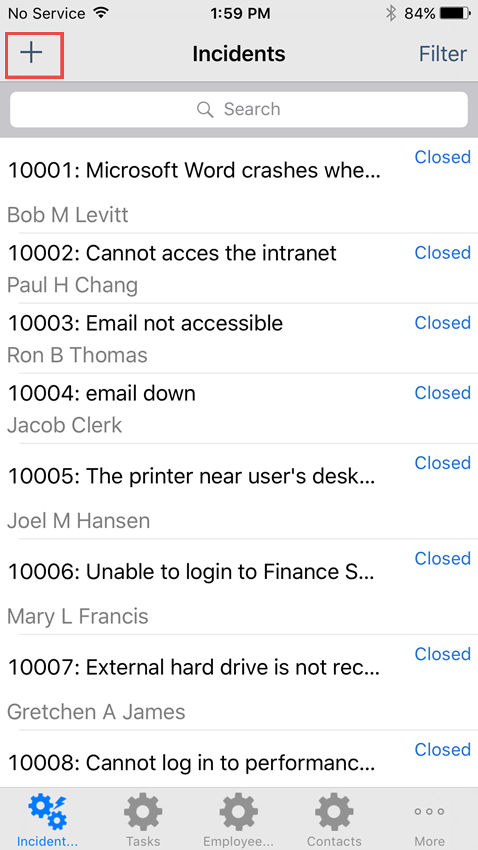
If your role has permission to create new records, the application displays a plus + sign on the header. If there is no plus + sign, your role does not have permission to create new records.
Mobile - Click + to Add an Entry
Editing Forms in the Mobile Client App
By default, forms on a mobile device are read-only. However, administrators can assign edit access to designated roles. If your role has edit permissions, you see an Edit button. You can then modify data in the following:
•Validated fields (including constrained lists)
•Date fields
•Text fields
•Numeric fields
•Boolean/bit fields
Using Quick Actions in the Mobile Client App
You can use quick actions related to the business object on the Neurons for ITSM Mobile Client app by clicking Quick Action in the bottom right corner of the screen.
About Saving Records in the Mobile Client App
After saving a record, the application calculates the required fields. The business object state may affect the required condition of a field. All required fields must contain a valid entry, or the application displays an error message and aborts the operation. When the validation occurs, the business object data is passed to the server.
Sending Emails through the Mobile Client App
Follow these steps to send an email from within the Neurons for ITSM Mobile Client app:
1.While in a record, click Email. The email window appears.
2.Send the email as you would normally.
Configuring the Log-In URL for On-Premise Mobile Client App Users
This procedure is for on-premise users only and does not apply to Cloud users.
•The login URL for the tenant must be the host. The mobile tenant uses the host name as the tenant ID.
•The role of the mobile user must be correctly configured to enable mobile login.
1.Log in to the Neurons for ITSM Configuration Database. See the Configuration Database Guide for Ivanti Neurons for ITSM for information about using the Neurons for ITSM Configuration Database.
2. Open the Tenants workspace. The application lists the available tenants.
3.Double-click the name of a tenant to open the Tenant workspace for that tenant.
4.In the Login Url field, enter the URL where mobile users go to log in.
5.Click Save.
6.In the Neurons for ITSM Mobile Client app, enter the URL, including the hostname or FQDN, as configured in the Neurons for ITSM Configuration Database. For example, enter http://FQDN/HEAT.
If you are using SSL in your environment, you also need to do the following:
1. Open the \AppServer\Web.config file with a text editor.
2.Go to:
<webHttpBinding>
<binding name="WebHttpBufferedBinding"...>
<security mode="None" />.
</binding>
3.Change the security mode from None to Transport.
4.Save the file.
5. Perform a Microsoft IIS reset.