Adding Multiple Actions to an Action
By default, an action is created with one action. But sometimes you might want to create a more complex action that involves multiple actions.
Adding Multiple Actions in the Classic Action Designer
1.From the Configuration Console, click Build > Automation Tools > Quick Actions to open the Actions Manager workspace. The list of business objects that have actions appears.
2.Click Add/Edit to see the actions for the business object. The application displays the Action Designer selection popup.
3.Select Classic Action Designer
4.Select the Your Actions tab to view a list of actions.
5.Select an action from the list. The Action Configuration interface appears.
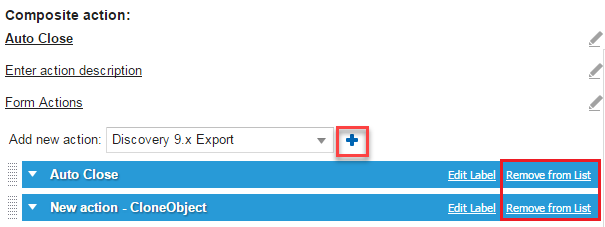
Action Configuration - Append Action

6.From the button area, click Append action, then choose the action type from the drop-down list. Fields associated with the action type appear in the configuration area. The Add new action drop-down list appears.
7.Enter data and configure in the new action fields as required.
8.To add more new actions, click the add icon  then enter data in the fields as required.
Composite Action
9.After you have added all actions and fields, click Save.
To remove an action from the list, click Remove from List on the right side of the action.
Adding Multiple Actions in the Graphical Action Designer
1.From the Configuration Console, click Build > Automation Tools > Quick Actions to open the Actions Manager workspace. The list of business objects that have actions appears.
2.Click Add/Edit to see the actions for the business object. The application displays the Action Designer selection popup.
3.Select Graphical Action Designer.
4.Select the action from the Your Actions list. The action block (or blocks if it is a composite action) are displayed on the Design Area.
5.Select an action from the New Actions list and drag it onto the Design Area.
6.Select the action you want to link to the new action, hover the mouse pointer over the Link icon  , and then drag the link to the new action. A link is displayed linking the two actions.
Links are added in the desired order of workflow as shown by the arrow on the link. For example, in the diagram below the Update a record action runs, followed by the Send an email action.

7.Enter data and configure the new action fields as required.
8.To add more actions, select them one at a time from the New Actions list, and then drag and drop onto the Design Area.
9.After you have added, linked and configured all of the required new actions and fields, click Save.
To delete a link, select it and click Remove Link  .
.
To remove an action from the Design Area, select it and click Delete Action Block  . This also deletes any links from/to the action block.