Example: Using the Clone Object Action
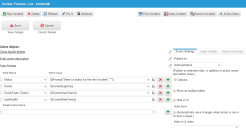
You can use the Clone Object action to copy and overwrite the specified fields from a business object record. You can set up the action to only overwrite certain fields on a business object record, as shown in the following example of the Clone Object action in the Incident workspace.
See Clone Object Action.
1.From the Configuration Console, click Build > Automation Tools > Quick Actions to open the Actions Manager workspace. The list of business objects that have actions appears.
2.Click Add/Edit for the Incident business object. The Actions Center appears.
3.Click the Create New Actions tab.
4.Select Clone Object from the list of options.
5.Enter override information into the fields.
Clone Object Action
| Field | Description |
|---|---|
| Set Action Name | A name for this action, such as Clone Action. |
| Assign a Category | The category. Select from the drop-down menu. |
| Publish to | The roles that need access to this action. |
6.From the Field Name drop-down list, choose Status, then from the Field Value drop-down list, select a value or enter an expression that prompts the user to select a status for the copied incident, such as $(Prompt("Select a status for the new incident", "")).
7.Click the add icon  to add a row.
8.From the Field Name drop-down list, choose Owner. This makes the default owner the user who is cloning the incident. For the corresponding value, enter $(CurrentLoginId()).
9.Click the add icon  to add a row.
10.From the Field Name drop-down list, choose Owner Team (Team). This makes the default team the team of the user. For the corresponding value, enter $(CurrentUserTeam()).
11.If you do not want values from fields such as Cost and Total Time Spent copied, select the fields from the Field Value section and enter 0 for the corresponding field values.
12.Click the add icon  to add a row.
13.From the Field Name drop-down list, choose LastModBy to update the modified date. For the corresponding value, enter $(CurrentDateTime()).
14.Click Save.
