Using Blocks in the Self Service Mobile Portal
You can use the blocks in the Self Service Mobile portal and also customize them by adjusting its size to suit your need.
Adding a Block
1.Log in to the Self Service Mobile portal. See Accessing the Self Service Mobile Portal.
2.From the Home page, click the gear icon  .
.
3.Click Parts to view the list of block templates.
4.Drag a block template from the list to the home page.
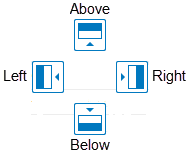
5.Position the template relative to an existing block using the placement tool.
Placing a Block on the Self Service Mobile User Interface Home Page
Resizing a Block
You can resize any block in the Home page of the Self Service Mobile portal. When you change the size of a block, the application adjusts the sizes of other blocks, in an attempt to keep all blocks visible in the Home page.
Adjusting the Height of a Block
1.Log in to the Self Service Mobile portal. See Accessing the Self Service Mobile Portal.
2.From the Home page, click the gear icon .
3.Click Preview.
4.Position your cursor at the bottom of the block to resize. The cursor changes to a double-arrow  .
.
5.Click the mouse. The cursor changes to a pointer.
6.Drag the bottom of the banner up or down.
Adjusting the Width of a Block
1.Log in to the Self Service Mobile portal. See Accessing the Self Service Mobile Portal.
2.From the Home page, click the gear icon .
3.Click Preview.
4.Position your cursor at the right edge of the block to resize. The cursor changes to a double-arrow  .
.
5.Click the mouse. The cursor changes to a pointer.
6.Drag the right edge of the banner left or right.
Editing Blocks
1.Log in to the Self Service Mobile portal. See Accessing the Self Service Mobile Portal.
2.From the Home page, click the gear icon .
3.Click Preview.
4.Click the Settings icon  of the block to edit.
5.Make necessary changes.
6.Click Save.