Knowledge Feedback
The Feedback tab appears within a knowledge record and lets you see what feedback users have provided as well as enter your own feedback items.
Viewing Feedback Entries
1.Log in to the Service Desk console.
2.Open the Knowledge workspace.
3.Open a knowledge record.
4.Select the Feedback tab. The list of feedback items is displayed (if any).
Creating a Feedback Entry
1.Log into the Service Desk console.
2.Open the Knowledge workspace.
3.Open a knowledge record.
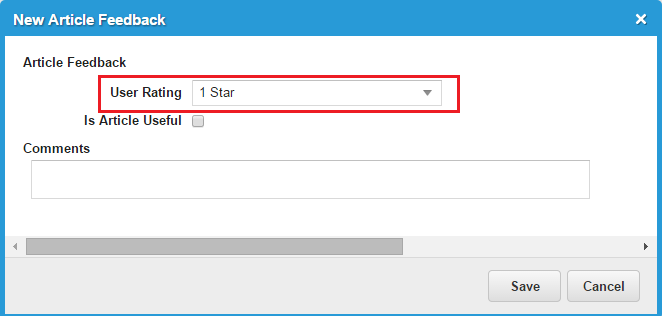
4.From the Feedback tab, click New Article Feedback. The New Article Feedback window opens.
5.Enter information into the fields.
| Field | Description |
|---|---|
| User Rating | The user rating. One star is not very useful, while five stars is extremely useful. Select from the drop-down list. |
| Is Article Useful | Asks if the article was useful. This value is not related to the User Rating field. |
| Comments | Explanation of why you chose a specific user rating. |
6.Click Save. The feedback item on the list is displayed.
Modifying a Feedback Entry
1.Log in to the Service Desk console.
2.Open the Knowledge workspace.
3.Open a knowledge record.
4.Click the Feedback tab.
5.Open the feedback entry to modify. The Edit Article Feedback window opens.
6.Edit the information.
7.Click Save.
Deleting a Feedback Entry
1. Log in to the Service Desk console.
2.Open the Knowledge workspace.
3.Open a knowledge record.
4.Click the Feedback tab.
5.Highlight the feedback entry to delete.
6.Click the delete icon  .
.
Configuring Feedback Options
•Enabling the Feedback Button for Non-Self-Service Roles
•Disabling the Ability for Self Service Users to Leave Feedback
•Changing the Default Values for Article Ratings
•Executing a Quick Action When Users Leave Feedback
Enabling the Feedback Button for Non-Self-Service Roles
To enable a Provide Feedback button to display when browsing articles from a non-Self Service role such as for a Service Desk Analyst, edit the layout for the Incident business object. This allows you to provide feedback for knowledge articles without using the Self Service role. The following example uses the Service Desk Analyst incident layout since it is often assigned to a number of roles. However, you can edit any layout to enable and display the button.
1.From the Configuration console, click Settings > Build > Business Objects to open the Business Objects workspace.
2.Open the Incident business object.
3.Click the Layouts tab.
4.Open a layout, such as IncidentLayout.ServiceDesk, for editing.
5.Scroll to the Views in this layout section and click formView.
6.If not already there, click Switch to old view.
7.Check Enable Matching panel.
8.Click Edit Matching Settings.
9.Check Provide feedback for knowledge article.
10.Click Save to return to the layout.
Disabling the Ability for Self Service Users to Leave Feedback
You can configure the system so that users in the Self-Service Portal can read knowledge articles but cannot provide feedback.
1.From the Configuration console, click Build > Page Layouts to open the Page Layouts workspace.
2.Under Roles, click SelfService. The page layouts available for Self Service users are displayed on the right.
3.For the page layout called Knowledge Center, click Advanced Options.
4. Uncheck Option to provide feedback.
5.Click Save. Users in the Self-Service Portal cannot provide feedback on knowledge articles.
Changing the Default Values for Article Ratings
You can change the default number of stars that are shown when a user provides feedback to an article. The default is 1 star, but you can change it to another number of stars.
Default Feedback Rating
1.From the Configuration console, click Build > Business Objects to open the Business Objects workspace.
2.Open the business object called KMFeedback.ArticleFeedback.
3.Click the Business Rules tab.
4.Click Initialization Rules to display all of the initialization rules.
5.Click the edit icon  next to the rule called Initialization Rule for KMFeedback#ArticleFeedback.UserRating (Default).
The Edit Initialization Rule window opens.
6.In the Expression Editor field, enter the new default value. To make the default value null, disable this rule.
Default Article Rating
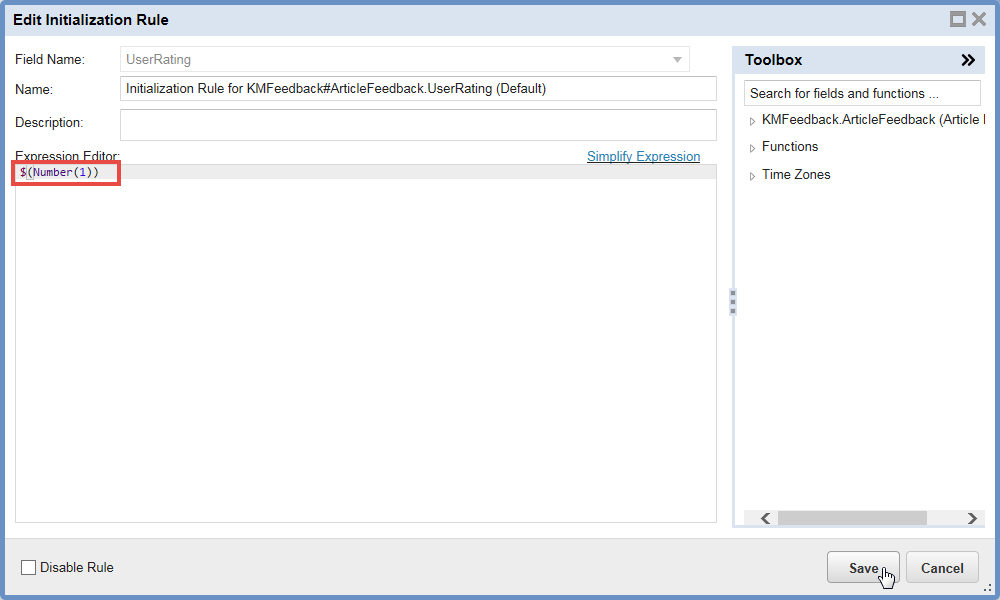
7.Click Save to save the initialization rule.
Executing a Quick Action When Users Leave Feedback
You can create a quick action to do any action, such as creating an incident, creating an assignment, sending a notification, and so on, but the quick actions configured here are all related to the Knowledge business object. You can also use an existing quick action instead of creating a new one.
To create the quick action:
1.From the Configuration console, click Build > Automation Tools > Quick Actions to open the Actions Manager workspace.
2.Scroll to the FRS_Knowledge item and click Add/Edit.
3.Click the Create New Actions tab.
4.Click Insert Child Object.
5.In the Child Object field, select IncidentAssocFRS_Knowledge.
6.Enter field names and associated field values, depending on what you want the quick action to do.
7.Click Save.
To specify the quick action to use:
1.From the Configuration console, click Build > Page Layouts to open the Page Layouts workspace.
2.Under Roles, click SelfService. The page layouts available for Self Service users are displayed on the right.
3.For the page layout called Knowledge Center, click Advanced Options.
4.Check Execute action when creating feedback. The Action Menu is displayed.
5.Click No Category and select Create Assignment.
6.Click Save.