Using the Status Mapping Tab
The Status Mapping tab only appears if you select Incident from the Email Processor field.
Use status mapping to execute a Quick Action for a specified Incident record status. The Quick Action executes only once if a given status is set at the time an email is received by the system, and Incident is linked to the email inbox (the incoming email is the trigger for the Quick Action).
1.After performing the tasks in Creating an Inbox, select the Status Mapping tab.
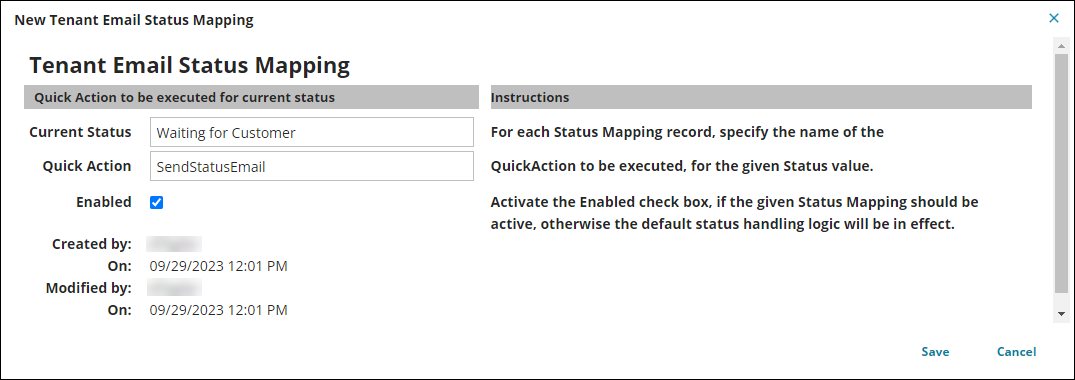
2.Select New Tenant Email Status Mapping. The Tenant Email Status Mapping configuration form opens.
3.Enter the required information.
| Field | Description |
|---|---|
| Current Status | The current status for which the Quick Action is performed. This is the status that appears in the Status field of an Incident record, for example Active. The entry in this field must be a valid status for Incident. |
| Quick Action | The name of the Quick Action that executes when the status you entered above is the current status of the Incident. If the Quick Action you want to perform does not exist, you can create a new Quick Action, see Using Quick Actions. |
| Enabled | Enables this status mapping record. If not checked, the default status handling logic is in effect. |
4.Select Save.
Alternatively, you can configure an advanced email monitor to achieve the same result as status mapping. Using an advanced email monitor offers more flexibility and options than staus mapping. See About Advanced Email Monitoring
Example
In this example the status mapping is configured to perform a Quick Action (SendStatusEmail) to send an email when the system receives an incoming email, and the current status of an Incident record is Waiting for Customer. For example, send an email to the customer to inform them that they need to respond to the Incident.
-
Select the Status Mapping tab.
-
Select New Tenant Email Status Mapping.
-
Enter Waiting for Customer in the Current Status field.
-
Enter SendStatusEmail in the Quick Action field.
-
Select Enabled.
-
Click Save.
The Quick Action must be configured to send the email to the relevant recipients, and the message body you want to include. You can create a Quick Action to do this, see Using Quick Actions.
