Example: Creating and Updating a Record using Go To Record Quick Action with Webhook Values (GAD)
This example shows you how to do the following tasks using the Go to Record Quick Action using webhook-supplied values:
•When using Go to Record, when the record that we want to go to does not exist, this example shows you how to create a new record with the information provided in the Go to Record Quick Action.
•Shows that the new record gets the focus by updating a value in the record using the Update a Record Quick Action.
•How to supply all the values for Go to Record, creating the record, and Update a Record using a webhook.
The webhook values are stored in the Update Variables And Stored Values Quick Action for use in the actions. The Postman application is used as the REST-API client when sending the webhook POST request to the Execute endpoint.
Prerequisites
To use the Go to Record Quick Actions, set the global constant EnableActionService to True.
This example assumes you have administrator-level access to the Configuration console and are familiar with creating business objects and Quick Actions.
Three sets of tasks have to be completed before you can send an Execute request to webhooks in ITSM:
1.Create a Composite Action with the actions Update Variables And Stored Values, Go to Record, and Update a Record in an existing business object (we used the Project business object in this instance).
2.Create a webhook referring to the Composite Action created above.
3.Create an API Key to use as Authorization in the Execute POST request.
1.Log in to ITSM as an Administrator.
2.Go to the Configuration Console > Build >Business Objects > Project > Quick Actions > Graphical Action Designer.
3.Under Advanced Actions, find the Update Variables and Stored Values Quick Action and then drag the block on to the Designer Board.
4.In the Common Settings tab, enter a name in the Name field, for example, CreateAndUpdatewithGTRWithWHValues. This is the name for the whole set of actions.
5.Select Auto-save.
Auto-save preserves any changes made up to that point if a problem occurs when using a Composite Action.
6.In the Block Settings tab, click Editor. Select or enter the following values:
| Field | Parameter |
|---|---|
| Variable Type | Variable |
| Variable Name | WebhookBody |
| Data Type | JSON or XML |
|
Value (JSON) Value (XML) |
{} <xml></xml> |

7.Click Ok at the bottom of the screen.
8.Under Record Actions, find the Go to Record Quick Action and then drag and drop the block on to the Designer Board.
9.Link the Go to Record block to the Update Variables and Stored Values block so that the latter is the second block in the chain.
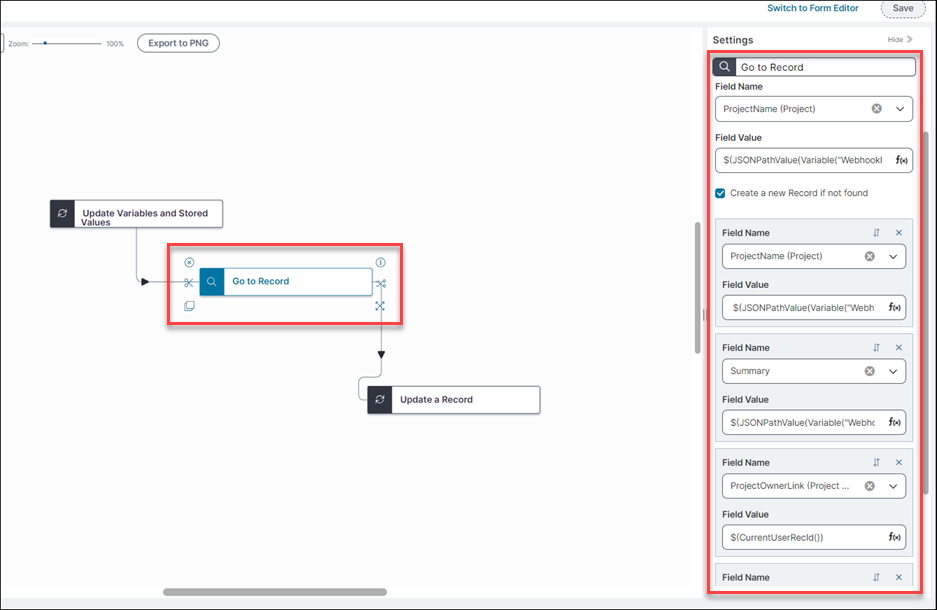
10.In the Block tab of Go to Record, the Business Object field is prepopulated with the current business object name and cannot be edited.
11.Complete the fields as follows:
| Field | Parameter |
|---|---|
| Field Name | ProjectName |
|
Field Value (JSON) Field Value (XML) |
$(JSONPathValue(Variable("WebhookBody"), "$.gotonamevalue")) $(XPathValue(Variable(“WebhookBody”), "gotonamevalue")) |
| Create a new Record if not found | Selected |
12.Enter values as per below for populating the new record on creation. Use + Add Field to add more field-value pairs as needed.
| Field | Parameter |
|---|---|
| Field Name | ProjectName (Project) |
|
Field Value (JSON) Field Value (XML) |
$(JSONPathValue(Variable("WebhookBody"), "$.gotonamevalue")) $(XPathValue(Variable(“WebhookBody”), "gotonamevalue")) |
| Field | Parameter |
|---|---|
| Field Name | Summary |
|
Field Value (JSON) Field Value (XML) |
$(JSONPathValue(Variable("WebhookBody"), "$.summary")) $(XPathValue(Variable(“WebhookBody”), "summary")) |
| Field | Parameter |
|---|---|
| Field Name | ProjectOwnerLink (Project Owner) |
|
Field Value |
$(CurrentUserRecId()) |
| Field | Parameter |
|---|---|
| Field Name | ProjectStartDate (Start Date) |
|
Field Value |
$(CurrentDateTime() |
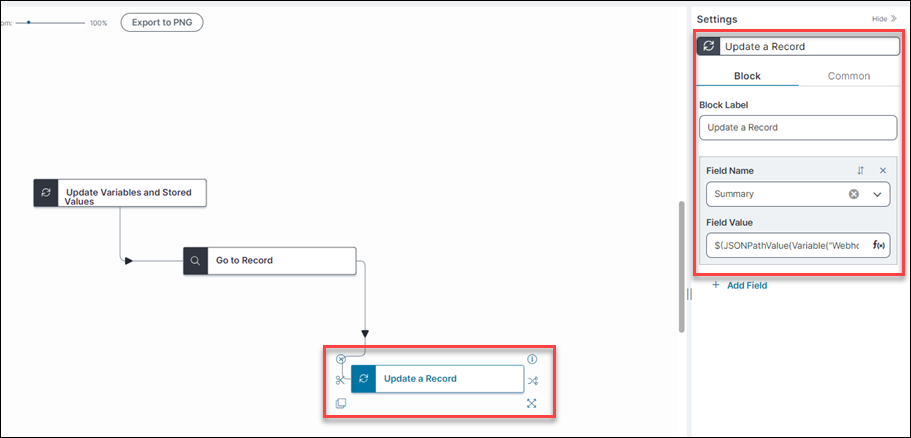
13.Under Record Actions, find the Update a Record Quick Action and then drag and drop the block on to the Designer Board.
14.Link it to the Go to Record block so that it is third in line to be run in the composite action.
15.In the Block tab of Update a Record, select or enter values as per below:
| Field | Parameter |
|---|---|
| Field Name | Summary |
|
Field Value (JSON) Field Value (XML) |
$(JSONPathValue(Variable("WebhookBody"), "$.secondsummary")) $(XPathValue(Variable(“WebhookBody”), "secondsummary")) |
16.Click Save.
1.Log in to ITSM as an Administrator.
2.Go to the Configuration Console > Build >Webhooks Manager.
3.Click + Add a New Webhook.
4.Populate the fields as follows:
| Field | Parameter |
|---|---|
| Name | CreateAndUpdatewithGTRWithWHValues |
|
Endpoint Extension |
webH2 |
|
Status |
Enabled |
|
Business Object |
Project (Frs_Project) |
|
Action |
CreateAndUpdatewithGTRWithWHValues (choose the Composite Action you just created from the list) |
5.Click Save.
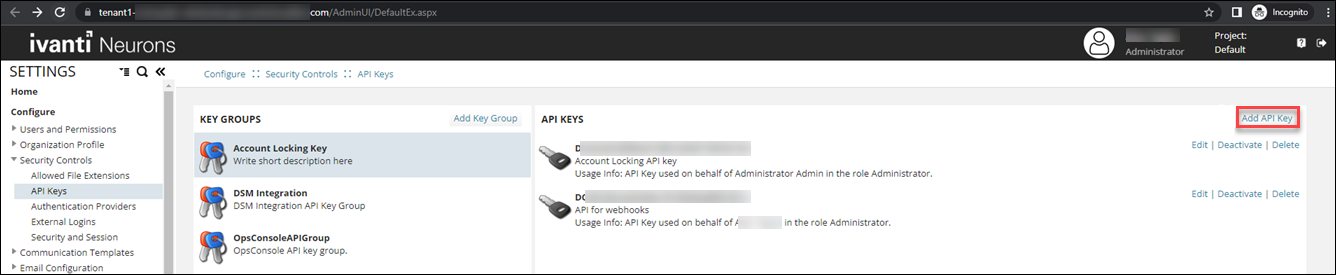
1.Log in to ITSM as an Administrator.
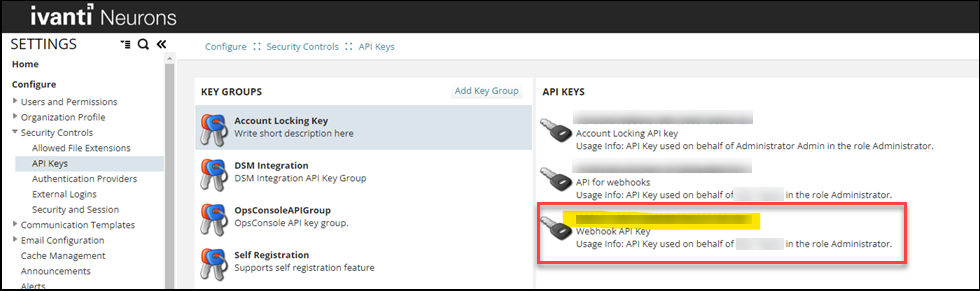
2.Go to the Configuration Console > Configure>Security Controls > API Keys.
3.Click Add API Key within one of the Key Groups to create a new API Key for webhooks
4.Enter values for the fields as follows:
| Field | Parameter |
|---|---|
| Description | Webhook API Key |
| On Behalf Of | Your User Name |
| In Role | Administrator |
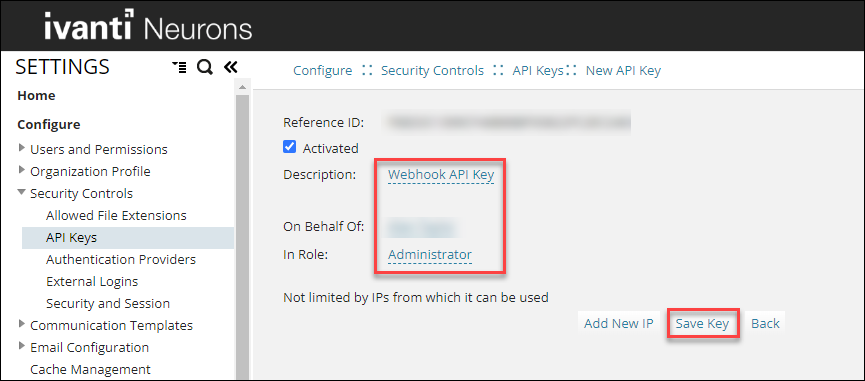
5.Click Save Key.
6.Click Back to go to the API Keys list page.
7.Make a note of your API Key. This is used as the Authorization value in the Execute POST request
Executing the Webhook and Composite Action
Once all the prerequistes have been completed you can now execute the webhook and Composite Action.
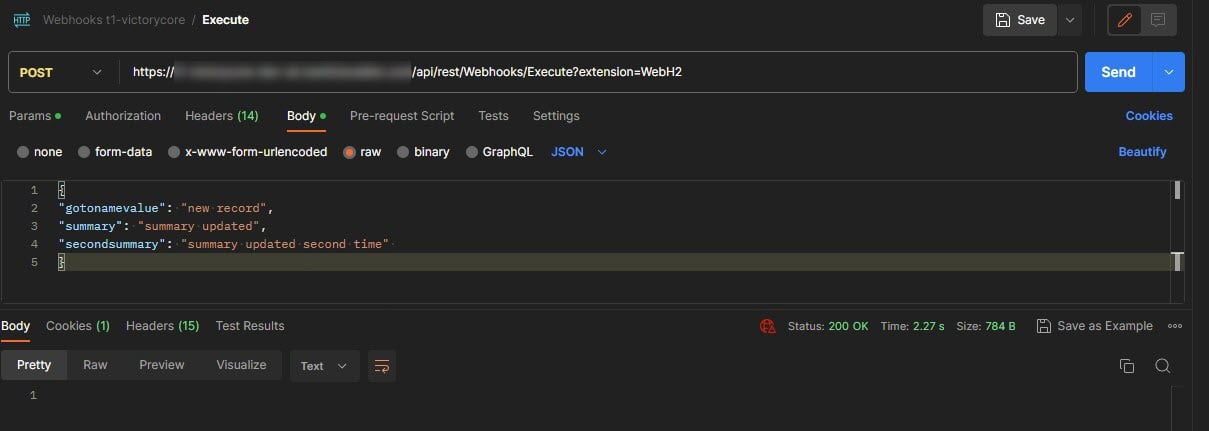
1.Open Postman or a similar application that can send HTTP requests.
2.Create a POST request for the Execute Endpoint by providing a URL with EndpointExtension, an Authorization header and a JSON/XML body as per below.
•In the POST request header, add your previously noted API Key as shown in the image.
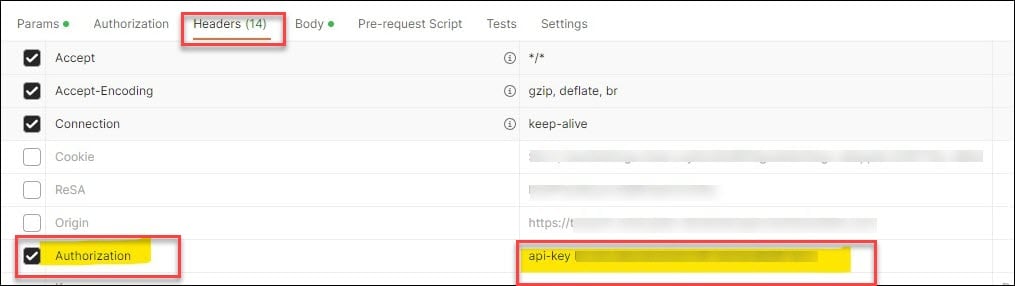
•Add the case sensitive Endpoint Extension on to the end of the POST URL: https://[your server]/api/rest/Webhooks/Execute?extension=WebH2. The POST URL is shown when creating the webhook.
•In the JSON Body, send the values to be used by the Quick Action variable:
For example:
{
"gotonamevalue": "new record",
"summary": "summary updated",
"secondsummary": "summary updated second time"
}
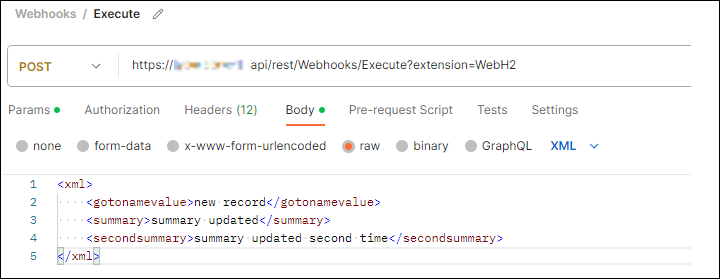
XML:
<xml>
<gotonamevalue>new record</gotonamevalue>
<summary>summary updated</summary>
<secondsummary>summary updated second time</secondsummary>
</xml>
There should not be an existing record with the same value as the gotonamevalue in the Project workspace, Name column.
3.Click Send.
4.Verify that you received a Status 200 OK for a successful response in Postman.
5.In ITSM, open the Project workspace and check if a new record has been created using the fields and values in the Create a new Record section of the Go to Record action in step 12.
•A new record with the webhook values sent via Postman should have been created with Name =new record.
•The Summary of the record with the Name (gotonamevalue provided in the JSON/XML body) has been updated with the secondsummary value provided in the JSON/XML body (see step 2 in this section).
•The Summary value for the new record has the value provided for the secondsummary field.
The Go to Record Quick Action creates a new record with the values from the webhook and GOES to that record. The Update a Record Quick Action then uses the value from the webhook secondsummary (see step 15) and updates the Summary value of the record.
