HR Case
Employee grievances such as payroll mismatch, missing swipe data or bad workplace, and requests such as employee address change, or employee separation, are recorded as HR cases . The Service Requests raised by Self Service users are logged as HR cases, an HR Administrator or HR Manager assigns case owners who are responsible to resolve and close these cases.
Apart from Self Service users, HR Cases can also be created by users with HR roles.
If you get an error when creating an HR Case, it is most likely due to the Security Operations package that is applied which deletes the Work Order and HR Case Business Objects for My Items' Configuration in the Configuration console.
Reach out to your organization's administrator to fix this issue.
For more information, see Adding Customized Business Objects.
1.From the workspace menu, click HR Case.
2.Click the drop-down arrow from the New button and select a template that matches the case.
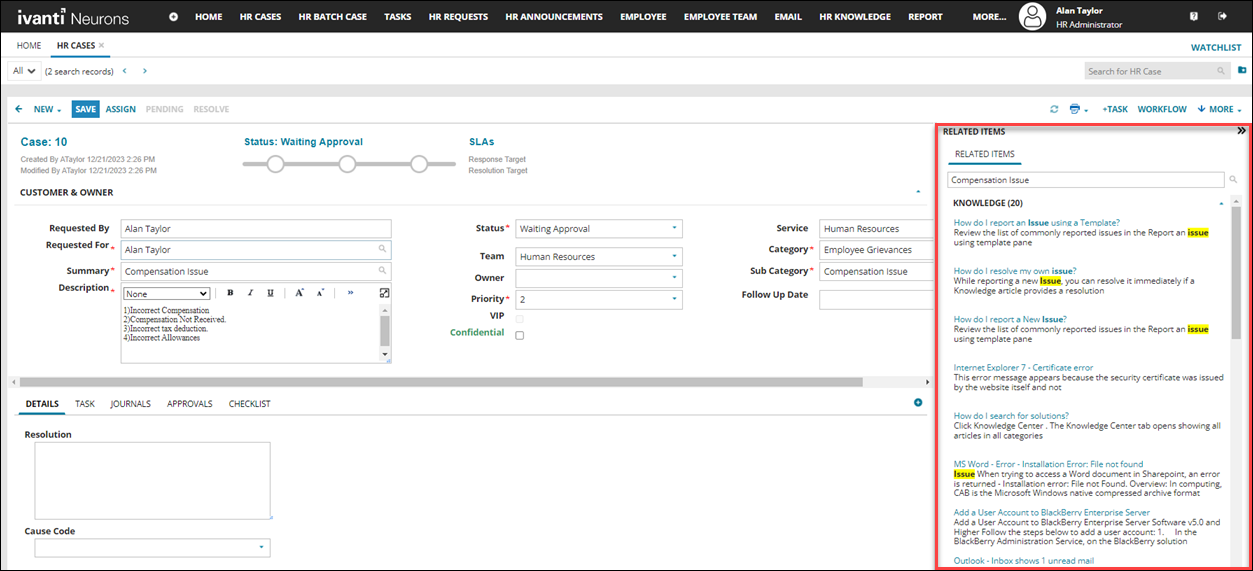
On selecting a template (example: Compensation Issue), the Related Items pane appears showing any related Knowledge Articles or HR Cases. This enables you to avoid duplication of cases and access information to help you solve the case.
3.If no template matches your case, then click the New button to create a fresh case.
| a. | If you create a fresh case - fill out the information in the fields as required. |
| b. | If you select a template - most of the fields are pre-filled, but you still need to fill out the missing information and edit the case as required. |
4.In the Requested for field, enter the employee name you are logging the case for.
5.Fill out other required information and click Save.
The HR Manager analyzes the case and then assigns it to a team member.
1.From the workspace menu, click HR Case.
2.Open a case that does not have an owner assigned.
3.Select a case owner in the Owner field.
4.Add a task to the case if required.
The case owner will be responsible for resolving and closing the case.
Case owners analyze the cases they are assigned to and take necessary action to resolve and close them. In this process, they add tasks to be completed by HR department or other department and any other action as required.
1.From the workspace menu, click HR Case.
2.Open a case from the list.
3.Assign a case to yourself.
•Open a case you wish to assign to you and click Assign from the menu.
4.Add a Task to the case.
| a. | Click the New Task button to add a new task to the case. |
| b. | Enter the Summary, Details, and select the Team. |
| c. | Set the Priority based on the urgency. |
| d. | Click Add to add notes or comments. |
| e. | Click Save. |
5.Take appropriate action for a task.
Several actions can be taken for tasks added to a case. You can:
•Re-assign a task.
• Accept, reject, cancel, or delete a task.
•Put a task on-hold.
•Complete a task.
For information on performing these actions, see Task.
6.Resolve the case.
When all the tasks are completed, you as a case owner can change the task's Status to Resolved.
| a. | From the menu, click Resolve or from the Status field, select Resolved |
| b. | Enter the Resolution and select the Cause Code. |
| c. | Click Save. |
7.Close the case.
When all the tasks are completed and the grievance or request is resolved, the case owner or HR Manager closes the case.
| a. | From the menu, click Close or from the Status field, select Closed. |
| b. | Click Save. |
Note that once a case is closed, no further changes can be made to the case.
If the logged case does not belong to the HR department, you can transfer the case to IT Incident.
1.Open the case.
2.Click More > Transfer Case to Incident > Transfer Case to IT Incident.
3.Enter the details in the Owner Team and Team fields.
4.Click Ok.
The HR Case is canceled and is logged as an incident, the assigned team and owner get notified. A record of this case being transferred to IT Incident is also created in the Incident tab of the HR Case.
This tab is available only when you select the Confidential check box.
You can limit access to the HR Case to selected users by adding Confidential Participants.
To add Confidential Participants:
1.Click Link and select the user to whom to wish to give access to the HR Case.
2.Press the SHIFT key to select multiple users.
3.Click Select.
The selected users are added to the Confidential Participants list and only they will have access to the HR Case.
To remove a Confidential Participant:
1. Select the user whom you wish to deny access to the HR Case.
2.Click Unlink.
The selected user is removed from the Confidential Participants list and will not have access to the HR Case.
VIP cases will be flagged red to draw attention so that it can be given a higher priority to resolve.
VIP cases are those that are logged by employees or on-behalf of employees who are tagged as VIP in the employee database.
