Configuring Trusted Agent for LDAP Connections
Configure and synchronize employee profiles from your LDAP Active Directory server to Neurons for ITSM.
1.Log in to Neurons for ITSM as Administrator.
2.Open the Configuration console.
3.Select Build > Global Constants to open the Global Constants list.
4.Locate EnableTrustedAgent in the list, and in the Value column, set the value to True.
5.Click Save.
The global constant is now enabled for Trusted Agent.
In the current version of Neurons for ITSM, you can add only one Trusted Agent connection.
1.In the Configuration console, select Extend > Integration Tools > Trusted Agent Connections.
The Trusted Agent for LDAP Connections form is displayed. You configure a new connection or edit an existing connection using this form.
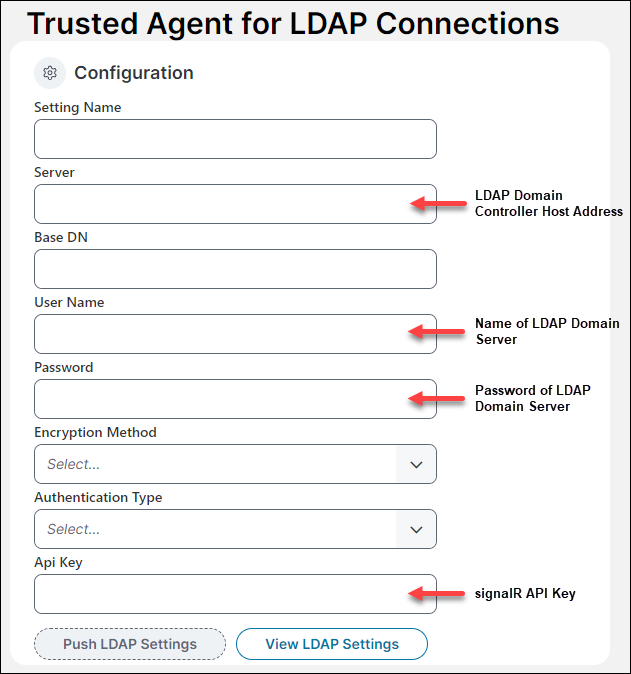
2.Enter the connection settings in the Configuration section of the Trusted Agent for LDAP Connections form.
| Field | Description |
|---|---|
|
Setting Name |
A unique name for this LDAP server connection. |
|
Server |
The LDAP domain controller host IP address. |
|
Base DN |
Optional. The distinguished name for the LDAP object in the LDAP server. This value is not case sensitive. |
|
User Name |
If the server requires authentication, enter the LDAP domain server name. |
|
Password |
If the server requires authentication, enter the LDAP domain server password. |
| Encryption Method |
Select an encryption method: •No encryption •Use SSL encryption (ldaps://) •Use StartTLS extension |
| Authentication Type |
Select an authentication type: •For No encryption method, select Ntlm. •For SSL or TLS method, select Simple (Basic) authentication. |
|
Api Key |
Optional: The SignalR API key required to enable external authentication. The SignalR API key is required if you want to enable users to login externally, if you do not want to enable external authentication this key is not required. For information on SignalR, see https://learn.microsoft.com/en-us/aspnet/signalr/overview/getting-started/introduction-to-signalr. To generate the API key, see step 3 below. Paste the generated API key into this field. When the key is provided, and the LDAP settings are pushed successfully, the Enable Authentication switch is displayed.
This switch can be toggled ON after the Trusted Agent is installed. If you toggle the switch ON before the Trusted Agent is installed a warning is displayed. See Enable External Authentication. |
Trusted Agent LDAP Connection Form
3.Optional: Generate a SignalR API Key to enable external authentication:
This step is only required if you want to enable external authentication. For information on SignalR, see https://learn.microsoft.com/en-us/aspnet/signalr/overview/getting-started/introduction-to-signalr.
In the Configuration Console, select Security Controls > API Keys.
In the API Keys workspace, select Add Key Group.
In the Name field, enter Signalr, and then enter a brief description in the Description field.
Click Save Key Group.
Select the Signalr group in the Key Groups list.
In the API Keys pane, select Add API Key.
Select the Activated checkbox if not already selected.
Enter a description, on behalf of, and role information if required.
Click Save Key.
Copy the generated API key identifier to the clipboard.
Return to the Trusted Agent for LDAP Connections form, and then paste the key into the Api Key field.
4.Click Push LDAP Settings.
While the LDAP settings for the Trusted Agent are being processed, the Status is displayed as Pending.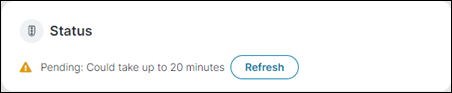
The Push LDAP Settings button changes to Update LDAP Settings, and is disabled while the settings are being processed.
The LDAP settings push can take up to 20 minutes to complete. Click Refresh to check if the push has completed. When completed successfully, the Status is displayed as Success. A pop-up message is also displayed.

Occasionally the status may revert to Pending. If this happens, push the LDAP settings again by clicking Update LDAP Settings, and then click Refresh. The status changes to Success.
If the push fails, a Failed pop-up message is displayed.

If a failed push occurs, check your settings are correct, and then:
•Push the settings again.
•If the push still fails, refresh the page in the browser, and push the settings again.
When processing is complete, an enrollment key, comprising of the tenant ID and activation key, is displayed in the Enrollment Key field.
5.Under the Download URL for Installer (Windows) section, click Download to download the installer files.
Copy the IvantiCloudAgent.exe and IvantiCloudAgent.exe.options files to the server on the private network where Trusted Agent is to be installed.
System Specification: The minimum requirement for the Trusted Agent engine is 16GB RAM.
The IvantiCloudAgent.exe file is installed on the same network as the private resource to which it connects. The IvantiCloudAgent.exe.options file contains the tenant ID and activation key, which together make up the enrollment key.
These files are required on the server in your private network where you intend to install Trusted Agent.
1.Open fixed port 8883 from the Trusted Agent machine for Message Queuing Telemetry Transport (MQTT) connection.
2.Use the Test-NetConnection PowerShell command to test the connection, for example:
Test-NetConnection -ComputerName <target computer name> -Port 8883 -InformationLevel "Detailed">
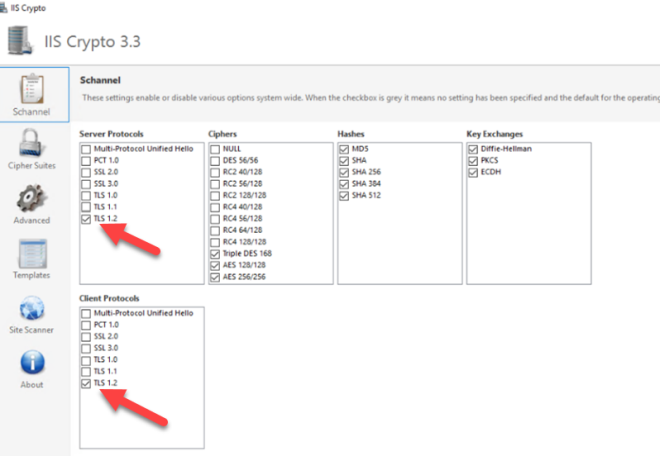
3.Open IIS Crypto (if installed) and enable TLS 1.2 for the Server and Client.
4.Open the IvantiCloudAgent.exe installer file using "Run as Administrator" on the private network server.
The registration dialog opens.
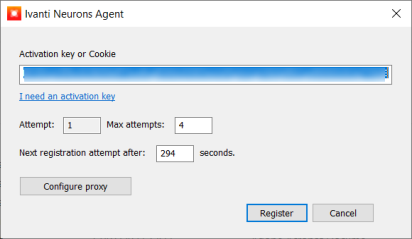
The Activation key field is automatically populated with the activation key.
5.Click Register.
6.Open a command line interface and check-in the policy.
Ensure you are in directory C:\Program Files\Ivanti\Ivanti Cloud Agent
Enter the following command .\STAgentCtl.exe update --checkin
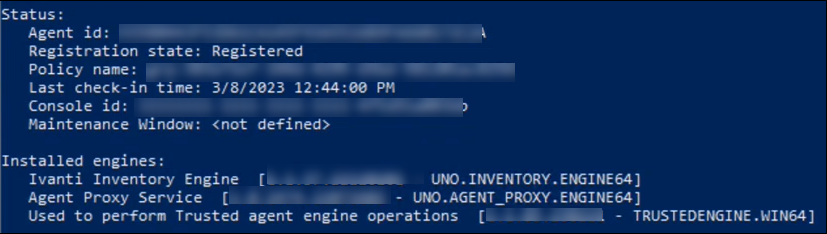
When check-in is complete, enter the following command to check the status .\STAgentCtl.exe status
7.Check the status shown on the command line interface. Once the registration state is "Registered", and all engines are installed (as shown below), you can move on to Connect Trusted Agent to the Directory Server and Test the Connection, and then Configure Root Nodes, Save and Synchronize Directory Information and Enable External Authentication.
You may need to wait up to 10 minutes for the engines to be installed. You can continue to wait, or run the .\STAgentCtl.exe status command again to recheck.
Prior to testing the connection, ensure that the Agent Status is displayed as "Success" on the Trusted Agent Connection page, and that Trusted Agent is installed successfully on the machine in the private network.
1.In the Configuration console, select Extend > Integration Tools > LDAP Settings.
The LDAP Settings list is displayed.
2.Click Add New.
The Connect to Directory form is opens.

3.Select Use Trusted Agent.
Provided the Trusted Agent is running, selecting this checkbox automatically populates the settings fields with the Trusted Agent connection settings.
For security reasons, the Password field displays "not set". The password is not shown.
4.Click Test Connection.
A message is displayed to inform you if the connection is successful or has failed. If an error is displayed, return to the connection settings to determine the error, edit and test again.
5.If successful, click Next.
When you click Next the Select Directory Info to Sync form is displayed. Use this form to select and add the root nodes to synchronize. See Configure Root Nodes, Save and Synchronize Directory Information and Enable External Authentication below.
If the connection test failed, you can find error information on the failed connection in Trusted Agent Monitoring. For more information, see Trusted Agent Monitoring and Logging.
When you have a successful connection, you need to select the directory root nodes (employees) to connect, save the LDAP settings, and then synchronize the settings to import their data.
Connecting the Root Nodes
1.Click Root DSE to expand the list.
2.Select the nodes you want to connect and synchronize.
3.Scroll down to the end of the page, click Add selected node as root, and then click Select sample entry.

4.Check at the top of the page if the selected nodes are displayed under Root LDAP node(s) and Sample LDAP entry to extract fields from.
5.Click Next to move to the Field Mapping form.
For this version, changes to field mapping are optional, you can skip the field mapping process if not required and move directly to completing the synchronization. If changes to the field mapping are required, see Mapping Fields.
6.Click Next, then click Next again to display the Completed form.
This form displays the Save and Synchronize Now functions.
Save and Synchronize the LDAP Settings
Save the LDAP settings before synchronizing them.
1.Click Save to save the LDAP settings.
2.Click OK in the LDAP Wizard message dialog.
3.Click Synchronize now.
The LDAP Sync dialog appears.
4.Click OK.
Once you have established the LDAP connection, and the connection is validated, you can use a workflow to schedule synchronization of the LDAP connection, and to notify users if the synchronization is started or has failed. See Example: Using a Workflow to Schedule LDAP Synchronization. You can also synchronize existing LDAP connections from the LDAP Settings list by selecting Sync Now in the Action column.
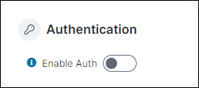
Enable External Authentication
If you configured an API key for the LDAP connection, toggle ON the Enable Auth switch in the Trusted Agent LDAP Connections form to enable external authentication for imported employees.
1.Open the Trusted Agent LDAP Connections form.
2.Toggle the Enable Auth switch ON.
A success message is displayed when external authentication is enabled for the connection.

You can return to the Trusted Agent LDAP Connections form at any time to disable or re-enable external authentication.
If the enable external authentication generates an error, check the following:
•Trusted Agent is installed, see Install Trusted Agent
•You have generated a SignalR API key.
•You have entered the correct API key (SignalR API key) in the Trusted Agent LDAP Connections form.
Check the LDAP Import Log
1.Select Extend > Integration Tools > LDAP Import Log.
2.Click Refresh to update the list and check that your LDAP import is logged.
This may take a few minutes to update if the LDAP import is queued. Click Refresh again to refresh the list.
View the Trusted Agent Monitoring logs if you want to verify the status of all the operations performed while setting up the Trusted Agent. See Trusted Agent Monitoring and Logging.
Verify Employee Import
You can verify all selected employees have been imported by the Trusted Agent connection to the Employee workspace.
1.From the Administrator dashboard, open the Employee workspace.
2.Check the list of employees and verify that the employees you imported are present in the list.
Use the Employee workspace search function to quickly locate each entry.
Verify External Authentication
If you have configured external authentication to enable external login for employees, check employee records to verify that their external login is enabled.
1.From the Administrator dashboard, open the Employee workspace.
2.Select an employee that you imported and open the Employee record.
3.Check the following:
•The Enable External Auth checkbox is checked.
•The employee user name and the Trusted Agent instance appears in the Login for External Auth entry.

4.Repeat step 2 and 3 above to verify additional records as required.
This feature enables you to verify and synchronize an existing Trusted Agent LDAP connection from the LDAP Settings list.
if you have made alterations to an existing Trusted Agent LDAP configuration, you can use the Verify Config option on the LDAP Settings page to validate the alterations made to the LDAP configuration.
When running Verify Config from the LDAP settings page, this prompts you to select the appropriate root node or directory within the configuration. This step is vital as it ensures that any changes made to the Trusted Agent LDAP configuration are saved, and accurately validated. By choosing the correct root node, you guarantee that your LDAP configuration remains consistent and functional.
This process also safeguards the integrity of workflows within the system. Ensuring that LDAP configuration changes are correctly validated helps prevent any disruptions or breakages in workflows that rely on LDAP data.
The Sync Now function for the Trusted Agent LDAP connection listed in the LDAP Settings page is disabled if the connection configuration settings are not verified.

To verify and synchronize existing Trusted Agent LDAP settings:
1.In the Configuration console, select Extend > Integration Tools > LDAP Settings.
The LDAP Settings list is displayed.
2.Select Verify Config for the LDAP connection.
The LDAP settings configuration opens.
3.Follow the configuration pages displayed, selecting Next to move through the process, ensuring the correct root nodes or directories are selected.
4.Save the LDAP configuration.
5.You can synchronize the LDAP connection in the settings page, or use the Sync Now function displayed in the LDAP Settings list.