Working with Read-Only and Required Business Rules
- Overriding Read-Only Business Rules
- Protecting the Read-Only Field From Override
- Overriding the Required Business Rule
- Working with Read-Only Business Rules
Overriding Read-Only Business Rules
- Overriding the Read-Only Business Rule from a Quick Action
- Overriding the Read-Only Business Rule from a Role Definition
-
Overriding the triggered Actions Business Rule for Locked Business Objects
When a field is applied with a read-only business-rule it becomes non-editable, but it retains its control type. Therefore, set fields as read-only (see Creating a Form), and remove the edit permission for the field from the Object Permission tab in the Roles and Permissions workspace.
Overriding the Read-Only Business Rule from a Quick Action
- From the Configuration Console, click Build > Business Objects to open the Business Objects workspace.
- Open a business object.
- Click Action Menu > Edit Actions to open the Quick Actions Center.
- Click the Create New Actions tab on the left.
- Choose Update Object.
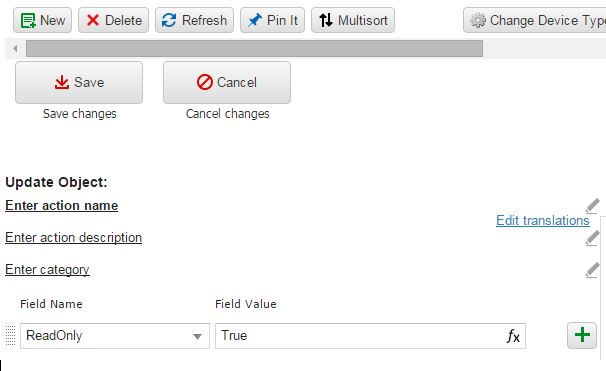
- In the Field Name field, choose ReadOnly from the drop-down list. In the Field Value field, enter true.
Update Object Quick Action - ReadOnly Field
- Enter information into the other fields as needed.
- Click Save.
Users can choose this quick action to apply to the read-only field on a specific business object record if the read-only field is set up for that business object.
Overriding the Read-Only Business Rule from a Role Definition
- From the Configuration Console, click Configure > Users and Permissions > Roles and Permissions to open the Roles and Permissions workspace.
- From the Role Name column, choose the role for which to modify the read-only rule. The Role Details page appears.
- Choose the Object Permissions tab.
- Find the business object to override for this role, then click Edit under the Lifecycle column.
- Under When Business Object is in Final State, check Allow Editing.
- Click Save.
Protecting the Read-Only Field From Override
Use a global constant to manage server-side validation of read-only fields. This ensures that fields set to read-only by a business rule only accept updates via business rules, preventing users from updating fields using Quick Actions, Templates, or Role Definitions without the approval of an Administrator. It also allows Administrators to control read-only access at the field level.
EnableServerSideValidationforReadOnlyFields
- This global constant is set to True by default for all new OOTB installations of ITSM. The global constant is set to False for updates to existing installations.
- When enabled, it allows server-side validation of the read-only field, configured at the field level.
- To enable the global constant when it is set to False, go to the Configuration Console and select Build > Global Constants. Find the EnableServerSideValidationforReadOnlyFields global constant and set the value to True.
Managing Server-Side Validation for Read-Only Fields
Server-side validation allows Administrators to lock a read-only field for users to prevent updates using Quick Actions, Role Definitions, or any other ITSM feature. Once the global constant is set to true, you can enable, configure, or disable it at the field level.
Verify that the field is not referenced or updated in any way other than business rules. Setting a referenced or continuously updated field to "Strict Read Only" will result in errors in workflows where it appears.
Configuring Strict Read-Only for a Field
The global constant, when set to True, allows Administrators to customize the way the read-only business rule is applied to the field.
- Open the read-only business rule.
- In the Read-Only Rule Editor, the box next to Strict Read-Only will be appear when the global constant is set to True. By default, it is not checked.
- If you want users to be able to modify the field using Quick Actions or other ITSM-provided features, leave the Strict Read-Only box unchecked.
- If you want to ensure that the field only updates via business rule, check the Strict Read-Only box.
- The Administrator has two options to choose from to describe the condition of the field:
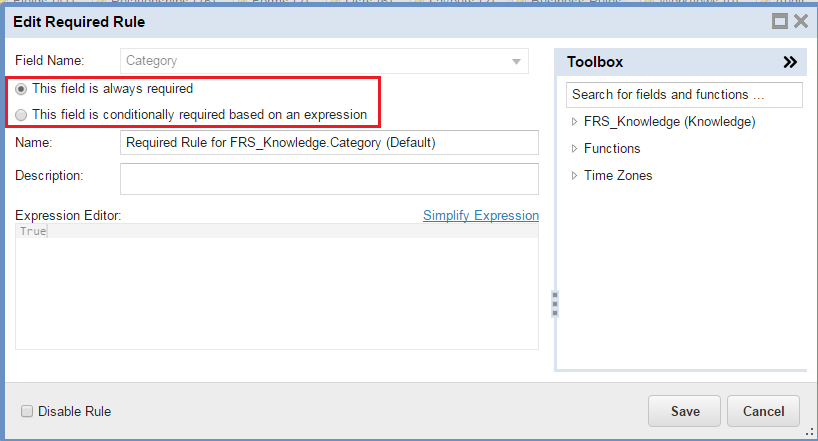
- This field is always read-only: This option enforces update only by business rule (Strict Read-Only).
- This field is conditionally read-only based on an expression: This option ensures the field is only updated based on an expression.
When a field is designated as "Strict Read-Only," users attempting to modify the read-only field receive an error message.
Uncheck the Strict Read-Only box to remove server-side validation from a field. To disable the Read-Only Business Rule for a field, check the Disable Rule box.
Overriding the Required Business Rule
- About Required Business Rules
- Setting a Field in a Business Rule to Required
- Setting a Form in a Business Rule to Required
- Overriding the Required Business Rule for a Form
- About Completely Overriding a Required Business Rule
- Required Business Rules Matrix
About Required Business Rules
You can specify that a business rule be required for a field. In this case, the application does not accept blank values in that field and you must enter something before the business rule can be saved. The fields in business objects that are created as a result of this required business rule are also subject to these rules.
Setting a Field in a Business Rule to Required
To specify that a field in a business rule be required, do one of the following:
- From the Configuration Console, click Build > Business Objects to open the Business Objects workspace.
- Open a business object.
- Click the Business Rules tab.
- Scroll to the Required Rules section.
- Click the edit icon
 for a business rule.
 - Do one of the following:
- Click Save.
Setting a Form in a Business Rule to Required
You can also specify that a business rule be required for all of the forms associated with a business object, including any that are created based on business rules or workflows.
- From the Configuration Console, click Build > Business Objects to open the Business Objects workspace.
- Open a business object.
- Click the Business Rules tab.
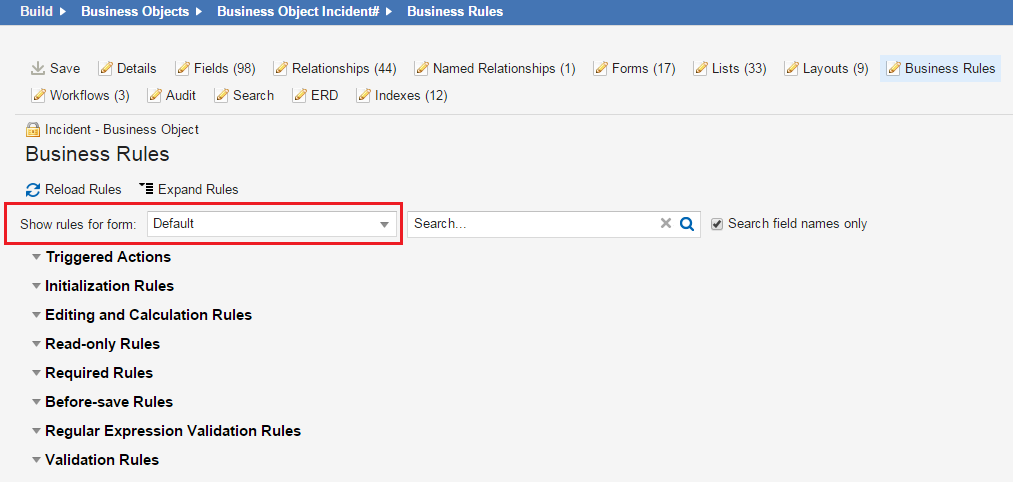
- For the Show rules for form field, select Default.
Required Business Rule
Overriding the Required Business Rule for a Form
You can override a business rule from being required for all forms. To make a business rule not required for a particular form, do the following:
- From the Configuration Console, click Build > Business Objects to open the Business Objects workspace.
- Open a business object.
- Click the Business Rules tab.
- For the Show rules for form field, select the form for which to override the rule. The application only displays the business rules that affect this form.
- Check Do not show any object-wide rules, show only form-specific ones.
- Click the Required Rules header to expand it.
- Open the business rule to modify.
- Select This field is conditionally required based on an expression and enter an expression.
- Click Save.
By overriding a required business rule for a form, you are using the Boolean OR operator.
About Completely Overriding a Required Business Rule
By default, if you override a business rule on a form, it is combined with the business object level rule. The resulting rule is of the form FormRule OR ObjectRule.
Check Complete Override to ignore any previous business rules and only use this business rule.
The following are examples:
- The Problem business object has the following required rule for the owner field: $(if Status == "Logged" || Status == "Cancelled" then false else true).
- To make the owner field not required when the status field is set to Investigation and the form is the problem form, first override the default rule on the problem form: $(if Status == "Investigation" then false else true).
- If left that way, the resulting expression for a form is: $(if Status == "Logged" || Status == "Cancelled" then false else true) OR $(if Status == "Investigation" then false else true).
- There is no way to make the owner field not required for "Identified" problem without having to change the business object-level rule.
- If you check Complete Override on a form business rule, the result is $(Status == "Investigation" then false else true).
- And it evaluates to false (that is, the business rule is not required) for business objects that have the status field set to Investigation.
If the status field is set to Investigation, the resulting value is still true (that is, the business rule is required) due to the first (business object-level) clause.
You must duplicate the business object-level rule part within an overridden business rule to extend the behavior correctly. To add the status field set to Investigation to the list of not-required and leave all other statuses as they are, check Complete Override and use this expression: $(if Status == "Logged" || Status == "Cancelled" || Status == "Investigation" then false else true).
Required Business Rules Matrix
| Business Object Rule | Business Object Rule Disabled? | Form Rule | Form Rule Disabled? | Complete Override? | Resulting Business Rule |
|---|---|---|---|---|---|
| R | -- | F | -- | -- | R or F |
| R | -- | F | -- | true | F |
| R | -- | F | true | -- | R |
| R | -- | F | true | true | R |
| R | true | F | -- | -- | F |
| R | true | F | -- | -- | F |
| R | true | F | true | -- or true | -- |
where
- R = business object-level rule
- F = form-level rule
- -- = false or not specified
- -- or true = the resulting value is the same for either true or false
Working with Read-Only Business Rules
- About Read-Only Business Rules
- Specifying a Read-Only Rule for a Field in a Business Object
- Specifying a Read-Only Rule for a Business Object
- Business Objects Containing Final State Rules
About Read-Only Business Rules
There are two types of read-only rules that can be specified for a business object. One is for fields within the business object and the other is for the business object. The following information provides an examples of how to add a read-only rule for both fields and business objects.
Specifying a Read-Only Rule for a Field in a Business Object
- From the Configuration Console, click Build > Business Object to open the Business Object workspace.
- Open a business object.
- Click the Business Rules tab on the toolbar. The Business Rules page appears.
- Under Read-only Rules, click Add Read-only Rule. The Add Read-only Rule window appears.
Add Read-Only Rule Window
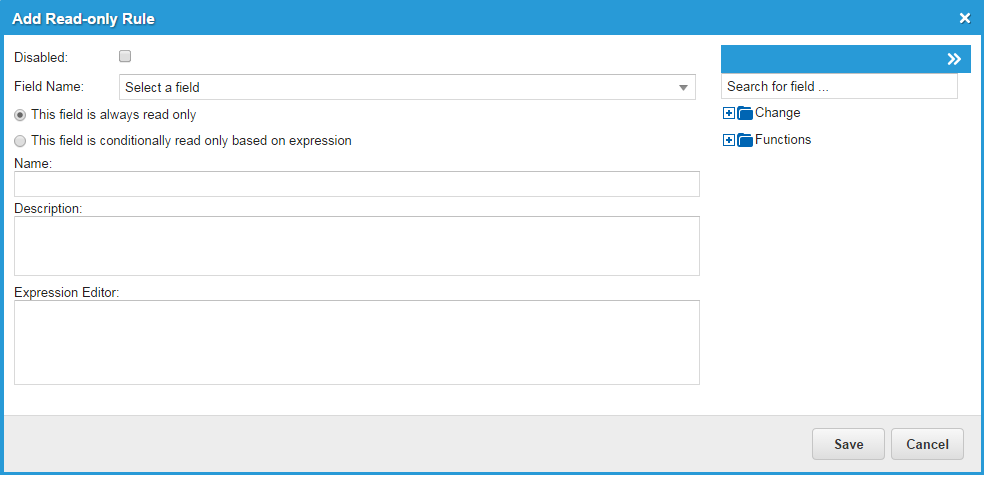
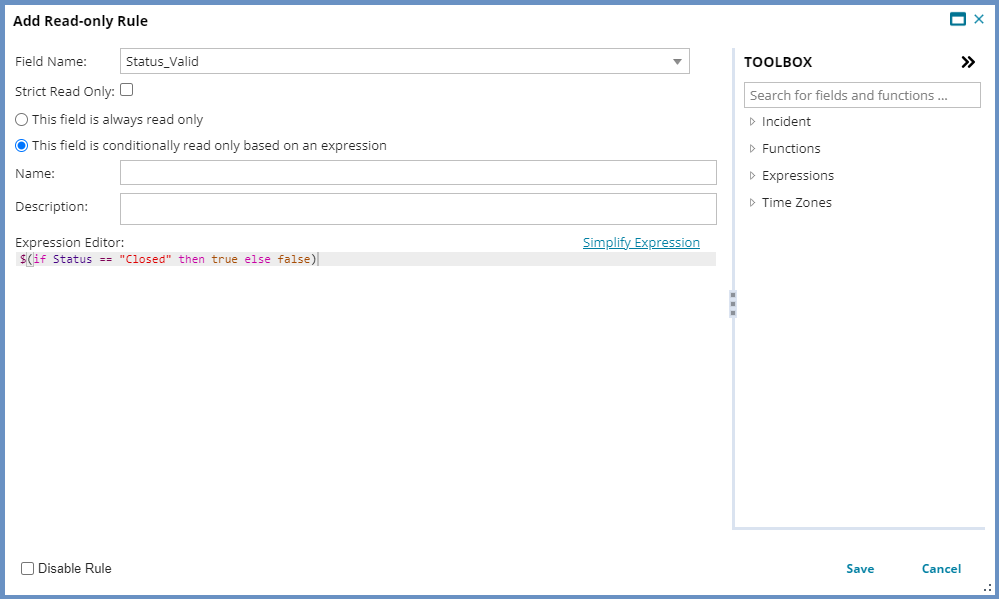
- From the Field Name drop-down list, select a field (for example, Status_Valid).
- Check This field is conditionally read only based on expression.
- In the Expression Editor, enter $(if(((Status == "Closed") then true else false))).
Add Read-only Rule Window with Expression
- Click Save.
Specifying a Read-Only Rule for a Business Object
You can create a read-only rule for a business object so that users are not allowed to modify the record after the status of the business object has been marked as being in a final state. You can select the states that define a business object as final.
You can also specify more than one state, such as closed and canceled, as a final state.
Do the following to edit a business object:
- From the Configuration Console, click Build > Business Object to open the Business Object workspace.
- Open a business object.
- Click the Business Rules tab on the toolbar to open the Business Rules page.
- Under Read-only Rules, click Add Object Read-only Rule to open the Add Final State Rule window.

- At the Add Final State Rule window, add or edit the following:
Field Description Name Add an easily identifiable name for the rule such as Final State Rule for Change Description Add a description for the business rule. Expression Editor Add the expression required to set the final state. See the examples below for setting a single state or multiple states as final states.
To make closed a final state, enter $(status == "Closed").
To make closed, canceled, and denied final states, enter
$(Status == "Closed" || Status == "Canceled" || Status == "Denied").
Except Fields Lists fields that can be edited even after the business object is in the final state. Enter exceptions here by selecting a field from the drop-down list and clicking the add icon
 . You can edit these fields for any business objects that contain final state designations.
 Disable Rule Disables the rule. - Click Save when you are done.
Business Objects Containing Final State Rules
The following business objects have read-only rules specified, with at least one status defined as a final state. Once the status for the business object record is changed to that state, the record and any child records, such as tasks and approvals, that were assigned to a user, can no longer be edited.
| Business Object | Final States |
|---|---|
|
Approval |
Canceled, Approved, Denied |
|
Call Log |
Closed |
|
Change |
Closed, Canceled, Denied |
|
CI Service |
Retired |
|
Knowledge |
Expired |
| Incident | Closed |
| Problem | Canceled, Closed |
| Project | Closed |
| Release | Canceled, Closed |
|
Service Request |
Canceled, Closed |
Overriding the Triggered Actions Business Rule for locked Business Object
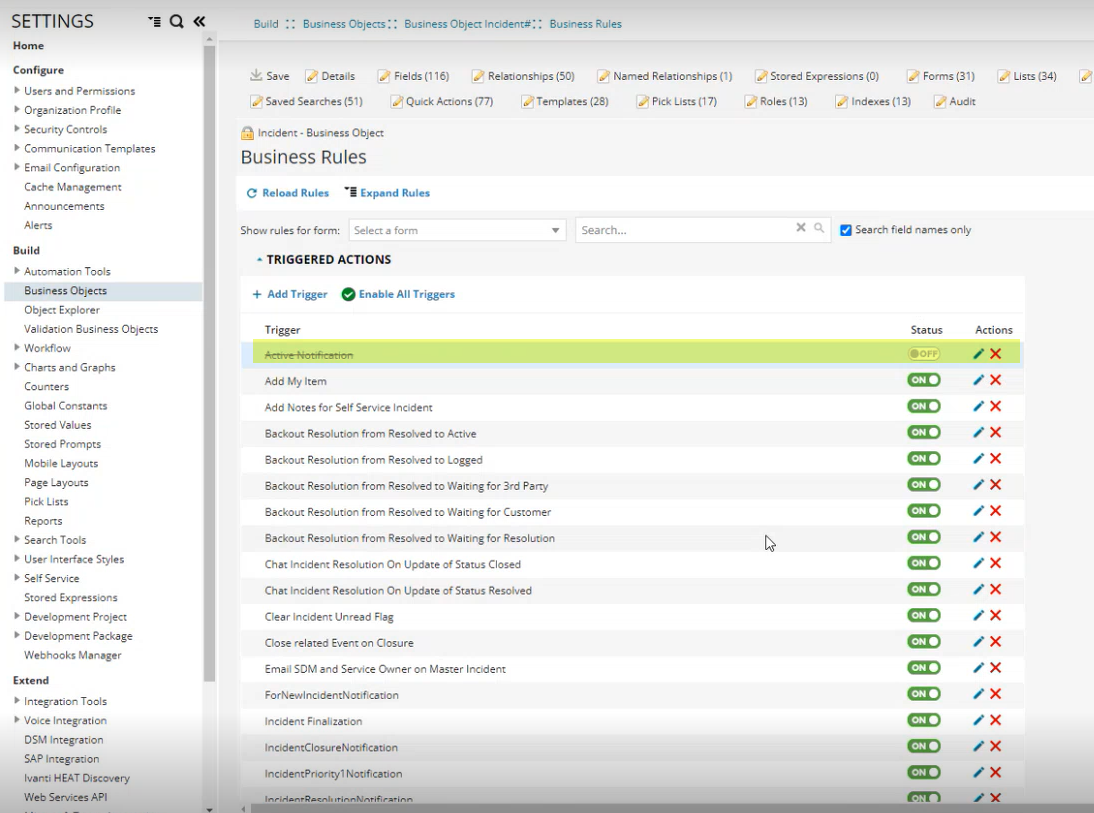
When a Business Object is locked, Triggered Actions for the Business Object cannot be modified. If you click the On/Off button for a Triggered Action record, the error message “ Metadata permission for object instance prevents update” is displayed.
However, there may be a case where you do not need all the default Triggered Actions provided for a Business Object and may want to disable some of them, in such a case you need to be able to override the Business Rule and disable certain Triggered Actions. To do so, a Global Constant - OverwriteTriggerActionsPermissions is provided.
•When the OverwriteTriggerActionsPermissions is True - you can edit the Triggered Actions for locked Business Objects.
•When the OverwriteTriggerActionsPermissions is False - you cannot edit the Triggered Actions for locked Business Objects.
Sample Scenario
Edit Triggered Actions of a locked Business Object
1.Login to Neurons for ITSM as an Administrator.
2.Open the Configuration console.
3.Click Build > Business Object.
4.Open any locked Business Object and select the Business Rules tab.
5.Try disable any of the Triggered Actions by clicking the On/Off toggle button in the Status column.
The application does not allow the edit and displays the message "Metadata permission for object instance prevents update".
Add and enable the Global Constant
Add the Global Constant to be able to edit the Triggered Actions.
6.From the Configuration console, click Build > Global Constant.
7.Click Add in the Global Constant page.
8.Enter the following values:
•Name - OverwriteTriggerActionsPermissions
•Value - True
•Type - Boolean
•Description - enter a relevant description, example - Overwriting the Triggered Actions for Locked Business Objects
9.Click Save.
Now edit Triggered Actions for a locked Business Object
10.Follow from step 1 through step 5.
You will be able to edit the Triggered Actions.
Triggered Actions edited for a locked Business Object
