Using Enhanced Object Permissions
Neurons for ITSM enables full access rights to the business objects associated with a role when you create it. You have to manually modify the permissions for each role. The enhanced object permissions feature allows you to apply permissions for a role based on the Top Level Tabs and metadata configuration.
Enhanced object permissions do not include Create (For Self) permissions such as Actions, Search and Dashboard in the System Permissions tab. These permissions are user specific, and you must manually apply required permissions to the role. In addition, the Admin role has all permissions granted by default, so the Apply Enhanced Permissions and Remove Enhanced Permissions buttons are not available.
You must select Apply Enhanced Permissions to update the additional permissions when making changes such as publishing dashboards/saved search/Quick Actions, enabling disabled business rules, or changing metadata such as adding fields.
This feature requires you to set the EnableEnhancedObjectPermission global constant to True. After applying enhanced object permissions, you cannot remove or apply enhanced permissions to a role because the Apply Enhanced Permissions and Remove Enhanced Permission buttons are unavailable when you disable the global constant.
-
Log in to Ivanti Neurons for ITSM with the Administrator user role.
-
Select Configure Application to go to the Configuration Console.
-
Select Build > Global Constants to open the Global Constants window.
-
Set the EnableEnhancedObjectPermission value to True. By default, EnableEnhancedObjectPermission value is False.
-
Select Save.
This procedure allows you to configure permissions automatically based on objects assigned to a role in the Top Level Tabs workspace.
When you add any object in the Top Level Tabs workspace, you must select Apply Enhanced Permissions to update the permissions.
-
Follow the steps for Creating a Role.
-
Select Top Level Tabs to add objects to that role's tabs. For more information, refer to Setting up Roles.
-
Select the Object Permissions tab.
By default, the application gives minimum permissions to the new role.
-
Select Apply Enhanced Permissions and select OK.
This option does not override manually applied permission changes.
-
The system automatically selects the permissions based on metadata configuration and on the objects you chose in the Top Level Tabs workspace.
Certain top level tabs don't support enhanced object permissions: License Manager Wizard, ProcessWizard, IPCMWebStat, and AdminUiTreeMetadata. Manually update the permissions for these business objects.
-
Enter data in the remaining fields. Refer to Setting up Roles.
-
Select Save.
-
From the Configuration Console, select Configure > Users and Permissions > Roles and Permissions to open the Roles and Permissions workspace and display a list of roles.
-
Open a role to display its Role Details page.
-
Select the Object Permissions tab.
-
Select Apply Enhanced Permissions. The system displays a Confirmation dialog box.
When you apply the enhanced object permissions, the system creates a backup of the existing permissions for use as a backup.
-
Select Ok. The system automatically selects the permissions based on the metadata configuration and on the objects available in the Top Level Tabs workspace.
-
Select Save.
If you give admin rights to an existing role after applying enhanced object permissions, you must remove enhanced permissions (refer to Removing Enhanced Object Permissions) before granting admin rights to that role.
-
From the Configuration console, select Configure > Users and Permissions > Roles and Permissions to open the Roles and Permissions workspace and display a list of roles.
-
Open the role for which you want to edit the object permissions. The system displays the Role Details page.
-
Select the Object Permissions tab.
-
Select Remove Enhanced Permissions to revert the permissions to the initial stage (refer to the note in Step 4 in the Assigning Enhanced Object Permissions to an Existing Role section). The system displays a confirmation.
Be careful to remove enhanced object permissions after modifying the permissions. The Remove Enhanced Permissions option removes all manual modifications made in the Object Permissions, System Permissions and Permission to Grant Roles tabs, and reverts the permissions to its initial stage (see the note in step 4 in the Assigning Enhanced Object Permissions to an Existing Role section). Manually modify these three tabs before applying the enhanced object permissions for the first time. You can also remove the enhanced object permissions, make the manual changes, and then apply the enhanced permissions.
-
Select Ok. The system will remove all enhanced object permissions and display initially saved permissions. For new roles, the system will automatically select all access rights associated with the business objects.
-
Select Save.
Tips for Using Enhanced Object Permissions Feature
-
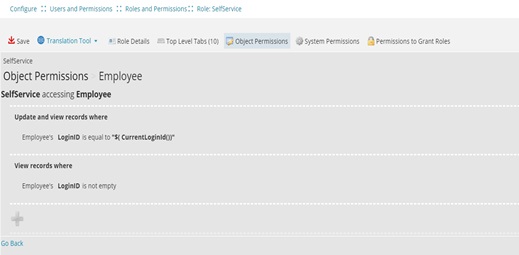
When you configure a role without including the Employee business object as the top level tab, the View and/or Edit permissions will be granted to the Employee business object due to its dependency on other business objects. Because of this dependency, you can configure the segregation rules to the Employee business object by selecting Edit in the Access column of the Object Permissions workspace.
The below example restricts the self service user from viewing all records. However, users can update their own Employee data.
-
Configure the fields' permissions based on your business requirement.
-
When configuring the Social Board top level tab, you must provide an Edit permission for the additional fields; the additional fields rely on the Employee business object to update your profile information in the Social Board workspace.
-
Analytic Metrics is independent of enhanced object permissions, and the metrics functionalities will continue to work even if the associated permissions are revoked.
