Example: Creating an Escalation Workflow using the Decision Quick Action (GAD)
Decision Actions enable you to create advanced workflows. For example, a subsection of actions can be executed based on the Escalation feature continually checking on the Status of an Incident record.
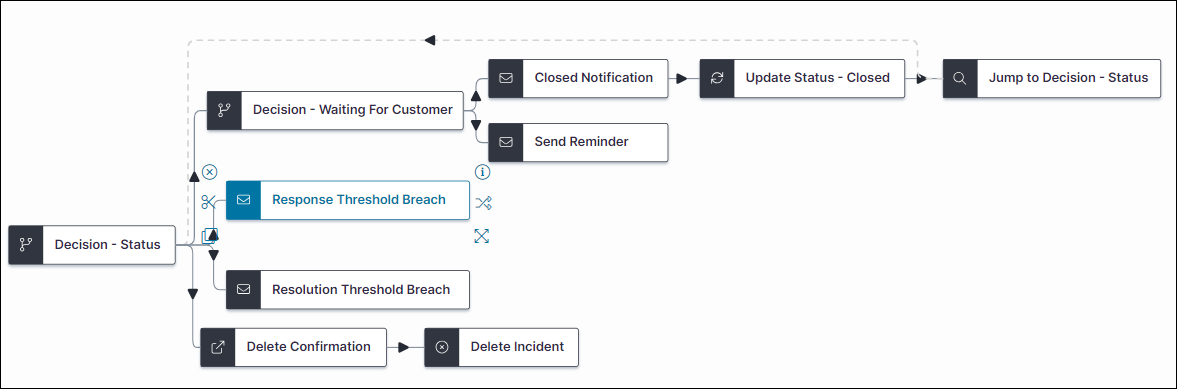
This is an example of an escalation workflow. The first Decision Quick Action conditionally checks the Status of an Incident record and determines which pathway to execute. The second Decision Quick Action (Decision - Waiting for Customer) Is used by the Escalation Schedule to check if the Incident response and resolution targets have been breached. If they have, it updates the record to the Closed state before jumping back to the first Decision Quick Action ready for processing another record.
This example uses the Graphical Action Designer (GAD). The Decision Quick Action is not available in the Classic Action Designer (CAD).
Prerequisite
To use this Quick Action, set the global constant EnableActionService to True. If EnableActionService is not available in the global constants list (this may be the case for upgraded instances), Administrators can manually add the constant.
This example assumes you have administrator-level access to the Configuration console and are familiar with creating business objects and Quick Actions. If you do not have administrator-level access, see Notes on roles and permissions and Open the Graphical Action Designer
Creating the Escalation Composite Action
1.Go to the Configuration Console > Build >Business Objects > Incident > Quick Actions > Graphical Action Designer.
2.Under Advanced Actions, find the Decision Quick Action and drag it on to the Designer Board.
3.In the Common Settings tab, set a name for the whole Composite Action such as My Escalation Workflow.
4.In the BlockSettings tab for the Decision block, enter a block name in the Name field, for example, Decision - Status.
5.Drag all the other actions on to the Designer Board until your board resembles the image above. The action types used are as follows:
| Action Type | Used For |
|---|---|
| Decision |
Decision – Status Decision – Waiting For Customer |
| Send an Email |
Response Threshold Breach Resolution Threshold Breach Closed Notification Send Reminder |
| Show a Popup | Delete Confirmation |
| Go to Action | Jump to Decision - Status |
| Update a Record |
Update Status – Closed |
|
Delete a Record |
Delete Incident |
6.The first Decision Quick Action continually checks the Status of an Incident record and determines which of three pathways to execute.
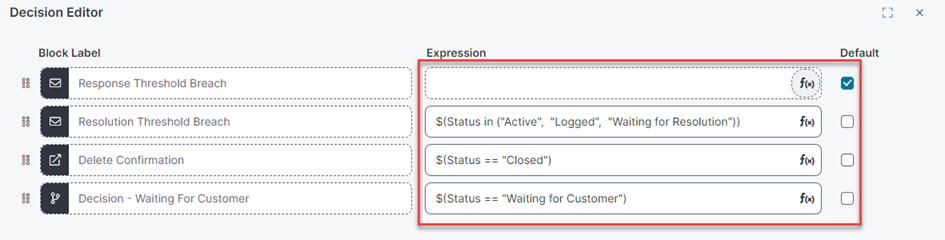
Select Decision - Status and then click Decision Editor. Enter the following expressions and select Response Threshold Breach as the default action.
| Action | Expression | Default option |
|---|---|---|
| Response Threshold Breach |
Deliberately left empty |
True |
| Resolution Threshold Breach | $(Status in ("Active", "Logged", "Waiting for Resolution")) |
False |
| Delete Confirmation | $(Status == “Closed”) |
False |
|
Decision - Waiting for Customer |
$(Status == “Waiting for Customer”) |
False |
7.The second Decision Quick Action, (Decision - Waiting for Customer), conditionally checks if the Escalation period has been breached. If so, it updates the record to the Closed state before jumping back to the first Decision Quick Action ready for processing another record.
8.Select Decision - Waiting for Customer and then click Decision Editor. Enter the following expressions and select Send Reminder as the default action.
| Action | Expression | Default option |
|---|---|---|
| Closed Notification |
$([Frs_data_escalation_watch#.IncidentAssocWaitingEscWatch]BreachPassed) |
False |
| Send Reminder |
True |
9.Here are the field values for all the other actions used in this example:
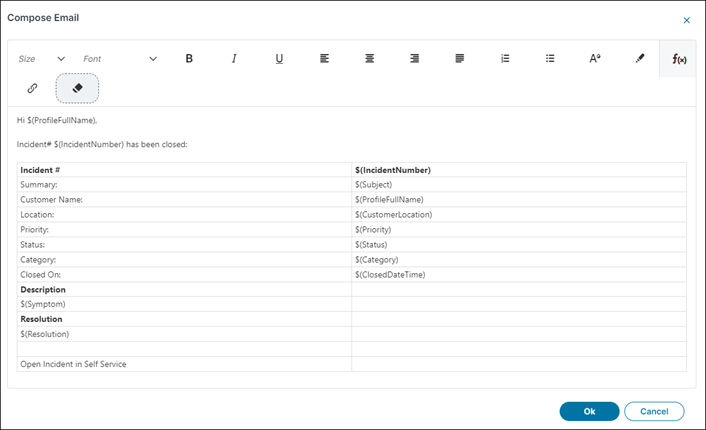
Closed Notification
| Field | Value |
|---|---|
| Log in Journal | All |
| From Address | Enter an ITSM email address that can send out emails to customers. |
|
To Address |
|
|
Subject |
$("Incident# " + IncidentNumber + " has been closed") |
|
Compose Email |
|
Update Status - Closed
| Field | Value |
|---|---|
| Status | Closed |
Jump to...
| Field | Value |
|---|---|
| Target Action | Decision - Status |
|
Max Number of Iterations (between 1 and 10) |
1 |
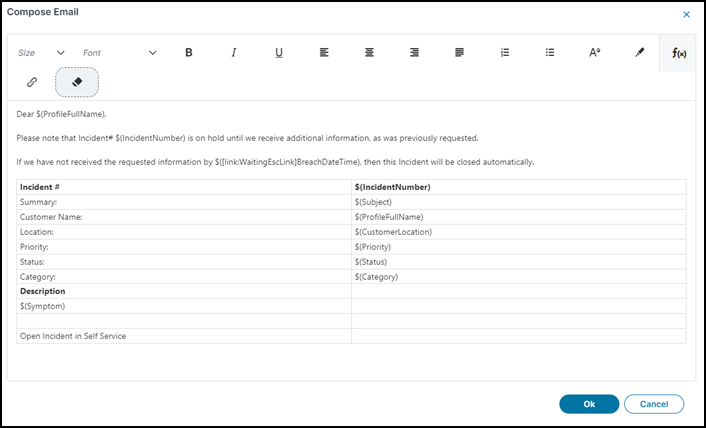
Send Reminder
| Field | Value |
|---|---|
| Log in Journal | All |
| From Address |
Enter an ITSM email address that can send out emails to customers. |
|
To Address |
|
|
Bcc |
|
|
Subject |
$("Incident# " + IncidentNumber + " Reminder: Additional Information request") |
|
Compose Email |
|
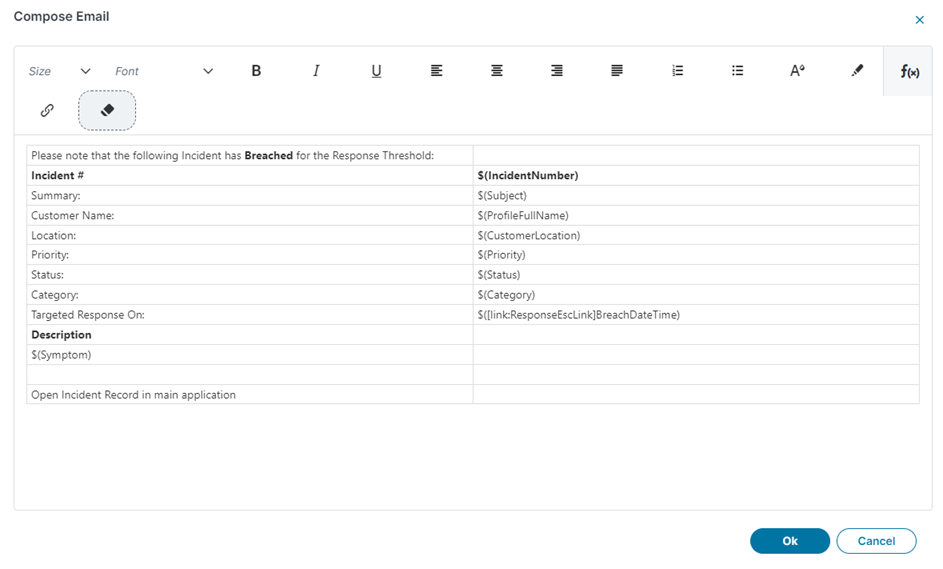
Response Threshold Breach
| Field | Value |
|---|---|
| Log in Journal | All |
| From Address |
Enter an ITSM email address that can send out emails to customers. |
|
To Address |
|
|
Subject |
$("Incident# " + IncidentNumber + " - Response Threshold has been breached") |
|
Compose Email |
|
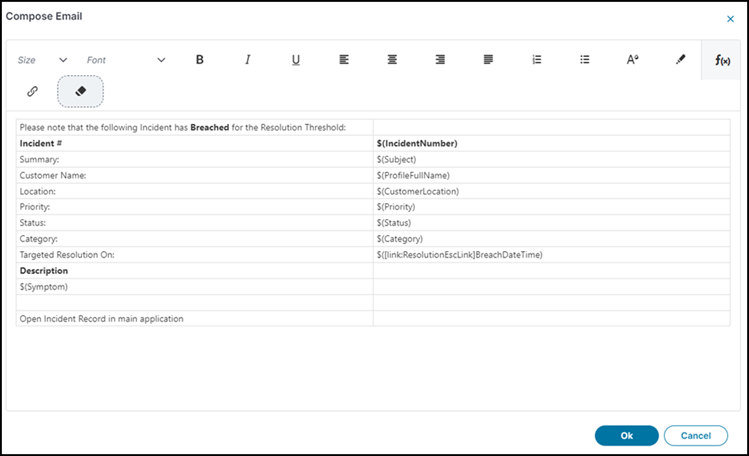
Resolution Threshold Breach
| Field | Value |
|---|---|
| Log in Journal | All |
| From Address |
Enter an ITSM email address that can send out emails to customers. |
|
To Address |
|
|
Subject |
$("Incident# " + IncidentNumber + " - Resolution Threshold has been breached") |
|
Compose Email |
|
Delete Confirmation
| Field | Value |
|---|---|
| Title |
$("Delete Incident# " + IncidentNumber + "?") |
| Contents | $("Are you sure you want to delete Incident# " + IncidentNumber + "?") |
|
Buttons |
Ok and Cancel |
Delete Incident
No properties to be set for this action.
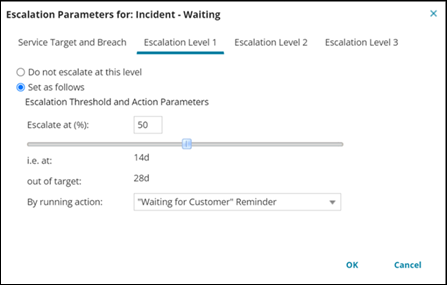
Setting up an Escalation
Using ITSM Escalations, create an escalation schedule that uses the Composite Action created in this example.
Here our Composite Action has been renamed to Auto Close Waiting for Customer and will be called when service targets are breached.
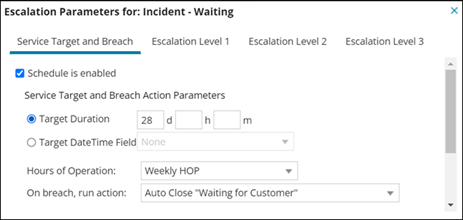
The same action can then be renamed again to Waiting for Customer Reminder and also used for Escalation Level 1 when a reminder needs to be sent out to the customer.
For more information: Working with Escalations.