Configuring Trusted Agent with PowerShell
Role: Administrators.
Minimum Version: Ivanti Neurons for ITSM 2024.2.
You can configure an agent to automate specific tasks or workflows by executing external PowerShell scripts. Using PowerShell script an agent can receive and process requests to execute.
Prerequisites
A self-signed certificate is required during the configuration procedure. The certificate is required to sign the PowerShell script so it can be executed securely. Ensure that you have completed the following prerequisites before you configure Trusted Agent for PowerShell.
To validate the self-signed certificate, you will need a PowerShell script (.ps1) file, and locate this file on the system you are working on, taking note of the file path.
Create a self-signed certificate is required for signing the PowerShell script.
1.Open Windows PowerShell ISE, and then enter the following code in the Script Pane (you need to provide a name for the certificate).
#certificate  name should be provided
$CertificateName = "<name of certificate>"
#Create a Self-Signed SSL certificate
$Certificate = New-SelfSignedCertificate -CertStoreLocation Cert:\CurrentUser\My -Subject "CN=$CertificateName" -KeySpec Signature -Type CodeSigningCert
Write-host "Certificate Thumbprint:" $Certificate.Thumbprint2.Run the code.
This creates a code signing certificate in your Personal\Certificates folder in Windows Certificate Manager.
3.Open the Windows Certificate Manager console (search "Manage user certificates" to locate this app), and locate the certificate file in the Personal\Certificares folder.
4.Copy the certificate file to the Trusted Root Certification Authorities\Certificates folder.
5.Copy the certificate thumbprint:
| a. | Select the certificate file in Trusted Root Certification Authorities\Certificates. |
| b. | Right-click, select Open, and then select the Details tab. |
| c. | Scroll down to find the Thumbprint entry, select it, and then copy it from the text field |
6.In Windows PowerShell ISE, run the following script, entering the thumbprint you copied in the previous step, and the file path to the PowerShell script (.ps1) file you created as mentioned in the note under "Prerequisites":
This verifies and signs the code signing certificate in the Trusted Root Certification Authorities\Certificates folder.
$thumbprint = "<enter the thumbprint you copied>"
$ScriptPath = "<enter the file path to the powershell script>"
#Get the Certificate from Cert Store$CodeSignCert = Get-ChildItem -Path Cert:\CurrentUser\My | Where-Object {$_.Thumbprint -eq $thumbprint}
#Sign the PS1 fileSet-AuthenticodeSignature -FilePath $ScriptPath -Certificate $CodeSignCert1.In Windows Certificate Manager, select the certificate you copied to the Trusted Root Certification Authorities\Certificates folder.
2.Right-click and select All Tasks > Export.
The Export Wizard opens.
3.Click Next, select No, do not export the private key, and then click Next again.
4.Select DER encoded binary X.509 (.CER), and then click Next.
5.Enter a file name, click Browse and navigate to the folder you want to save in, and then click Save.
6.Click Next, check the settings are as expected, and then click Finish.
Configure a Script Policy and Add a PowerShell Execution
Follow the procedures below to add a script only connection, and then add a new PowerShell execution.
Once you have completed the prerequisites and have a validated self-signed certificate, add a new script only policy.
1.Log in to Neurons for ITSM as an Administrator.
2.Open the Configuration console and click Extend > Integration Tools > Trusted Agent Connection.
3.Click New trusted agent connection to open the Trusted Agent Connections form.
The New trusted agent connection button is enabled only at the first use.
4.Enter the connection settings in the Configuration section of the Trusted Agent for Connections form.
| Field | Description |
|---|---|
|
Setting Name |
A unique name for this script policy. |
|
Policy Type |
Select Script. When this option is selected, the Update Validation Certificate section is displayed. |
|
Upload validation certificate |
Upload the self-signed certificate you created earlier for Prerequisites. Only .cer file type is accepted. Click Select a File, and then navigate to the folder where you saved the self-signed certificate, select the file, and then click Open. |
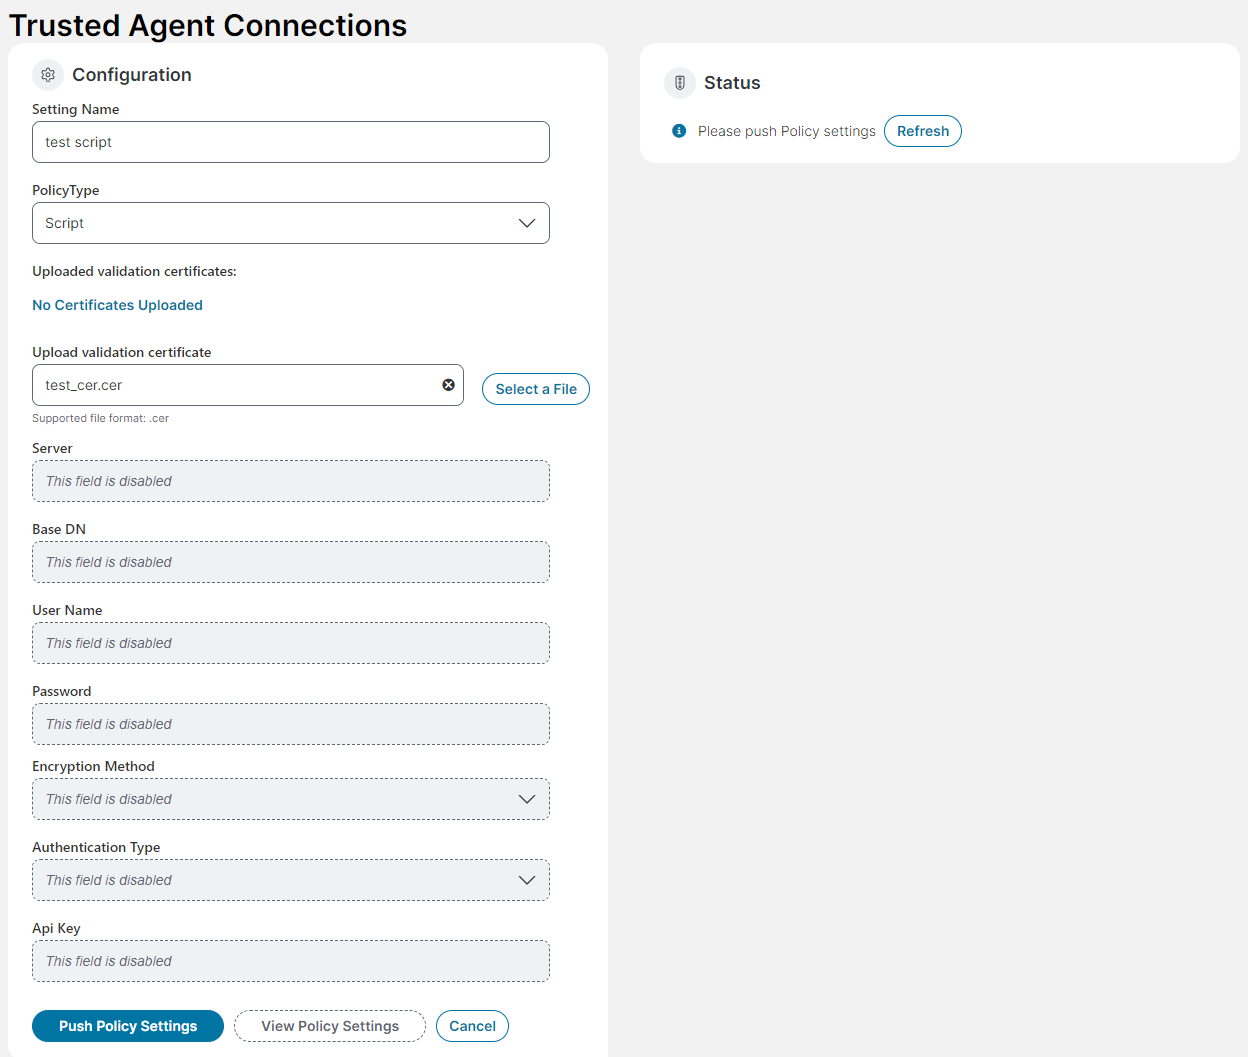
5.Click Push Policy Settings.
You must configure and push a script policy before you can add a PowerShell execution.
1.Open the Configuration console and click Extend > Integration Tools > Trusted Agent Connection.
2.Click New PowerShell Execution to open the New PowerShell Execution form.
3.Enter the configuration settings in the Configuration section of the form.
| Field | Description |
|---|---|
|
Setting Name |
A unique name for this PowerShell execution. |
|
Trusted Agent |
Select the script policy |
|
Upload signed PowerShell |
Click Select a File and upload the signed PowerShell script file for the agent. Only .ps1 file type is accepted. If you attempt to upload a PowerShell script that is not signed, a fail message is displayed when you attempt to save the configuration. |
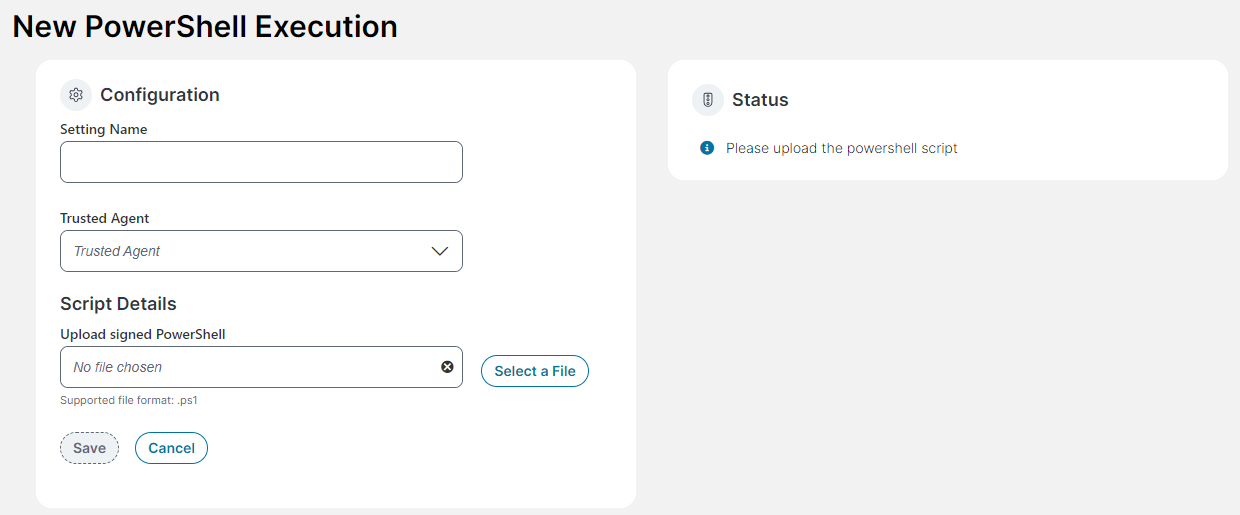
4.Click Save.
Upgrade to a Hybrid Policy
You can upgrade an existing LDAP policy to hybrid with both PowerShell and LDAP features.
When you update an LDAP policy to hybrid, you cannot revert the policy back to LDAP only.
Before starting this procedure, you need to complete the procedures as described in Prerequisites above to provide a self-signed certificate for the hybrid configuration.
1.From the Configuration console, click Extend > Integration Tools > Trusted Agent Connection.
2.Select the LDAP policy to open the Trusted Agent Connections form.
3.Click the Policy Type drop-down and select Hybrid.
4.Click Select a File, and then navigate to the folder where you saved the self-signed certificate, select the file, and then click Open.
5.Click Update Policy Settings.
Add the PowerShell script you want to execute.
1. Click Extend > Integration Tools > Trusted Agent Connection.
2.Click New PowerShell Execution to open the New PowerShell Execution form.
3.Enter the configuration settings in the Configuration section of the form.
| Field | Description |
|---|---|
|
Setting Name |
A unique name for this PowerShell execution. |
|
Trusted Agent |
Select the script policy |
|
Upload signed PowerShell |
Click Select a File and upload the signed PowerShell script file for the agent. Only .ps1 file type is accepted. If you attempt to upload a PowerShell script that is not signed, a failure message is displayed when you attempt to save the configuration. |
4.Click Save.
Create a New Hybrid Policy.
You can create a new hybrid policy with both PowerShell and LDAP features.
Before starting this procedure, you need to complete the procedures as described in Prerequisites above to provide a self-signed certificate for the hybrid configuration.
This procedure must be completed prior to installing Trusted Agent as described in Install Trusted Agent. Also note that In the current version of Neurons for ITSM, you can add only one Trusted Agent connection.
1.In the Configuration console, select Extend > Integration Tools > Trusted Agent Connections.
The Trusted Agent Connections form is displayed. You configure a new connection or edit an existing connection using this form.
2.Click New trusted agent connection to open the Trusted Agent Connections form.
3.Enter the connection settings in the Configuration section of the Trusted Agent for Connections form.
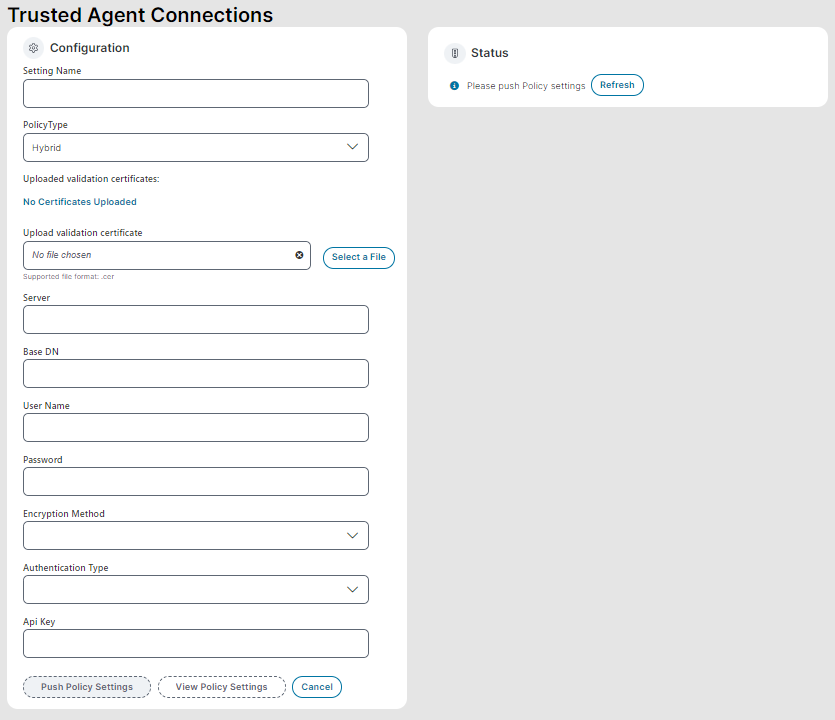
| Field | Description |
|---|---|
|
Setting Name |
A unique name for this LDAP server connection. |
|
Policy Type |
Select Hybrid. When this option is selected, the Update Validation Certificate section is displayed. |
|
Upload validation certificate |
Upload the self-signed certificate you created earlier for Prerequisites. Only .cer file type is accepted. •Click Select a File, and then navigate to the folder where you saved the self-signed certificate, select the file, and then click Open. |
|
Server |
The LDAP domain controller host IP address. |
|
Base DN |
Optional. The distinguished name for the LDAP object in the LDAP server. This value is not case sensitive. |
|
User Name |
If the server requires authentication, enter the LDAP domain server name. |
|
Password |
If the server requires authentication, enter the LDAP domain server password. |
| Encryption Method |
Select an encryption method: •No encryption •Use SSL encryption (ldaps://) •Use StartTLS extension |
| Authentication Type |
Select an authentication type: •For No encryption method, select Ntlm. •For SSL or TLS method, select Simple (Basic) authentication. |
|
Api Key |
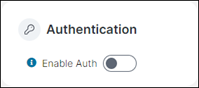
Optional: The SignalR API key required to enable external authentication. The SignalR API key is required if you want to enable users to login externally, if you do not want to enable external authentication this key is not required. For information on SignalR, see https://learn.microsoft.com/en-us/aspnet/signalr/overview/getting-started/introduction-to-signalr. To generate the API key, see step 4 below. Paste the generated API key into this field. When the key is provided, and the LDAP settings are pushed successfully, the Enable Authentication switch is displayed.
This switch can be toggled ON after the Trusted Agent is installed. If you toggle the switch ON before the Trusted Agent is installed a warning is displayed. Refer to Enable External Authentication. |
4.Optional: Generate a SignalR API Key to enable external authentication:
This step is only required if you want to enable external authentication. For information on SignalR, see https://learn.microsoft.com/en-us/aspnet/signalr/overview/getting-started/introduction-to-signalr.
| a. | In the Configuration Console, select Security Controls > API Keys. |
| b. | In the API Keys workspace, select Add Key Group. |
| c. | In the Name field, enter Signalr, and then enter a brief description in the Description field. |
| d. | Click Save Key Group. |
| e. | Select the Signalr group in the Key Groups list. |
| f. | In the API Keys pane, select Add API Key. |
| g. | Select the Activated checkbox if not already selected. |
| h. | Enter a description, on behalf of, and role information if required. |
| i. | Click Save Key. |
| j. | Copy the generated API key identifier to the clipboard. |
| k. | Return to the Trusted Agent for LDAP Connections form, and then paste the key into the Api Key field. |
5.Click Push Policy Settings.
While the LDAP settings for the Trusted Agent are being processed, the Status is displayed as Pending.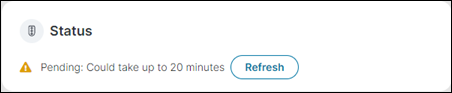
The Push Policy Settings button changes to Update Policy Settings, and is disabled while the settings are being processed.
The settings push can take up to 20 minutes to complete. Click Refresh to check if the push has completed. When completed successfully, the Status is displayed as Success. A pop-up message is also displayed.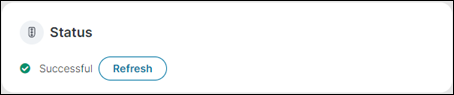

Occasionally the status may revert to Pending. If this happens, push the LDAP settings again by clicking Update Policy Settings, and then click Refresh. The status changes to Success.
If the push fails, a Failed pop-up message is displayed.

If a failed push occurs, check your settings are correct, and then:
•Push the settings again.
•If the push still fails, refresh the page in the browser, and push the settings again.
When processing is complete, an enrollment key, comprising of the tenant ID and activation key, is displayed in the Enrollment Key field.
6.Under the Download URL for Installer (Windows) section, click Download to download the installer files.
Copy the IvantiCloudAgent.exe and IvantiCloudAgent.exe.options files to the server on the private network where Trusted Agent is to be installed.
When completed successfully, proceed to installing the Trusted Agent before continuing with the remaining procedures in this topic, refer to Install Trusted Agent
To add a PowerShell execution script, refer to Add a PowerShell Script.
Invoke a PowerShell operation with Trusted Agent
Invoke an agent that executes with PowerShell script to update a business object.
1.Log in to Neurons for ITSM as an Administrator.
2.From the Service Desk console, open the Incident workspace.
3.Open an incident, click More, and select Edit Actions.
4.Create a quick action using Graphical Action Designer.
By default, Start Block is selected.
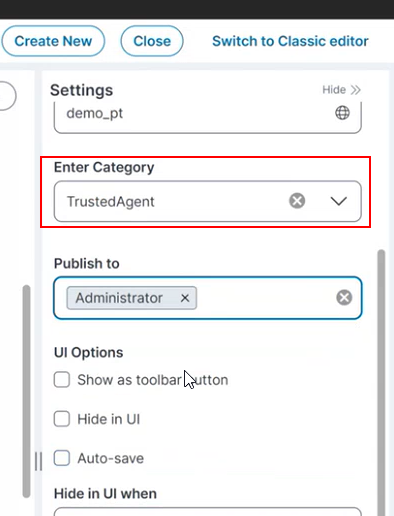
5.Enter the Settings details for the mandatory fields Name, Description, Enter Category, Publish To, and UI Options in the Graphical Action Designer.
Manually enter "Trusted Agent" or "TrustedAgent" (the white space is not required for function) if the Trusted Agent category is not present in the Enter Category option.
6.Drag the Run Program from the Common Actions to the block.
• Enter a unique name in the Block Label field.
•Select the PowerShell script in the Connection drop-down.
•In the Arguments field specify the argument that needs to be parsed through the Powershell script.
Declare arguments, for example: declare a 10, b 5 variables. You can also declare a variable and expression, for example, a 10, UserEmail $(PrimaryEmail), where UserEmail is a parameter in the script, and $(PrimaryEMail) is a field in the business object.
•Select the Output Field to show the result of the action triggered by the PowerShell script.

7.Link the Start block to the Run Program block and click Save.
8.Go back to the Incident page, click More > TrustedAgent, and select the action you created.
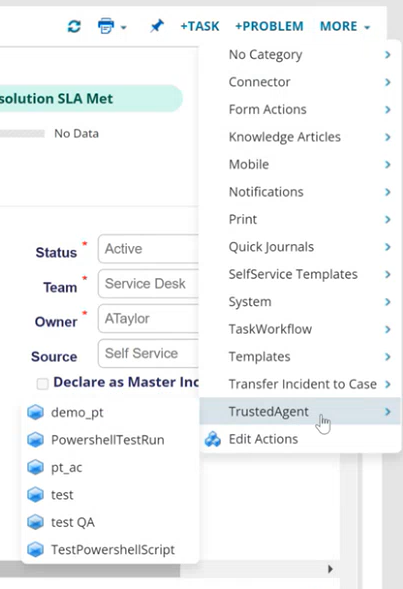
Now the agent will get triggered and update the associated incident as per the PowerShell script actions.
Verify Execution
To verify the execution of the agent:
1.From the Configuration console click Extend > Integration Tools > Trusted Agent Monitoring.
2.In the Operational Logs, select a PowerShell executed operation and verify the Log Entry for the associated operation.
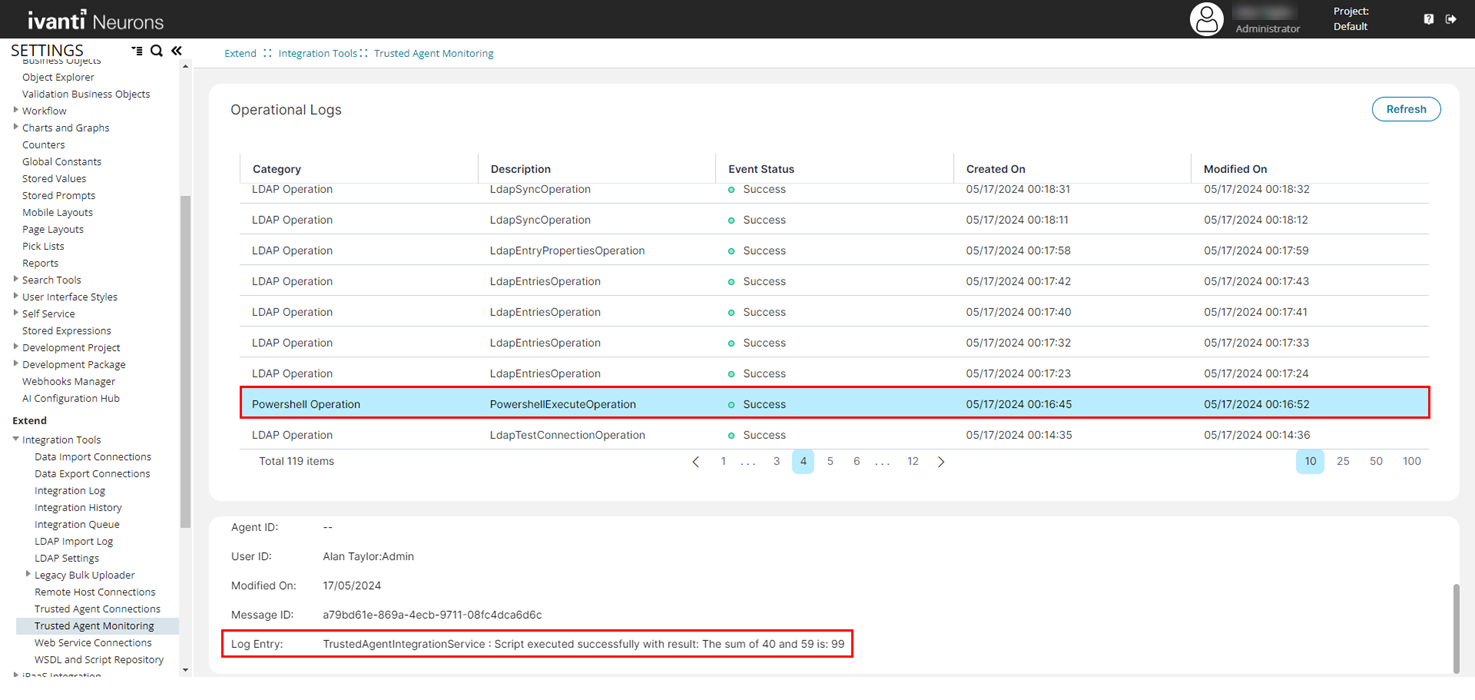
The Log Entry shows whether the script executed successfully with the expected result.