Classic view
Role: All roles except Self Service and Self Service Mobile.
Availability: To legacy ITSM customers prior to version 2024.3.
ITSM Classic View is the traditional interface used in Ivanti’s IT Service Management platform. The menu is structured and detailed, helping users quickly find and access important ITSM modules. The interface may be different for you depending on the settings made by your organization's Administrator.
Prerequisites
•Get the log in URL from your Administrator.
•You must be assigned to at least one role to log in. If you are not assigned a role, you can only log in if your administrator has enabled anonymous login.
Log in to the application
1. Enter the URL for Neurons for ITSM in a browser. The login page is displayed.
2.Enter your user name and password. (The password is masked.)
3.Click Login. The application displays a list of roles.
4.Select a role and click Submit.
You are now logged in and ready to use Neurons for ITSM.
To log in with a different role, log out and then log in again with a new user role.
Classic View - Home Page
Home Page
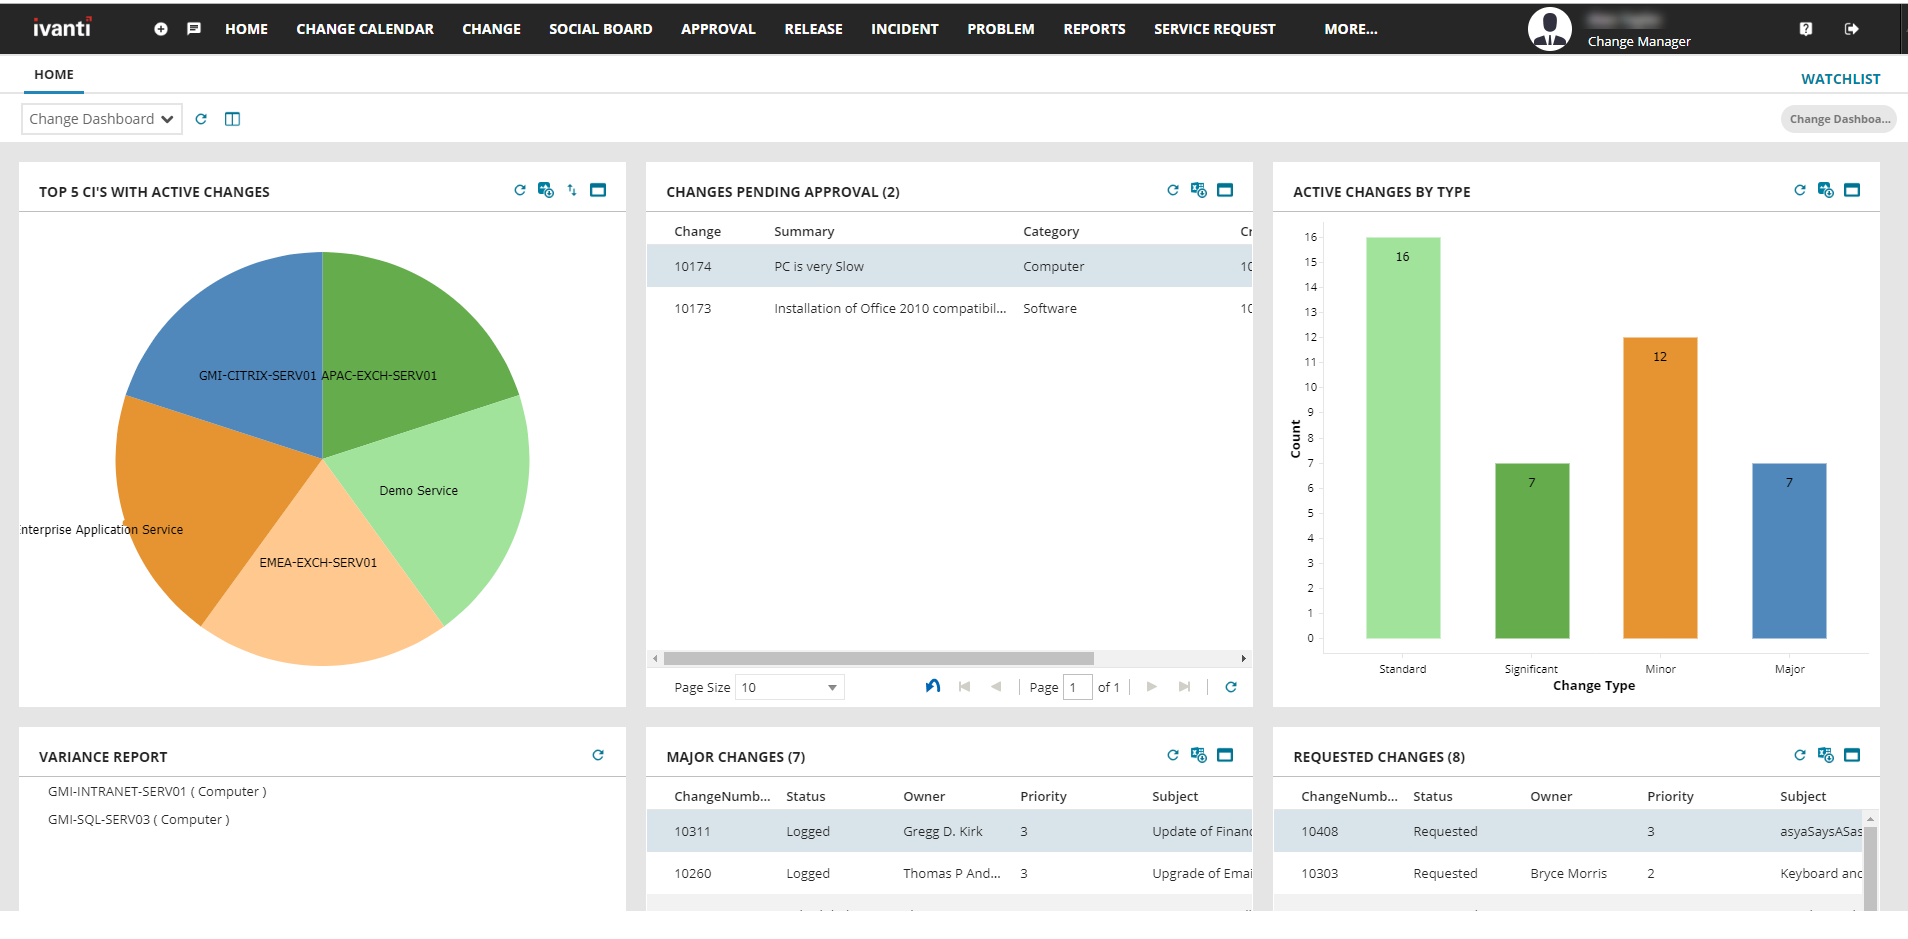
When you log in to Neurons for ITSM, the Home page is displayed with widgets and reports configured for your user role.
You can navigate to different workspaces configured for your user role. When you open a workspace, a list of records pertaining to the selected workspace is displayed.
Home Page - Classic View
Parts of the main workspace
Top header bar
The top header bar components from left to right:
•Workspace list: Click and select the workspace from the list.
•Social Board: Click to open the Social Board.
•Workspace selectors: Click any workspace name to open it. Only workspaces applicable for the logged in user role appear.
•More: Click to view additional workspaces. You can also search for workspaces here.
•Logged in user name: Click to change password, locale, or picture.
•Logged in user role: Click to change user role. Only configured user roles for the logged in user are displayed.
•Online help button: Click to view the online help.
•Logout button: Click to log out of the application.
Workspace footer bar
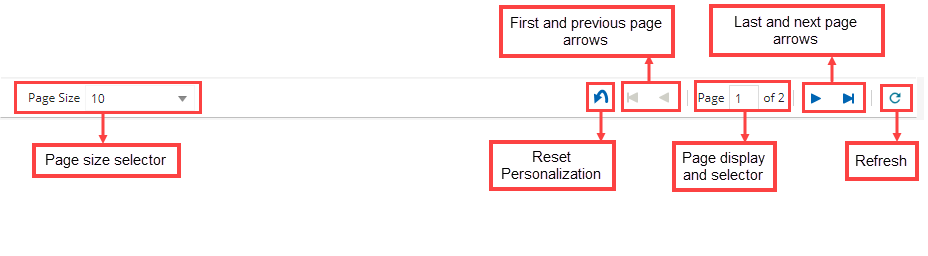
The workspace footer bar components:
•Page size selector: Click the dropdown arrow to select the page size.
•Reset Button: Resets personalization.
•Page number selector: Select the page to be displayed.
•First and previous page arrows: Navigate to first or previous page.
•Last and next page arrows: Navigate to last or next page.
•Refresh button: Click, to refresh data.
Tabbing between fields
In a form, you can tab from one field to the next. The exact tab order is set by the administrator.
Starting from the top of the form, you can tab through the controls in the header, then enter the first field in the Detail form. When you reach the last field in the Detail form, the tab moves to the child tabs (if the tab order has been specified for the form header).
Press Tab to go forward and Shift + Tab to go backwards through the fields.
Using the full-screen mode
You can hide the top header bar by entering full-screen mode (this is different from pressing F11 on your keyboard; when you press F11, you still see the header bar with the top-level tabs). In full-screen mode, you do not see the header bar and top-level tabs; you only see the current business object record or workspace. This is useful when you need to display more vertical space, such as if you are working in 1024x768 where there is limited vertical space.
1.Click the arrow icon  on top right corner of the page. The application is displayed in full-screen and the top header bar is hidden.
2.Press the ESC key on your keyboard or click the Exit Full Screen icon  to get out of full-screen mode.
Switch to unified product experience
Refer Unified Product Experience for more information.
Revert to classic view
You can choose to switch back to classic view anytime.
1.Login to the ConfigDB Tenant.
2.Navigate to the Feature Management workspace.
3.Create a New Tenant Feature and click New TenantFeature
4.Configure the new feature with:
•Select the tenant in the Tenant field.
•Select the ForceOneNav feature in the Feature field.
•Set the State to Disable.
You have now switched back to the classic view.
For more information, refer to Feature flags and global constants - unified product experience.