Neurons Platform Integration
Role: Administrator.
Platform: SaaS and on-premises.
Minimum Version: Ivanti Neurons for ITSM 2025.2.
Feature Availability: New customers get this feature OOTB by default. Existing customers upgrading to version 2025.2 should raise a request to Ivanti Operations team to get it enabled.
Watch this video for a visual walkthrough of Integrating the Neurons Platform with ITSM.
Integrating Neurons Platform with ITSM (2:05)
With Neurons Platform Integration feature, ITSM and Neurons tenants can be integrated for a seamless centralized experience without the involvement of the Operations team. With this, ITSM Administrators can manage the integrations from the Configuration console ensuring a streamlined and user-friendly experience. The ability to test connections instantly provides immediate confirmation of connectivity, reducing delays and uncertainty. Additionally, this feature simplifies troubleshooting by allowing quick identification of common integration issues.
•If you are upgrading to version 2025.3, you can access Asset Import Configuration and Client Registration pages.
•To enhance security and standardized connection methods, the manual URL-based connection option is removed for SaaS based customers. URL-based connections must be configured through the Client-Based Connection option. For more information, see Configure the Integration using Client Based Connection.
From Neurons ITSM 2025.3 release, new customers receive a seamless, centralized experience OOTB. To reduce need of operations team involvement, and admins to manage configurations directly through the Configuration console.
•The Asset Import Configuration and Client Registration pages are disabled by default. To configure, see Configure the Integration using Client Based Connection.
•The manual URL-based connection option is removed for SaaS based customers. Connections must now be configured using the Client-Based Connection method.
•To configure integrations, use Neurons Platform Integration → click Manage Connections, then proceed with App Registration.
•To enable or disable features use the Options menu instead of managing features in Asset Import Configuration page. The Asset Import Configuration page is disabled. For more information, see Working with Integrated Features.
Prerequisite
Existing users must submit a service request to Ivanti Operations to enable the EnableNeuronIntegrationToken feature flag in Config DB. If you upgrade to 2025.3 version, this feature is enabled by default.
Configure the Integration using Client Based Connection
1.Log in to Neurons for ITSM as an Administrator.
2.Open the Configuration console > Extend > Neurons Platform Integration.
The Neurons Platform Integration page is displayed.
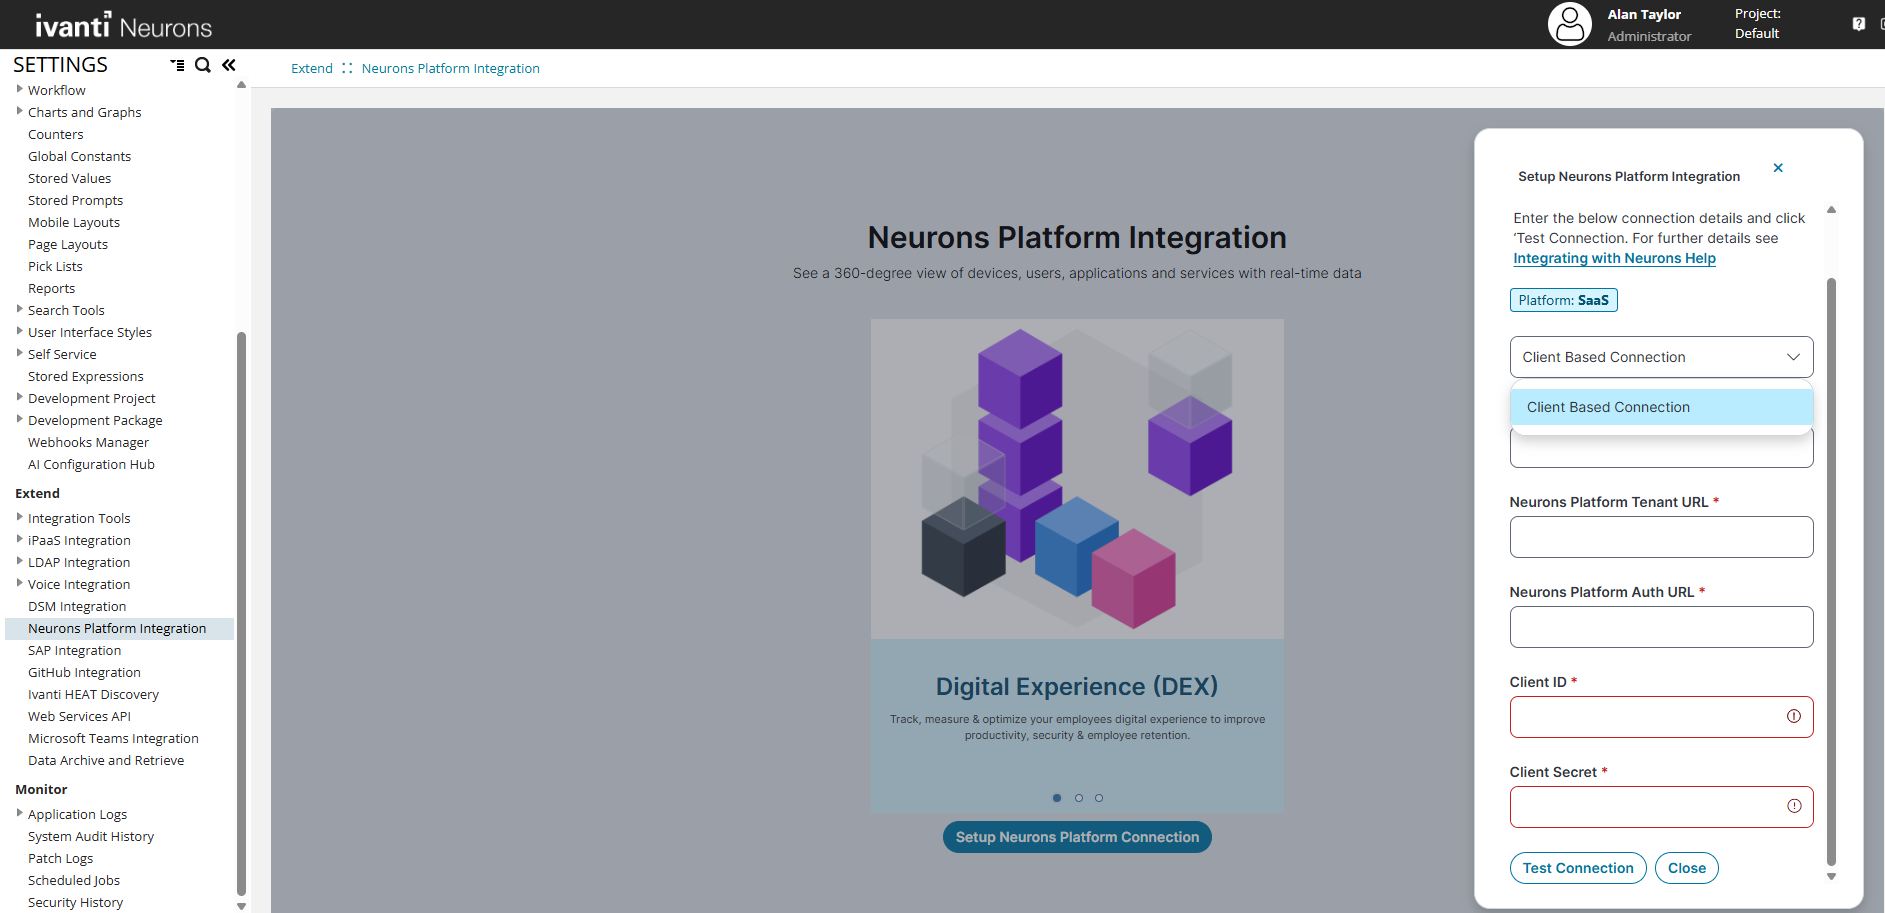
Neurons Platform Integration page
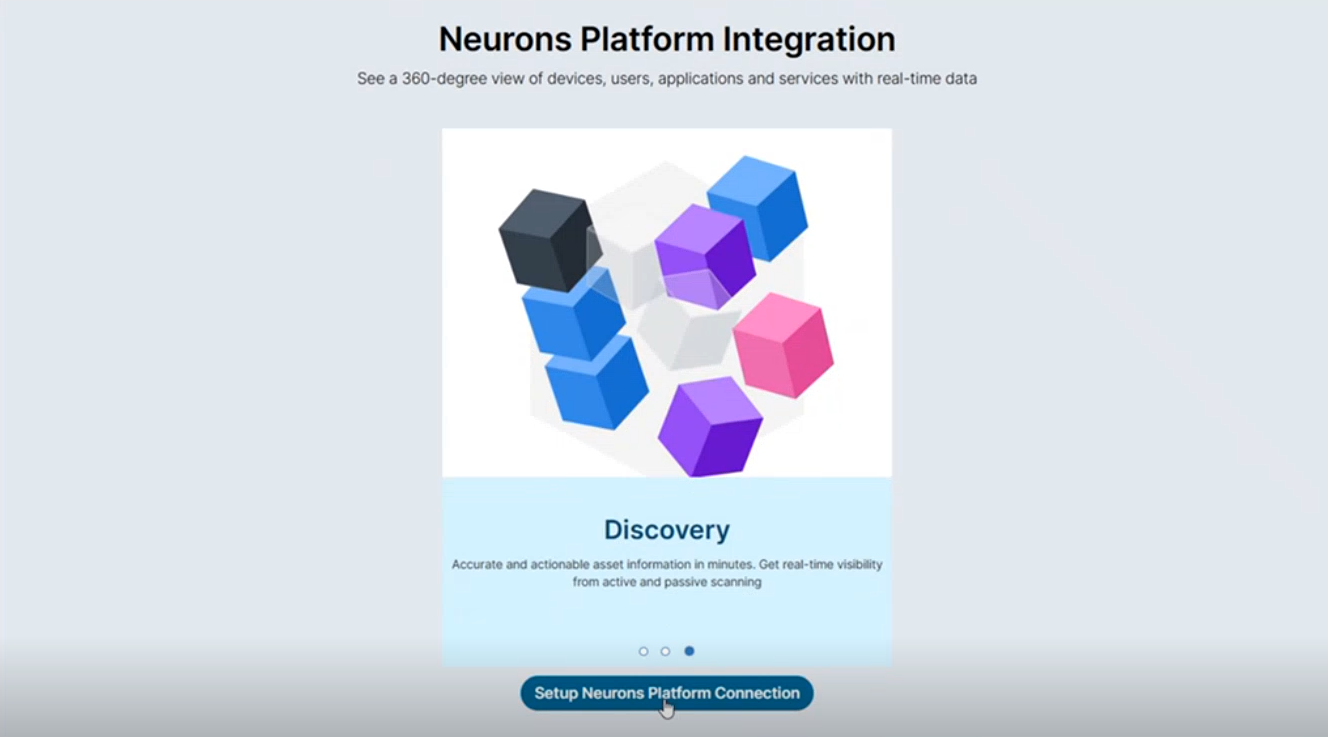
3.Click Setup Neurons Platform Connection.
The platform information of the tenant is displayed at the top.
4.Enter the following details:
| a. | Connection Type- By default, the system sets the connection type to Client Based Connection. |
| b. | Name- Enter a contextual name for the connection. |
| c. | Neurons Platform Tenant URL:- Enter the Neurons Platform Tenant URL. |
| d. | Authentication Details - Enter the relevant information for: |
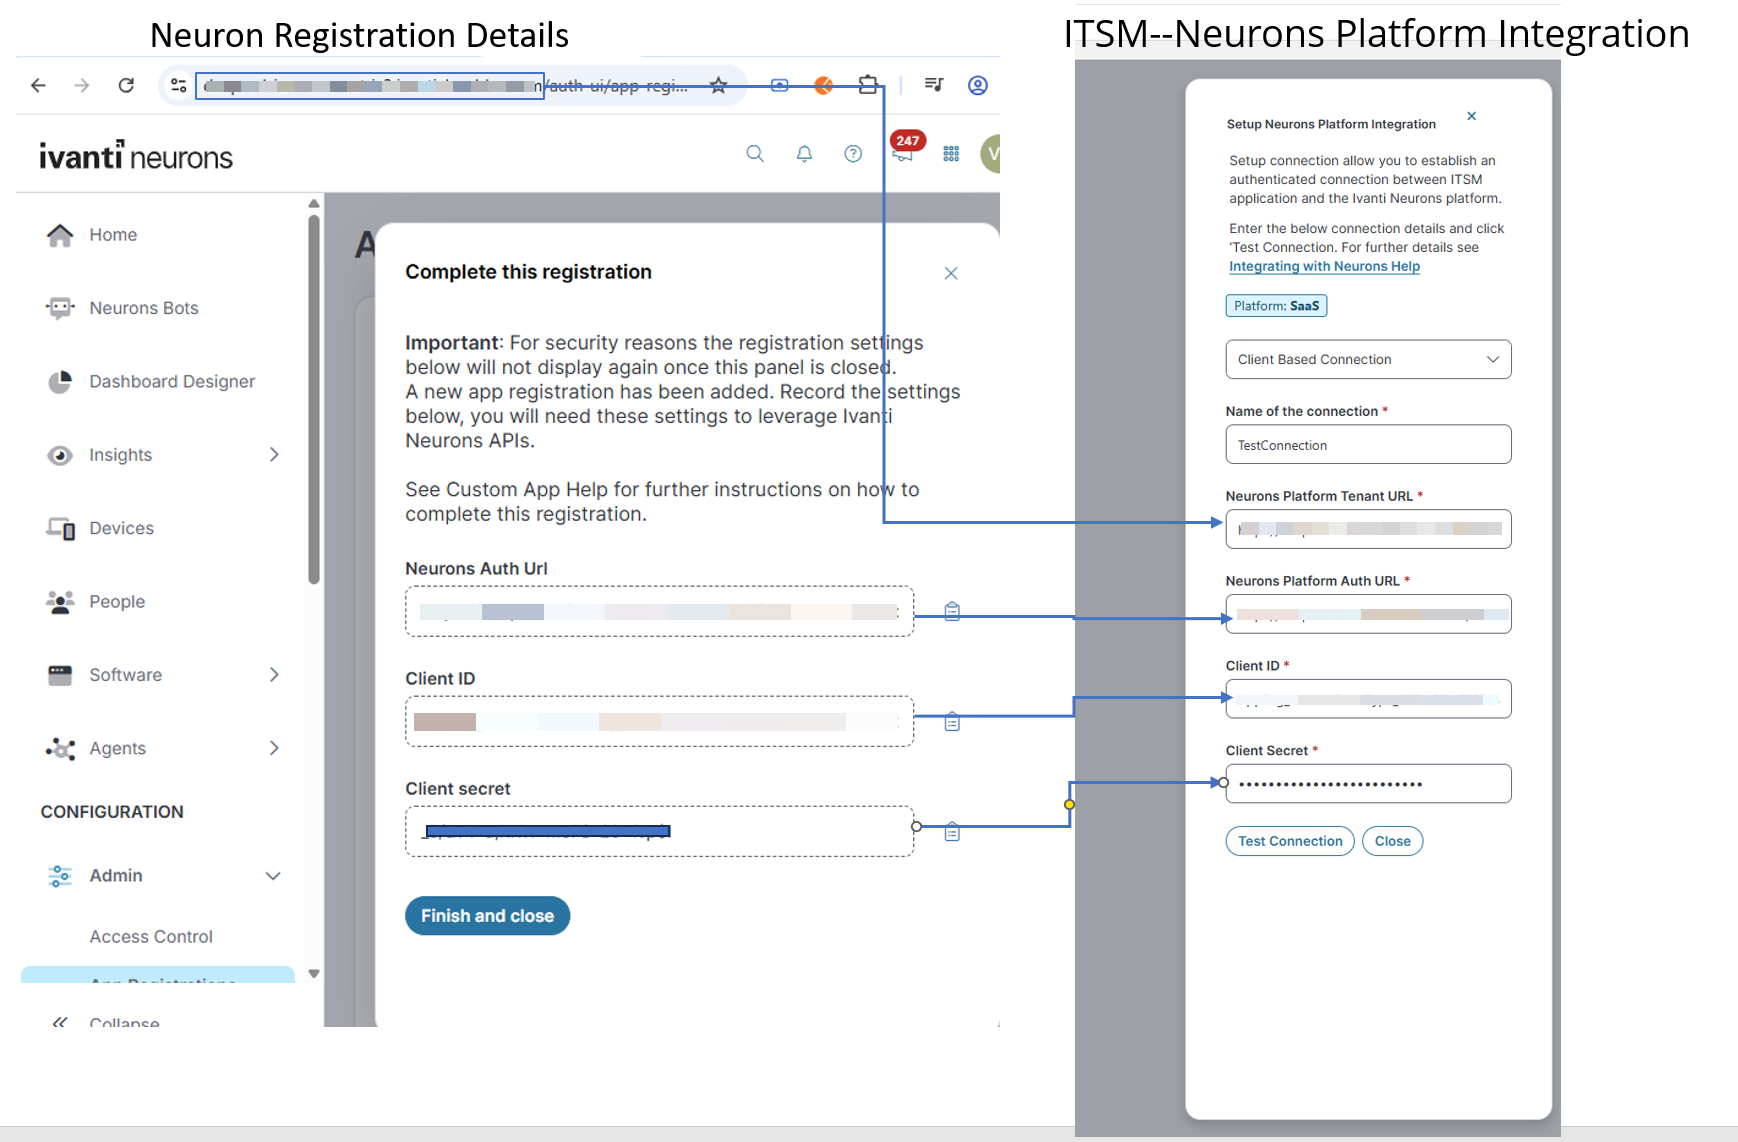
•Neurons Platform Auth URL
•Client ID
•Client Secret
Setup Neurons Platform Integration Display
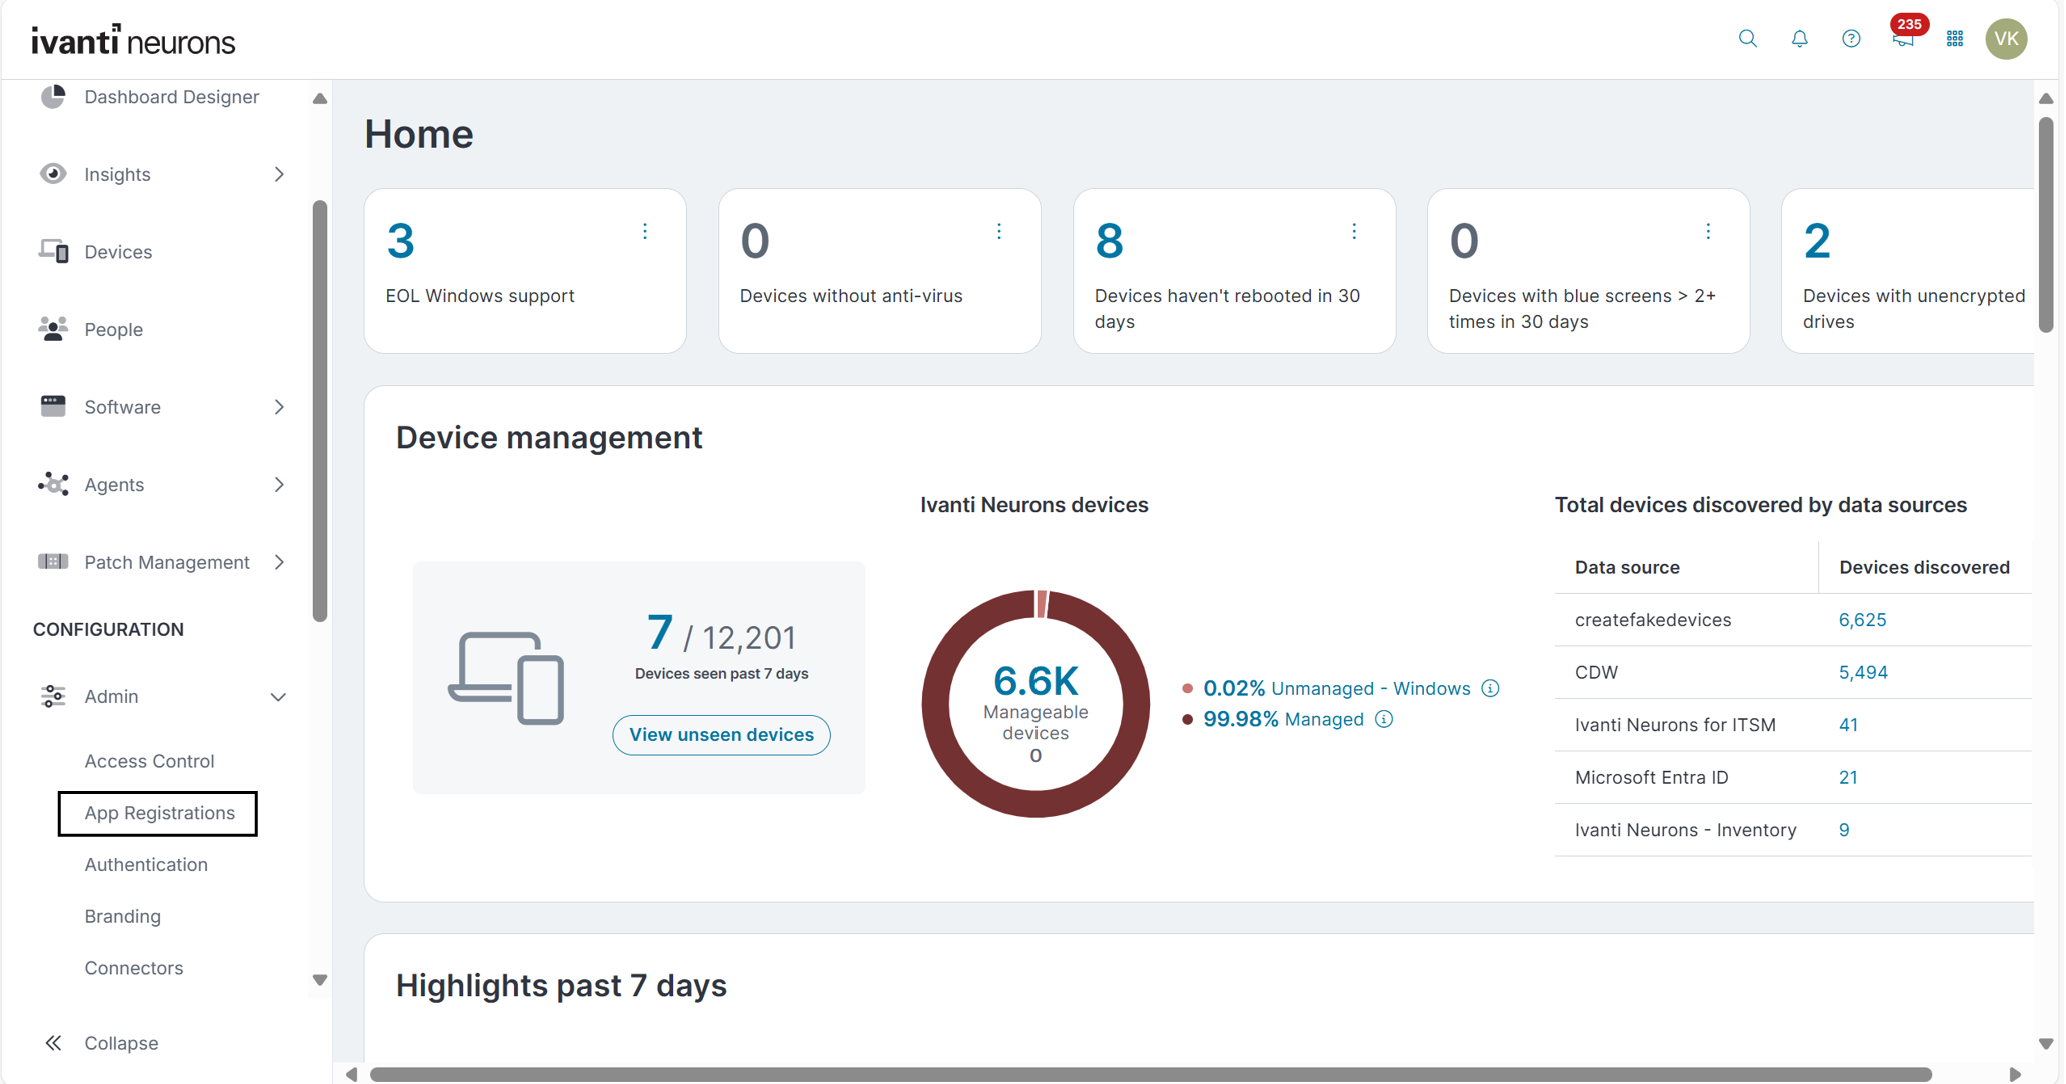
To obtain the authentication details go to the App Registration section in any Neurons Tenant.
Retrieve Authentication Details from Neurons
To fetch the required authentication details follow the steps:
1.Open a web browser and log into any Neurons Tenant.
2.Go to Home > Admin.
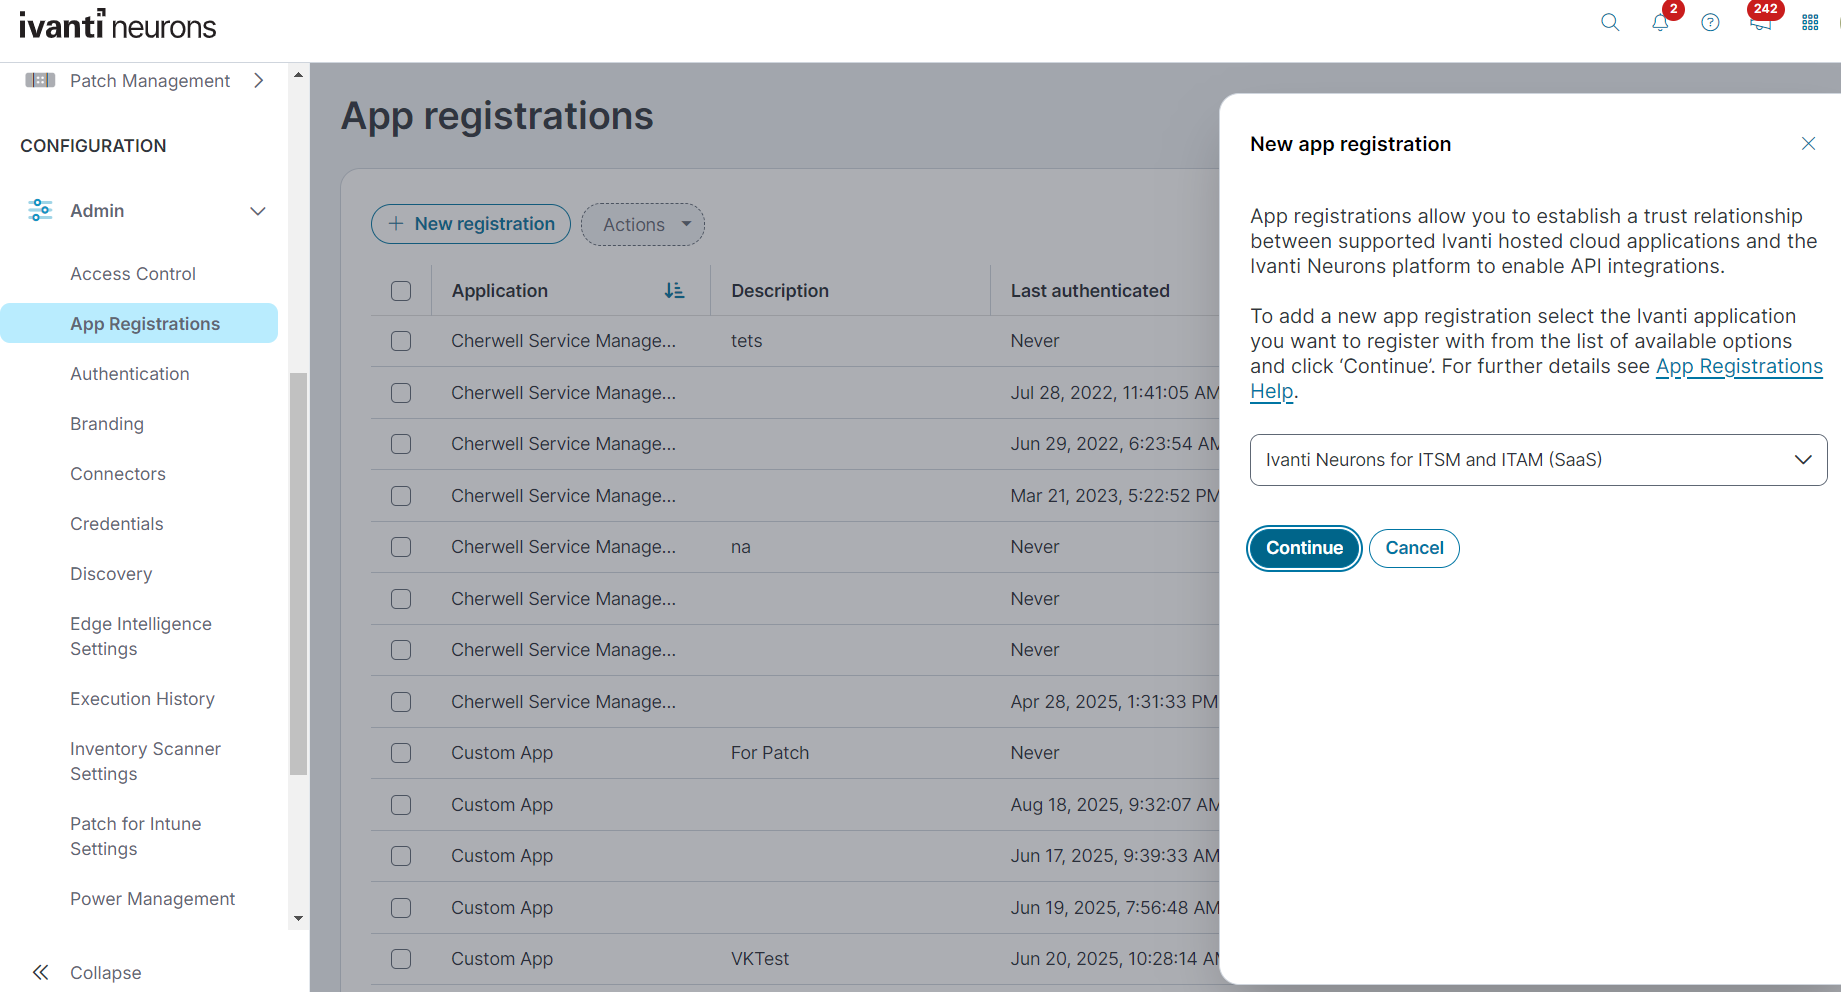
3.Click App Registration > New Registration
4.Select Ivanti Neurons for ITSM and ITAM (SaaS) on the displayed right panel.
5.Click Continue.
6.[Optional] You can enter a description in the text field.
7.Click Register.
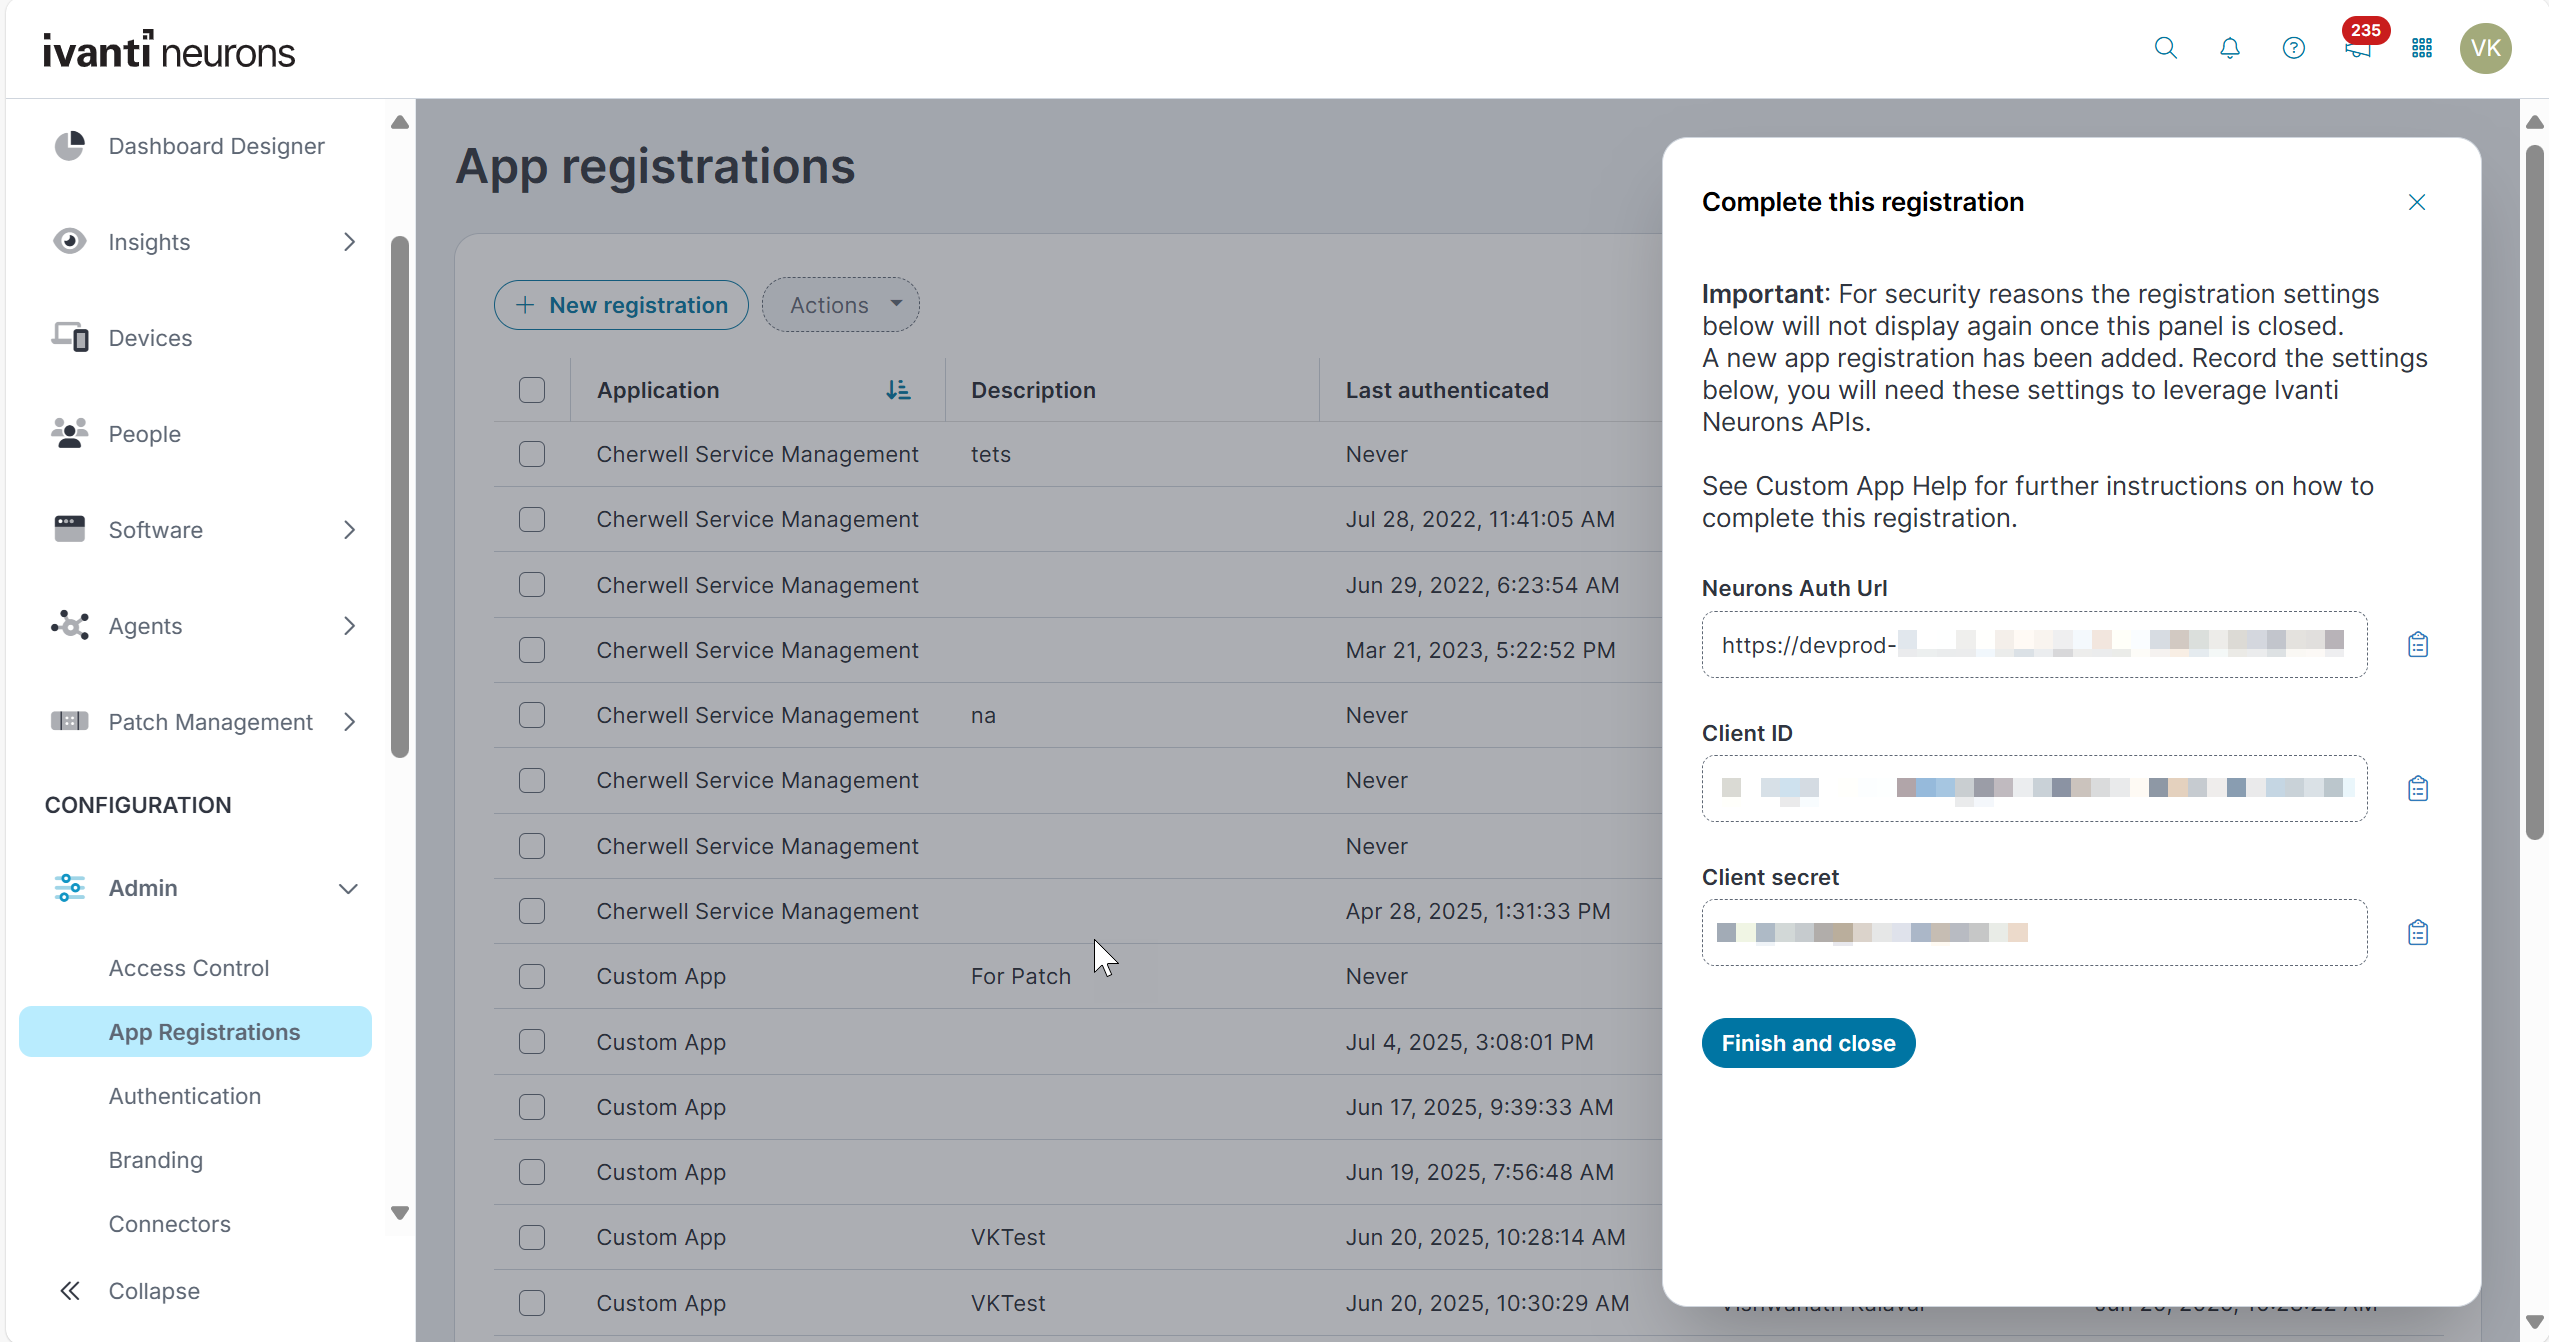
A success message is displayed and values with authentication details appears on the right panel.
8.Copy the Neurons Platform Auth URL, Client ID, Client Secret values.
Neurons Tenant Home Page
Continue with choosing Ivanti Neurons for ITSM and ITAM (SaaS)
Displayed Authentication Values
• For more information, refer to the New Registration section in the Neurons App Registration topic.
• Ensure that the App registration is set up as a Ivanti Neurons for ITSM and ITAM (SaaS), as this is required to support all Client based connections such as Patch Intelligence, Neurons Bot, and others.
-
Navigate to Setup Neurons Platform Connection display and paste the values.
-
Click Test Connection.
Fill Authentication Values
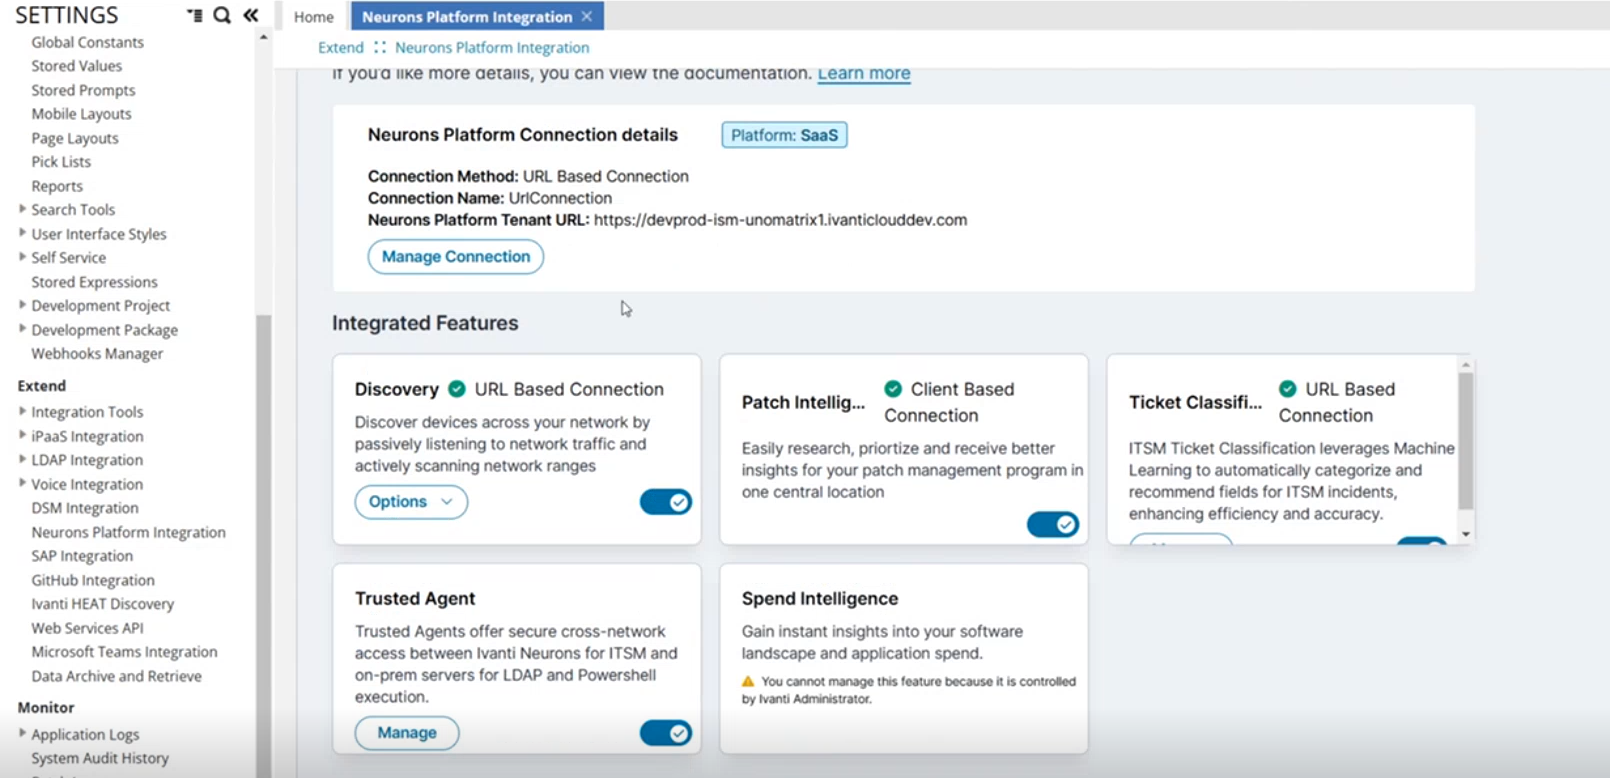
After the test connection is successful, the Neurons Platform Integration page is displayed with details of the account and the integrated features are listed with a green check mark.
If you upgrade to version 2025.4, after the initial app registration using the client secret ID, you can test the connection multiple times without re-registering the app. The client secret ID is retained and doesn’t need to be re-entered for subsequent tests.
Configure the Integration using URL Based Connection
From version 2025.3, to enhance security and standardize connections, manual URL-based connection is removed for SaaS customers. URL connections must be configured via Client-Based Connection.
1.From the Neurons Platform Integration page, select URL Based Connection.
When you select URL-Based Connection, make sure you do the following configurations in the Config Tenant:
UnoLandscape, UnoTenantId, and UnoRecId
2.Provide a contextual name for the connection.
3.Enter the URL in Neurons Platform Tenant URL.
4.Click Test Connection.
Once the connection is successful, the Neurons Platform Integration page is displayed with details of the account and the integrated features are listed with a green check.
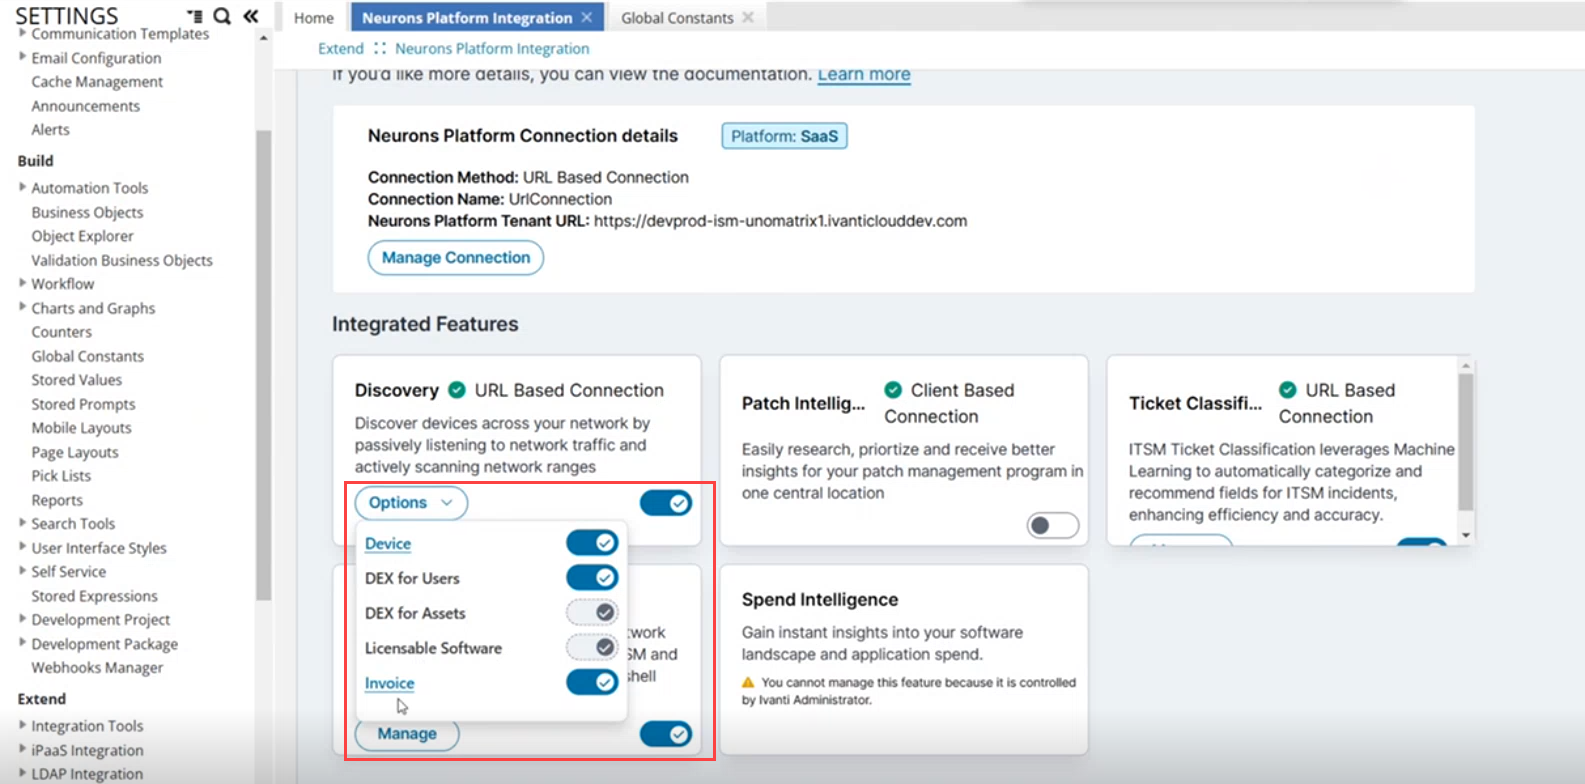
Working with Integrated Features
The Neurons Platform Integration page displays all the Neurons integrated features. You can control the feature from this page without going through the hassle of navigating to the Global Constants or the relevant feature page.
App registration is a one time configuration. Enter the app registration credentials in Manage Connections in Neurons for ITSM to complete the setup. A successful test confirms that all integrations display a Connected status. To perform the test connection again, you must complete the app registration in Neurons Discovery and enter the new credentials, as the client secret resets to the default.
Ivanti recommends migrating to app registration and testing the connection to ensure continued integration support, as upcoming releases support integration exclusively through app registration.
Enable/disable the feature
•From the Neurons Platform Integration page, use the toggle button for the feature you wish to enable or disable.
If the feature is enabled, the relevant Global Constant is set to True. If not, it's set to False.
Other actions
1.Log in to Neurons for ITSM as an Administrator.
2.Open the Configuration console > Extend > Neurons Platform Integration.
The Neurons Platform Integration page is displayed.
3.From the Neurons Platform Integration page, click the Options button for the feature you wish to take action.
A list of options is displayed.
4.Use the toggle button next to the option to enable or disable it.
5.Click the link to navigate to the relevant page to make necessary changes.