Integrating Microsoft Teams with Ivanti Neurons for ITSM
Role: Administrator.
Minimum Version: Neurons for ITSM 2021.1
Neurons for ITSM seamlessly integrates with Microsoft Teams Bot to create a custom Teams app. This enables Self Service users to chat with Service Desk Analysts, create incidents, submit customized service requests, and check the status of their tickets from the Teams app. This enhanced integration improves user experience by streamlining ITSM interactions directly within Microsoft Teams.
Integration Process
-
Enable the Global Constant from the Configuration console > Global Constants > MSTeamsIntegrationEnabled > set it to True. By default, this option is set to False.
-
Enable the Neurons for ITSM Chat feature. Refer to Configuring the Chat Feature.
-
Ensure Microsoft Teams application is installed on your computer with Admin credentials.
-
Ensure that Secure Sockets Layer is enabled. SSL is required for the integration to function properly.
It is recommended to set up the chat application first, followed by the Teams Bot application.
1.Log in to your Microsoft Teams account.
2.Open the Microsoft Teams Developer Portal. Clients must have an account for the Teams Bot to function.
In the Microsoft Teams Developer Portal, the page opens in the old UI by default. To open new UI, select New Developer Portal toggle.
3.From Apps, open App Studio and create a new app.
4.Enter the following details:
|
Fields |
Description |
|
|---|---|---|
| Details | ||
|
App Details
|
Short Name and Full Name |
Contextual names of the app. |
| App ID |
This is auto-generated by Microsoft App Studio. |
|
| Package Name |
Contextual name of the package. |
|
|
Version |
Version number of the package. |
|
|
Short Description and Full Description |
Contextual descriptions of your app. |
|
|
Developer/Company Name |
Your company name. |
|
|
Website |
Your company website URL. |
|
|
Privacy statement |
URL to the privacy statement of your organization. |
|
|
Terms of use |
URL to the terms of use or policy page of your organization. |
|
5.Optionally, click Branding to add a branding logo or other elements of your organization.
6.Click Save.
Update validDomains fields in an Existing Teams App
When you upgrade to 2025.4 version, a new Teams feature displays KB and FAQ suggestions in pop-up windows. To support this feature, you must update the validDomains field in your existing Teams. To update the app:
1.In the Microsoft Teams Developer Portal, open the existing bot app.
2.Increment the app version (for example, from 1.0.0 to 1.0.1).
3.Add the tenant ID to the validDomains section as a valid domain.
.png)
'Stg-url.ivanticloud.com' represents the expected format of the URL. It does not correspond to a real customer environment.
4.Download the updated app package.
5.Upload the new package using one of the following methods:
•Through the Teams Admin Center.
•Directly in Microsoft Teams, depending on your deployment method.
6.Verify that the updated version is installed and available to users.
Create, Configure, Generate Client Secret Key and Link a Bot to Microsoft Teams App
1. Open the Microsoft Teams Developer Portal and log in.
Developer Portal
2.Once you have logged in, you can now create your Bots.
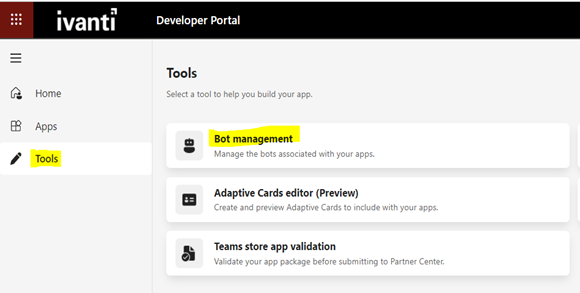
•Go to Tools > Bot Management. A list of existing bots is displayed.
•Select an existing Bot or create a new one.
•To create a new Bot, click Add and enter a name for the Bot.
3.After creating your Bot, configure it and generate the Client Secret Key by following the below steps:
-
To configure the Bot
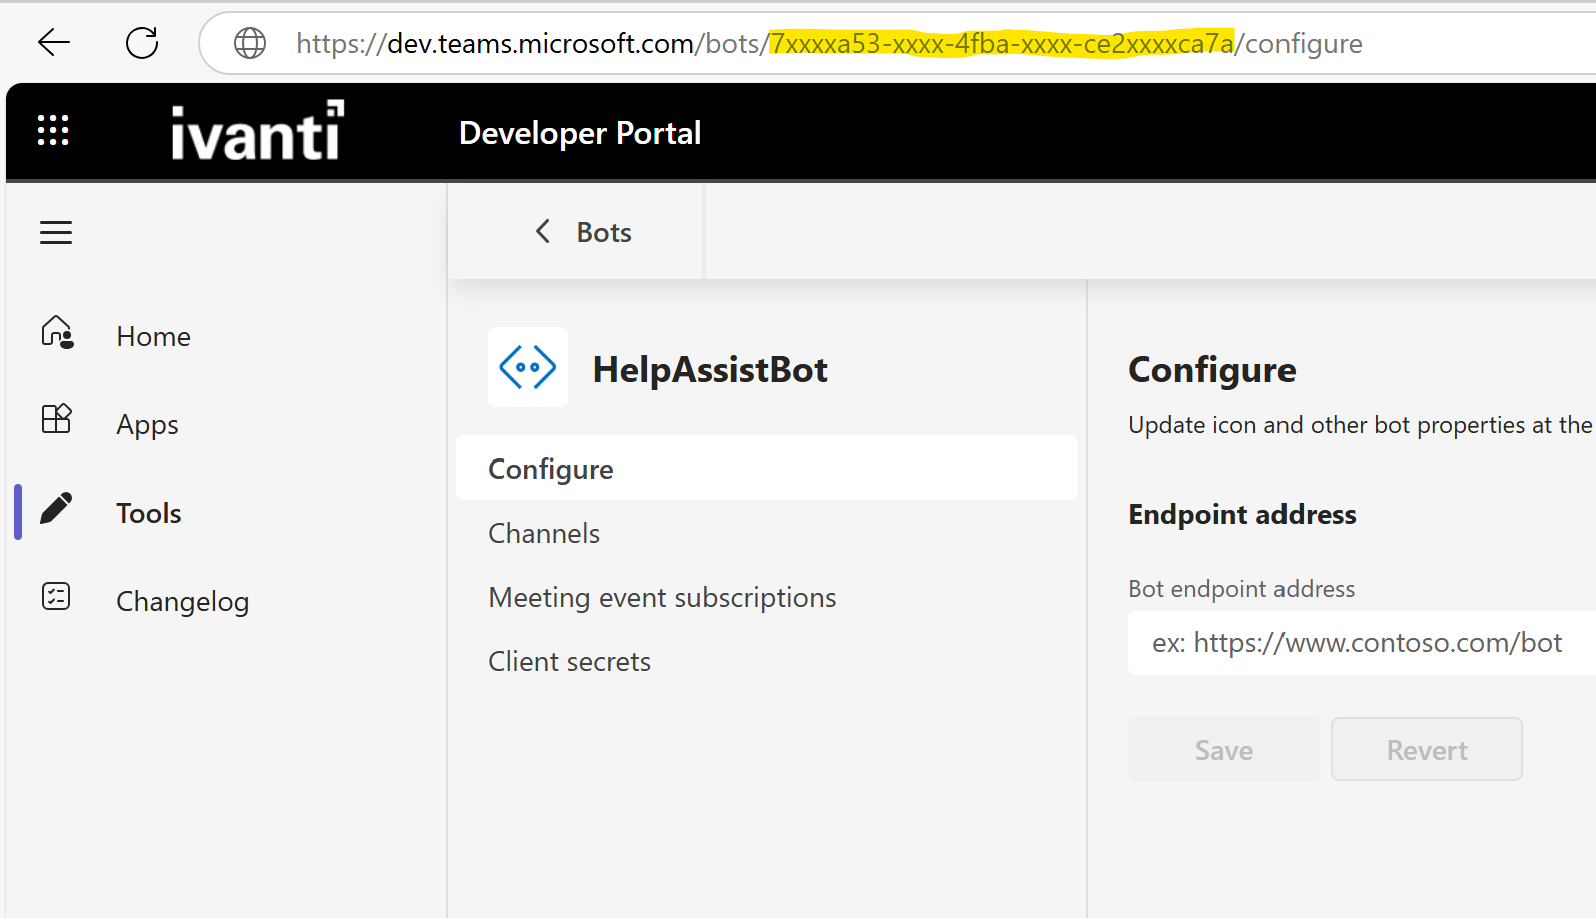
| a. | Click Configure and select the desired Bot. The Bot configuration page is displayed. |
| b. | You will need a Bot ID for the configuration. The Bot ID is displayed in the URL. |
| c. | Copy the Bot ID from the URL, which is the value between /bots/ and /configure. |
example : https://dev.teams.microsoft.com/bots/your-bot-id/configure
| d. | Copy and save the Bot ID . |
Below is a sample screenshot with the Bot ID in the URL.
Image of the masked Bot ID from the URL
| e. | In the Configure panel, add the Bot endpoint address and save. |
The Bot endpoint address should be in the following format:
https://{customer tenant ID}/IvantiBotService/api/messages?
To maintain secure communication, restrict public access to the Bot endpoint address. Revealing the endpoint will result in unauthorized access or misuse of the Bot service. Only the ITSM tenant address should be publicly accessible.
-
Generate the Client Secret Key for the Bot
-
Click the Client secrets option on the side panel and select Add a client secret Key for your Bot.
A dialog box with the auto-generated client secret key for your Bot is displayed.
Now that you have created the Bot, go through the following steps to link the Bot to the Microsoft Teams App.
-
Copy and save the Secret key to use it when configuring the integration between Neurons for ITSM and Microsoft Team app.
-
-
Now that you have created the Bot, go through the following steps to link the Bot to the Microsoft Teams App
-
In the Microsoft Teams Developer Portal, go to the App list, select your App, and open the App feature section.
-
Select Bot.
-
Choose a Bot from the Select an Existing Bot dropdown or manually enter the Bot ID.
-
In the What can your bot do? section, select Upload and Download files and click Save.
-
Under scope, select Personal checkbox, and click Save.
-
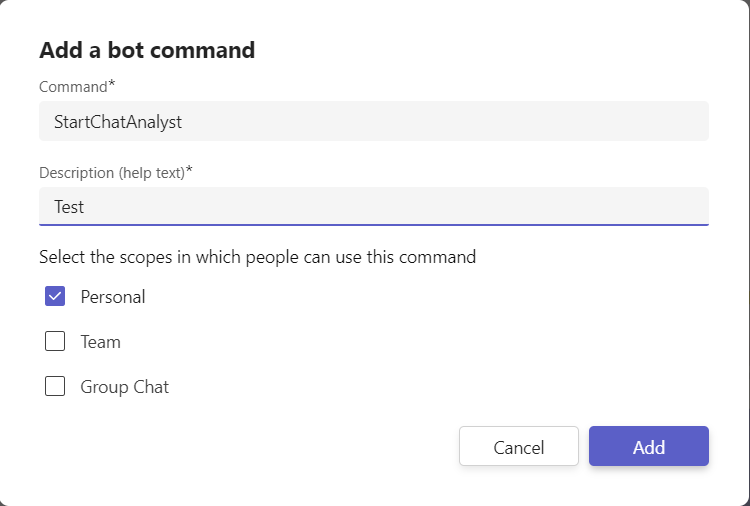
Optionally, in the Commands section, click Add a Command to add commands to the MS Teams Bot App.
A list of command options is displayed.
-
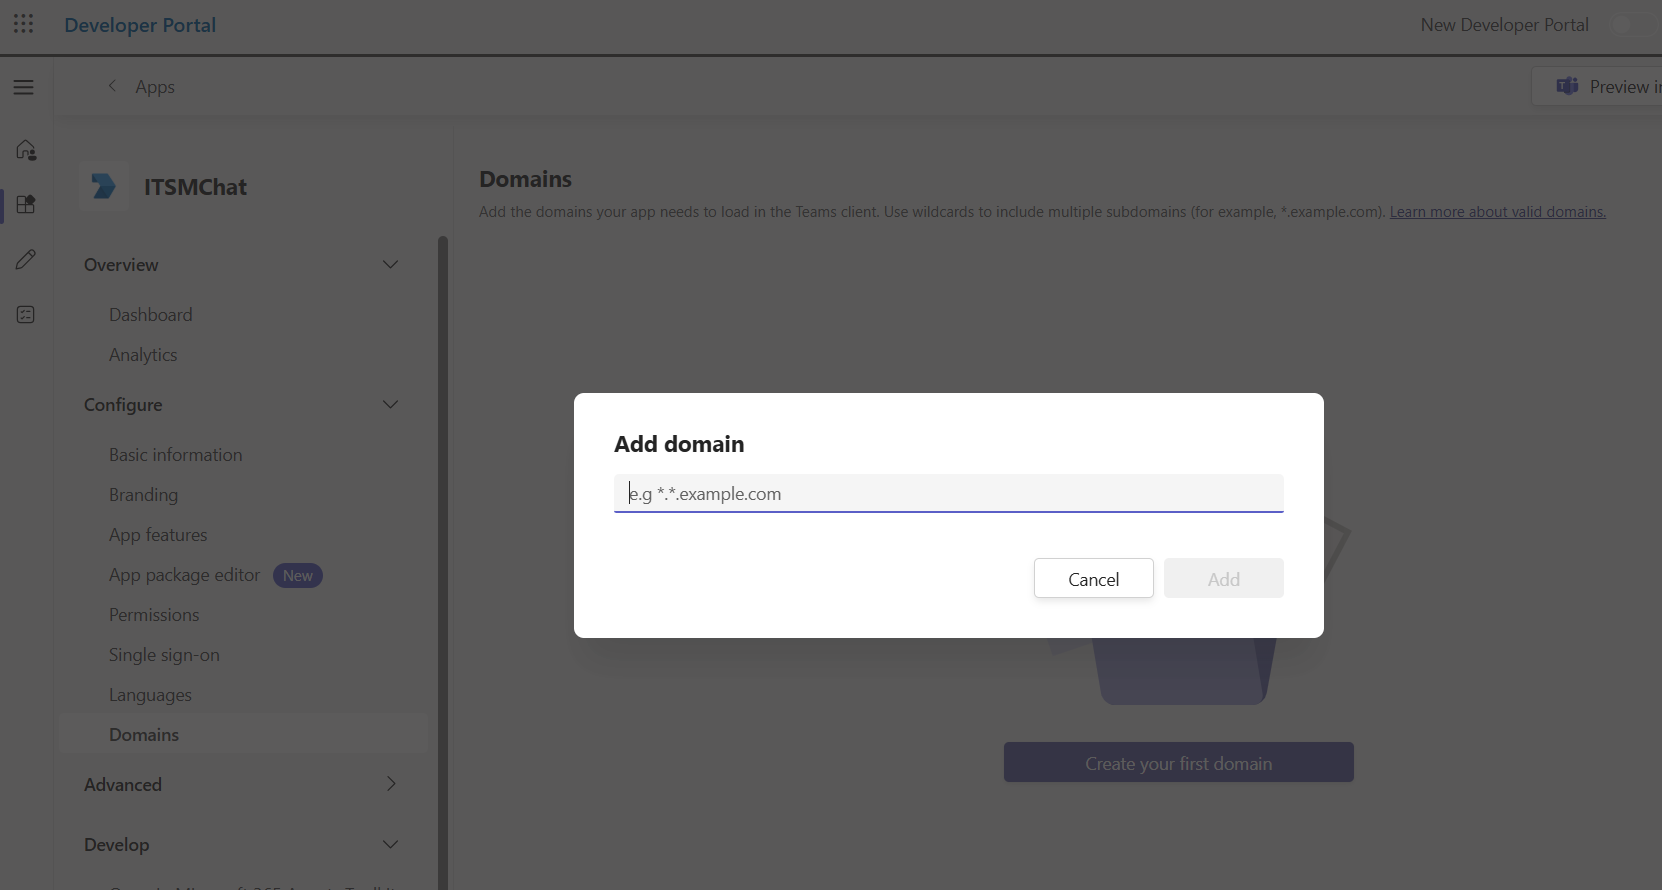
Add the tenant ID as a valid domain in the validDomains section.
Add Domain
Adding a command is a mandatory step when creating the MS Team Bot App through the Microsoft Teams Developer Portal.
Commands are added to the Bot to define its functionality and allow users to interact with it in specific ways. By setting up Commands, you enable the Bot to perform tasks, respond to user input, and provide useful actions like retrieving information, sending messages, or performing other automated functions. This helps users engage with the Bot more effectively in Microsoft Teams.
Neurons for ITSM supports the following commands:
•StartChatAnalyst
•StopChatAnalyst
•CreateIncident
•MyItemStatus
•Help
•CreateServiceRequest
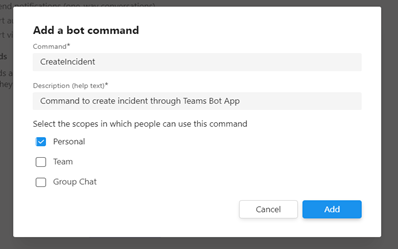
Adding a Bot Command
Enter the remaining commands similarly.
-
Select the Scope for the Bot's interaction.
•Personal: This limits the Bot to one-on-one conversations with you, making it ideal for handling personal tasks and questions.
Since this is the only available option, please proceed with selecting it.
Creating a CreateIncident Command
-
After adding all the commands, click Save to save all the settings.
You have now successfully created the MS Teams Bot App.
1.Go to the Publish section and choose App Package.
2.Click Publish on the top right corner of the page.
In the new UI of the Microsoft Teams Developer Portal, the Distribute button appears in the top-right corner instead of Publish.
3.Select the Download the App Package from the pop-up to download the app package for the MS Teams Bot App.
Image of the Download the App Package Pop-up

Uploading the App in Microsoft Teams
You can upload the Teams app and make it available for employees in your organization to use. Only when the app is uploaded and available, users can add it to their Microsoft Teams client app and use it as a communication channel to chat with Service Desk Analysts, create incidents, and view incidents' statuses.
1.Log in to your Microsoft Teams account.
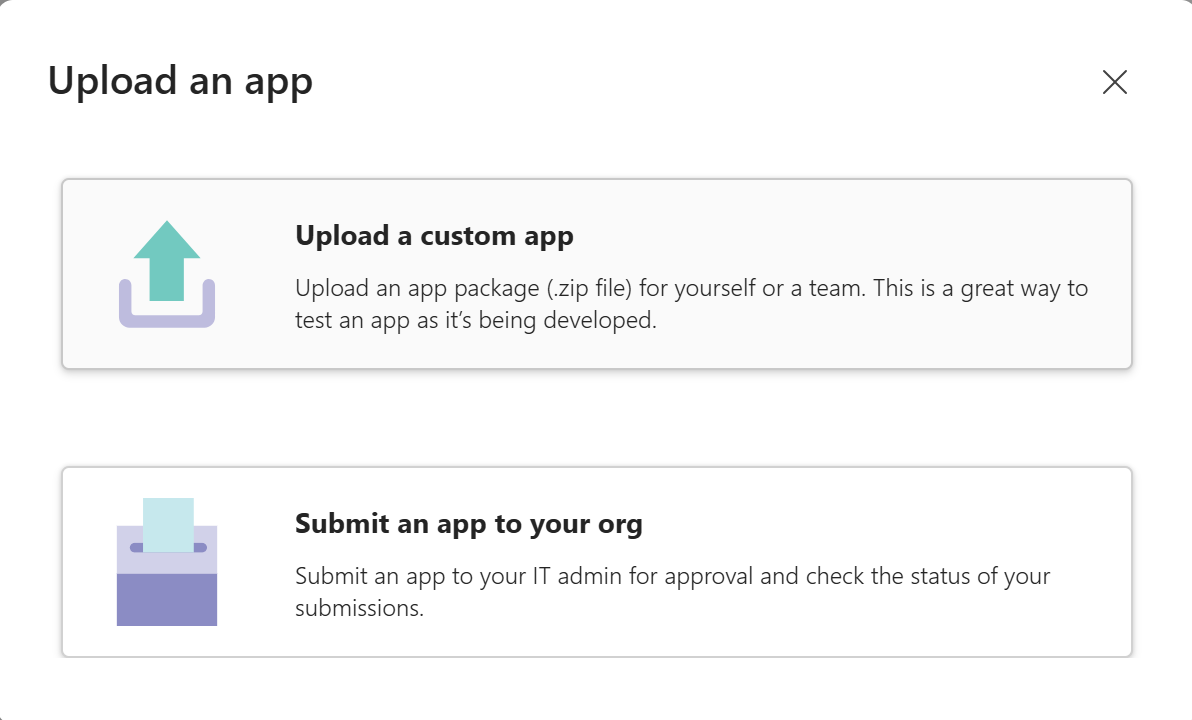
2.Go to Apps > Manage your apps > Upload an app.
3.Choose an option:
•Upload a custom app – if the app is for individual or team use.
•Submit an app to your org – if the app is for organization-wide use.
The app you built is now available for employees in your organization/team to use.
The Microsoft Teams integration is complete after configuring the integration in Neurons for ITSM.
-
Log in to Neurons for ITSM.
-
From the Configuration console, click Extend > Microsoft Teams Integration.
-
Enter the following information:
|
Field |
Description |
|---|---|
| Bot ID | Enter the Bot ID that you copied and saved while creating the Teams app bot. Refer to Step 1 to 6 in Creating the Teams app from Microsoft Teams App Studio section. |
| Bot Secret Key | Enter the Microsoft Bot Secret Key. This is the Teams app password that was generated and saved while creating your Teams App in Microsoft App Studio. Refer to Step 1 to 6 in Creating the Teams app from Microsoft Teams App Studio section. |
| Allow User only with Employee Email ID | After the first-level of authentication by Bot ID and Bot Secret Key, this option allows setting a second-level authentication. Selecting this option, you will be restricting access to the Teams app you created to users with registered employee email ID in Neurons for ITSM. |
| Allow User Only With Org Email Domain Names |
After the first-level of authentication by Bot ID and Bot Secret Key, this option allows setting a second-level authentication. Selecting this option, you will be restricting access to the Teams app you created to users with email address in the specified domains. You can add the domain names you want to allow in the Microsoft Teams Org Email Domain Name tab. For example, if you allow ivanti.com and ivanti.in domain names, then users having email addresses such as |
|
Validate Teams User Email ID with existing Employee Account |
Selecting this option, the Customer name for Incidents created through Teams app and the chat display name when chatting from Teams app will have the Neurons for ITSM registered user name. If the user is not registered in Neurons for ITSM, then the name specified in the Default Account for managing non-registered users field is used. |
|
Default Account for managing non-registered users |
Specify the default user name. This will be used as the Customer name for Incidents created through Teams and for the chat display name in the following scenarios: •When the Validate Teams User Email ID with existing Employee Account option is selected but the user is not registered in Neurons for ITSM. • When the Validate Teams User Email ID with existing Employee Account option is not selected and/or the user is not registered in Neurons for ITSM. |
|
Number of tickets to Display |
When the user selects the Check the Status of my Ticket option in a chat, the number of tickets that should be displayed is set in this field. The default is set to 10 which the maximum limit, user can set a number between 1 to 10. An error message is displayed when the number is set to anything above 10. The tickets created by ITSM users through any channel such as Microsoft Team, bot, email, or the ITSM application will be displayed. |
|
Custom Messages |
Use the fields in this tab to add custom messages and responses your Teams app should display. |
|
Microsoft Teams Org Email Domain Name |
This tab is available only when you select the Allow User Only With Org Email Domain Names option for second-level authentication. You can add the domain names allowed to access the Teams app. |
-
Click Save.
Configure Email Address for Microsoft Teams Bot Access
To use the Microsoft Teams Bot with your ITSM account, ensure that your email address is correctly configured in the ITSM portal. These steps applicable only to ISM users.
1.Log in to the ITSM portal, navigate to the email workspace.
2.Create a new user record and enter the user name and email address in the appropriate fields.
3.Save the changes.
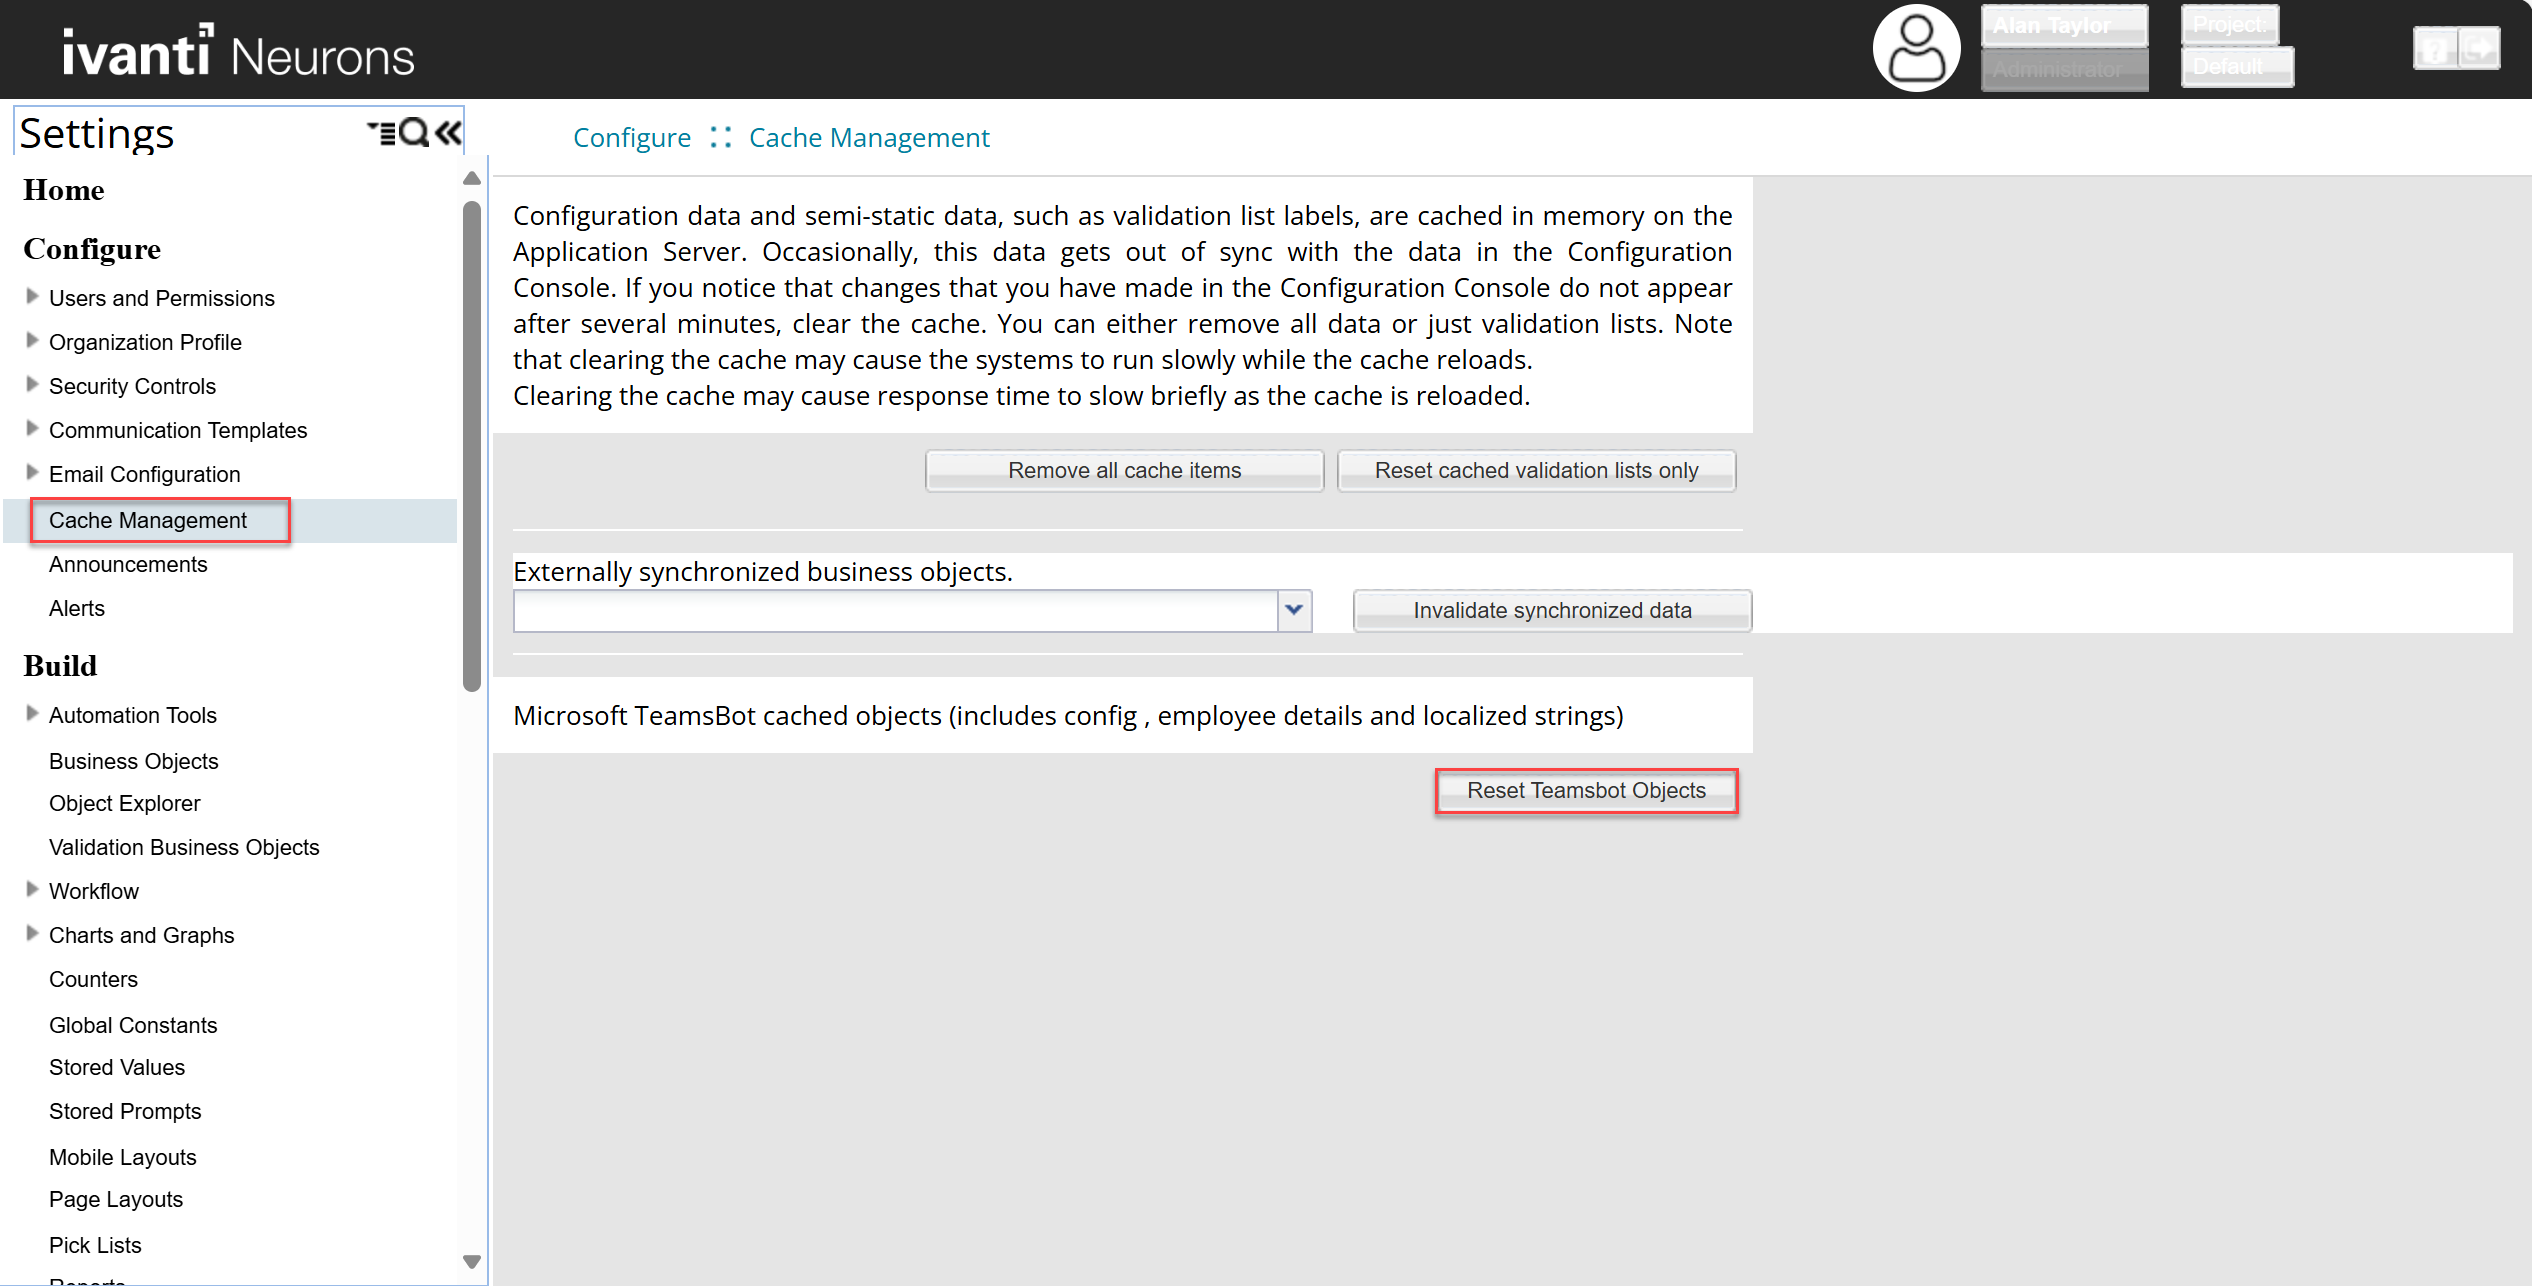
By default, changes takes up to 30 minutes. To avoid this and to reflect changes in the Microsoft Teams Bot, clear the cache.
Perform the following:
1.Go to Settings > Cache Management.
2.Click on Reset Teamsbot Objects.
This configuration step is not required for non-ISM users.
Configuring Bot with email address
You can configure custom questions in the Teams Bot before initiating an incident creation. The supported fields for customization include Summary, Description, Impact, and Urgency. Additionally, you can configure any text-based incident field based on your specific requirements. This flexibility allows you to customize the Teams Bot interaction to gather relevant information for a more detailed incident creation process.
•You cannot configure fields with duplicate display names.
•In some cases, the Teams Bot may not respond as expected due to a missing central-config-api-key entry in the Teams Bot appsettings.json file. This setting is part of the internal configuration and is not included in the standard documentation. If you've followed all setup steps and are still experiencing issues, please reach out to the Ivanti Support Team for assistance. Configuration changes should only be made under the guidance of Support to ensure system integrity.
To configure the custom questionnaire:
1.Open Configuration console, and click Microsoft Teams Integration under Extend.
2.Enter the ISM API key.
You must create a new specific key designated for teams and roles set to admin. If a new key cannot be created, use the existing key where the role is already set to admin. The ISM API key can be created or copied from Configure > Security Controls > API Keys.
3.Go to Incident Question Library tab.
4.Add a new question or edit the existing question.
Image of the Incident Question Library Tab

5.Click Save.
1.Open the Configuration console.
2.Navigate to Build > Pick Lists.
3.Select MicrosoftTeamsIncidentFieldPickList from the Get list data drop-down list.
4.Under Constraints, add a new Constraint for the custom field.
Adding Custom Fields to the Incident Question Library
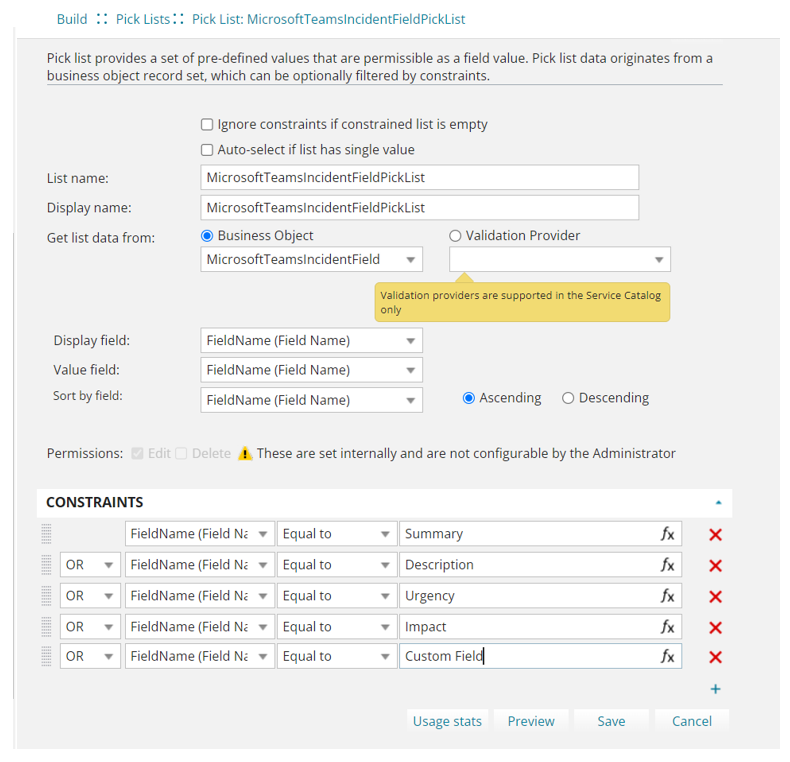
5.Click Save.
Request offerings published in ITSM are configurable in the MS Teams bot. Navigate to the Request Offering workspace and check the Enable for Teams Bot option. No additional configuration is required, providing a seamless experience.
1.Log in to Neurons for ITSM as an Administrator.
2.Select More > Request Offering. Select an offering from the list.
3.In the Define Request Offering tab, select the Enable for Teams Bot checkbox to enable this in the Teams bot.
4.Only request offerings with the bell icon have the Enable for Teams Bot checkbox available.
5.Click Save.
Limitations and Tips for Using the Service Request Feature in MS Teams Bot
To get the best out of the service request feature in the MS Teams bot, here are some key points to keep in mind:
-
Form Design Limitations:
Advanced features like aligning rows or adding custom masking to text or numeric fields, are not supported by the bot.
-
Pick List Restrictions:
Certain fields in pick lists, such as pricing or descriptions, are not supported in the bot. Also, Select all and MultiSelect options are unavailable in the bot.
-
Expression Limits:
Complex formulas or expressions that directly reference other fields or objects are not supported in the bot. Functions, like “!” are not supported by the bot.
-
File Uploads:
You can upload one file per upload field in a Service Request template. Supported formats are .png, .jpg, .pdf, .jpeg, or .doc.
-
Dropdowns:
Default values in drop-downs are not supported by the bot. All options are listed any preselection.
-
Validation Rules:
Complicated rules, especially those that rely on matching field names and values, aren’t supported by the bot.
Ivanti recommends usage of supported features. Ensure to test the Service Request templates before deployment.