Managing Service Request Actions and Permissions
You can configure service requests to allow users to edit or cancel them after submission. This provides flexibility to accommodate changes or corrections while maintaining control over the request lifecycle. In addition, you can restrict editing or cancellation after a specific stage in the workflow. For example, you might allow users to cancel a request until it has been approved. Once approval occurs, you can prevent further changes.
By default, requests with a status of Canceled, Closed, or Fulfilled cannot be edited or canceled. These statuses indicate that the request has reached a final state and is no longer actionable.
1.Log in to the application as a service owner or Administrator.
2.Open the Request Offerings workspace.
3.Open the service request to configure.
The Request Offerings wizard appears.
Request Offerings Wizard
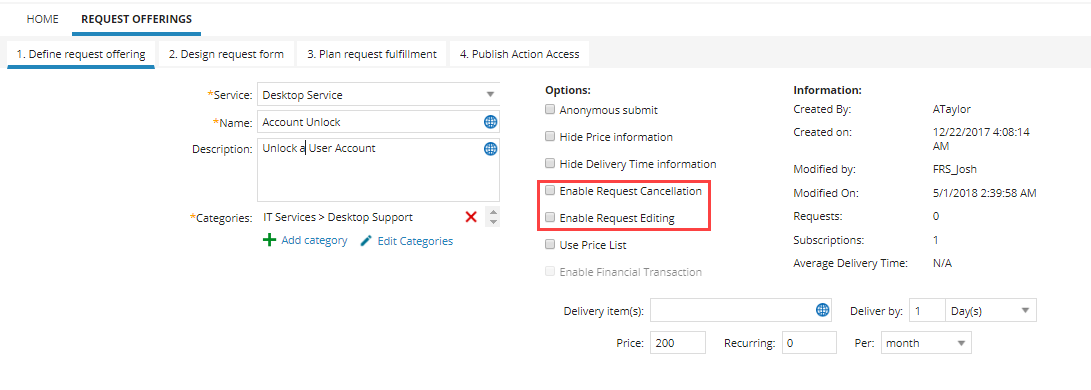
4.In the Define Request Offering tab, select:
•Enable Request Editing - Enables self service users to edit a submitted request, allowing them to update details after submission when corrections or additional information are needed.
•Enable Request Cancellation - Allows self service users to cancel a submitted request. Canceling sets the request status to Canceled and ends processing when the request is no longer needed or was submitted by mistake.
5.Click Save.
Users can now cancel or edit a service request once it has been submitted.
Users (except those in the Self service Portal) see a Cancel button ( ) in the service request toolbar. They can click this to set the status to canceled.
To remove cancel button:
1.In the Configuration console, click Build > Business Objects.
2.Click Service Request.
The Service Request details page appears.
3.In the Layouts tab, select ServiceReqLayout.New.
The Layout Editor appears.
4.Click formView.
The Form View Editor appears.
5. In the toolbar area, click Edit.
The Toolbar Editor appears.
Toolbar Editor
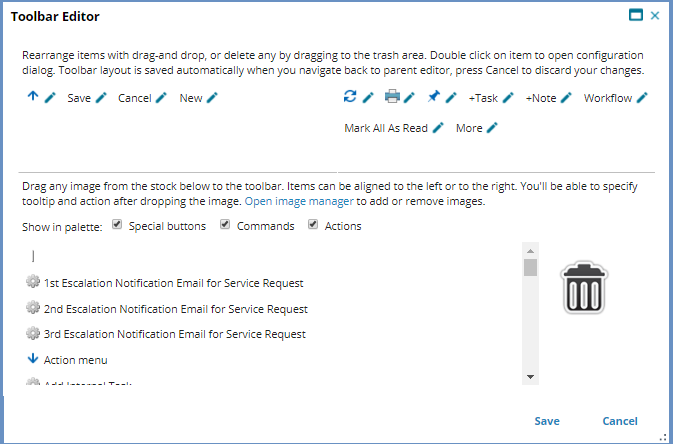
In the Toolbar Editor, the Cancel Service Request button appears in the white area. If the button does not appear, then it has been disabled.
6.Drag Cancel Service Request over the trash can icon.
This removes the button from the layout. The Delete Confirmation window appears.
7.Click OK.
8.Click Save to close the window.
9.Click Save again to save the layout.
The Cancel Service Request button no longer appears on the user workspace.
Administrators can add the Cancel button if it does not appear.
1.In the Toolbar Editor, drag Cancel Service Request from the list to the toolbar area.
The Toolbar Button Editor window appears.
2.Enter the following parameters:
| Parameter | Description |
|---|---|
|
Action |
Select Button Invokes Action > Cancel Service Request. |
|
Display |
Select Image and Text. |
|
Image |
icon_task_cancel.png |
|
Text |
Default |
|
Tooltip |
Enter Cancel Service Request |
3.Click Save.
4.Click Save again to close the editor.
5.From the toolbar, click Save.
You can prevent editing or canceling at specific points in the workflow by setting the ForceNotEditable and ForceNotCancelable to True in the Update workflow block.
1.Log in to the application as the service owner.
2.Open the Request Offerings workspace.
3.Double click the request to modify.
The Request Offerings wizard appears.
•In the Plan Request Fulfillment tab, the Fulfill option must be set to Workflow.
4.Drag the Update block onto the Workflow Designer, and double click the block header to open the properties.
5.Set the following parameters under ServiceReq > Fields (you can set either item or both items):
| Field | Description |
|---|---|
| Force Not Cancelable | Set to True to prevent canceling. |
| Force Not Editable | Set to True to prevent editing. |
Prevent Editable or Cancellable Service Requests
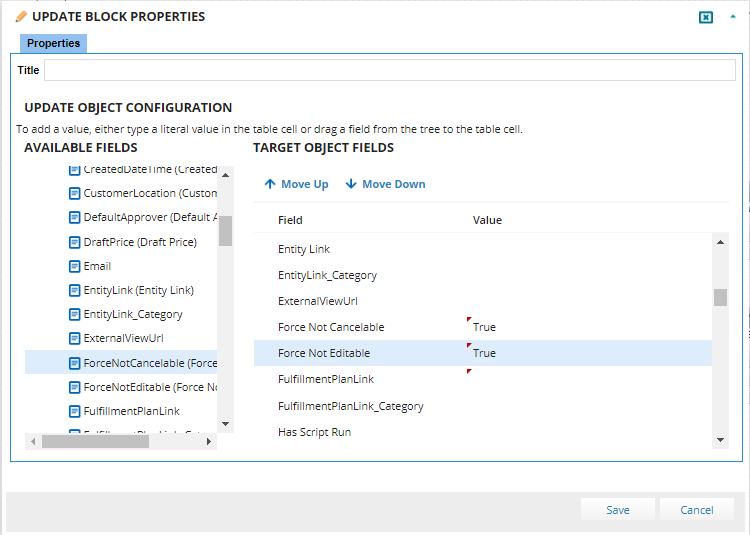
6.Click Save.
7.Connect the block to the workflow. For example, connect the Approval block to the Update block, then connect the Update block to the next block.
Approval Block in Workflow
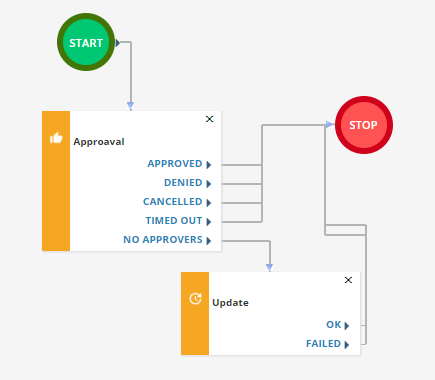
After approval, users cannot edit or cancel the request.
8.Click Save.
Users in the Self service Portal do not have a toolbar. The Cancel button appears in the form interface.
Service owners must define the Cancel Request quick action within the request offering workflow. Refer to Using Workflows.