Incident creation agent
Minimum Version: Ivanti Neurons for ITSM 2026.1
The Incident creation agent enables users to report issues using natural language and automatically creates incidents with the relevant details, ensuring faster and more accurate incident logging.
To enable and configure the Incident creation agent, do the following:
1.Log in to Neurons for ITSM as an Administrator.
2.Open the Configuration console and select AI Configuration Hub > Agentic AI > Agent Settings.
3.Enable the Incident creation agent using the toggle button.
An additional toggle button with the same function is available in the upper-right corner of the agent page.
4.Click Configure to further set up the agent.
5.Under Knowledge base settings > Suggest articles before ticket creation, enable the toggle button if you want the agent to suggest knowledge articles before creating an incident.
6.Under Knowledge base settings > User can skip viewing knowledge base, enable the toggle button to provide users an option to skip the knowledge article search and go directly to Incident creation.
7.In Skip button name, enter a custom name for the skip button according to your preference.
8.Under Messaging > Successful creation, enter a success message that the agent shows after the successful Incident creation. You can add {IncidentId} and {IncidentLink} in the message, which displays the Incident ID and link to the incident record.
9.Under Incident handling, configure the following settings:
| a. | Default incident template: |
Set any incident template as default from the dropdown. When the agent cannot find the right incident template for a user's query, it will use the default incident template for the incident creation.
To view the available templates, go to Incident business object > Quick Actions > Edit Actions > Graphical Action Designer / Classic Action Designer > Your Actions > Templates.
You can also create new templates using the Create New Actions option. For more information, refer to Action Templates.
Image of the saved templates
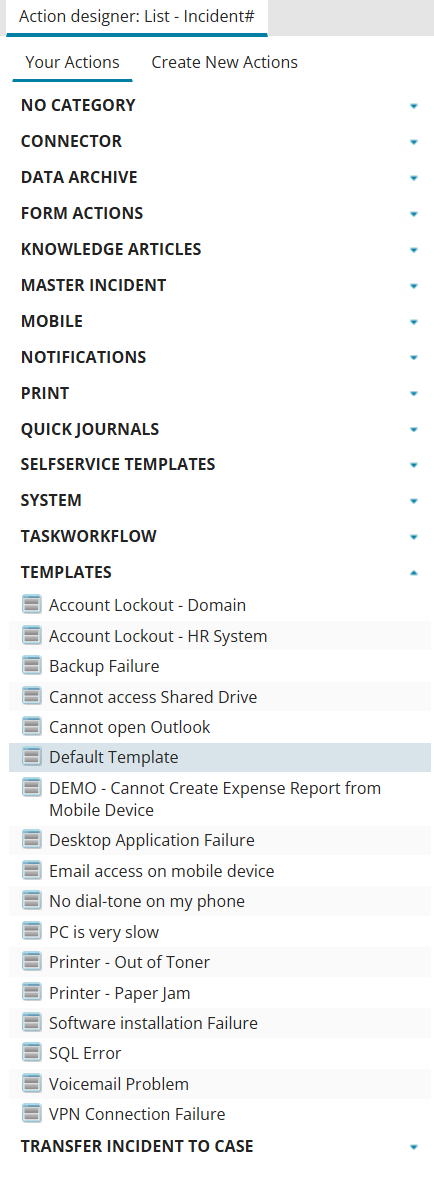
For a user query, if there is no matching template available in the given list, the agent will choose the default template for the incident creation.
For every saved template, you must provide values for all mandatory fields based on the form selected in the Default published incident form dropdown.
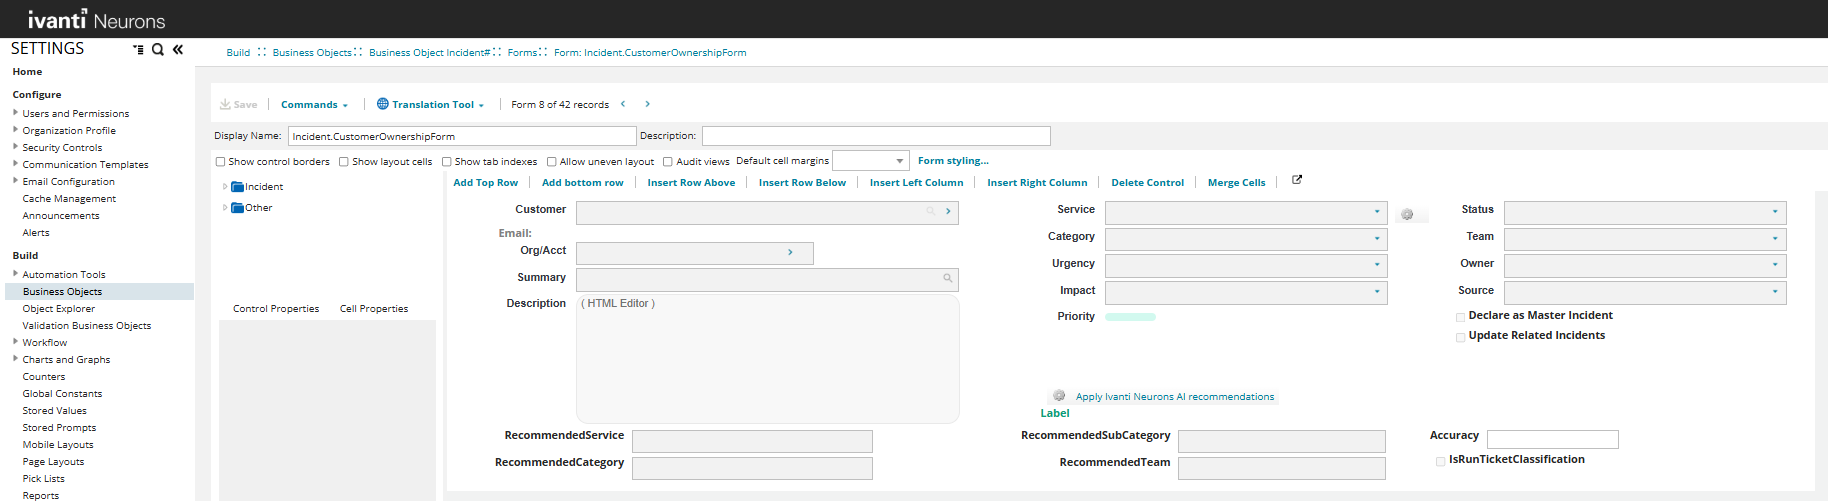
The selected form contains several mandatory fields that the agent needs to prefill during incident creation. While the agent can predict and prefill some fields based on the user’s query, it cannot reliably predict values for all mandatory fields.
For example, the following image shows an Incident form and its mandatory fields. The agent can predict and prefill Summary and Description from the user’s query, but it cannot predict fields such as Team and Owner.
The agent cannot predict Team and Owner details because these values are organization-specific. Therefore, administrators must provide values for such mandatory fields in the template. The following image shows a template with mandatory fields prefilled.
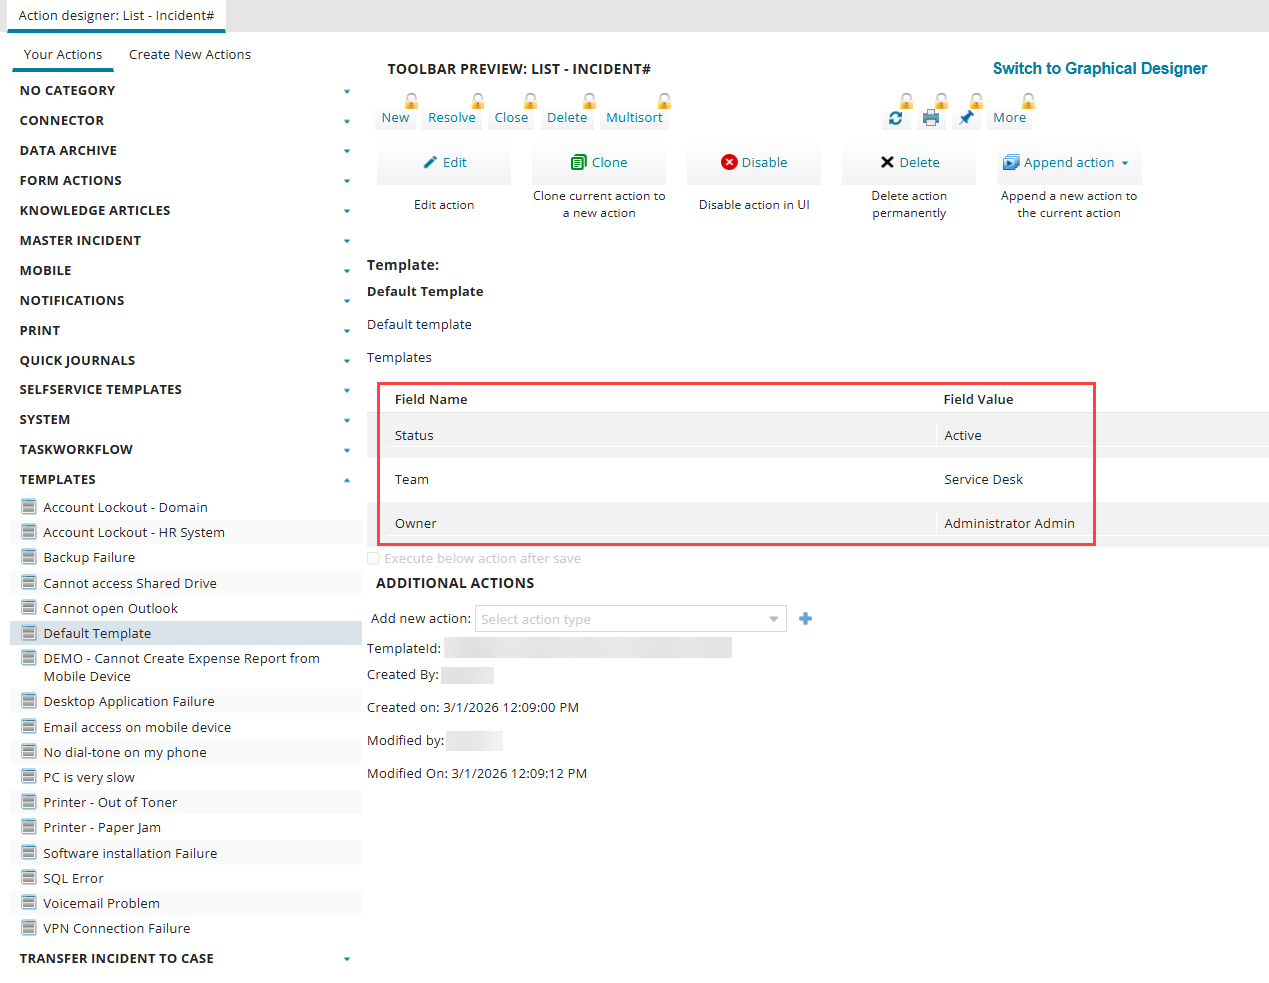
When creating an incident, the agent captures the mandatory field values from the template and uses them to prefill the incident form automatically.
If you don’t fill a mandatory field for the incident form in the template and the agent cannot predict the value, the agent will prompt the user for the information. This is not advisable because the field may not be adequately populated to select the field value, or the user may not have access to the information requested by the agent.
Ensure the fields added in the template are available in the Default published incident form, otherwise the field will not appear in the Incident record.
| b. | Default published incident form: |
Select the appropriate incident form from the dropdown. The form helps understand the fields required for Incident creation when a user opts for Incident creation. Therefore, ensure that all the required fields are present in the Form for Incident creation.
If any required fields are missing in the form, you can create them from the Incident Business Object > Fields tab and then update the form. To update the Form, go to Incident Business Object > Forms tab > open the relevant form.
For more information, refer to Using Forms.
| c. | CI mining question depth: |
Enter the maximum number of questions the Incident agent can ask to identify a specific user device.
| d. | Incident description question depth: |
Enter the maximum number of questions the Incident agent can ask to better understand the user’s problem.
| e. | Device mining: |
Enable this toggle to allow the Incident agent to search for possible devices that users might be experiencing issues with. If disabled, the agent does not ask about the device and creates the incident without device information.
If the agent cannot find the device through device mining, it prompts the user to manually provide the device name.
To ensure successful device mining, configure the following:
•Maintain device records in the CI
•Define the Employee - CI relationships
•Agentic configuration for Employee - CI relationships
•Enable the Full-text indexed option for relevant CI fields
-
Maintain device records in the CI
For agents to identify devices managed within your organization, ensure that device information is configured in Configuration Items (CI). The CI Business Object helps maintain a reliable record of the devices, enabling easy tracking agents.
For more information, refer to Working with Configuration Item Management.
-
Define the Employee – CI relationships
To configure an Employee – CI relationship, open the Employee Business Object > Relationships tab.
For the agent to identify the devices linked to a user/employee, you should configure the relationships between devices managed in CI records and associated users in your organization.
The relationships configured here are used by the agent for device mining.
For more information, refer to Using Relationships.
-
Agent configuration for Employee – CI relationships
For the agents to understand the relationship between an employee and CI, you must configure the relationship information in the Agentic configuration workspace as well.
To configure a relationship:
-
Log in to Neurons for ITSM as an Administrator.
-
From the top header bar, select More... to open the workspace selector.
-
Using the Search Objects field, open the Agentic Configuration workspace.
-
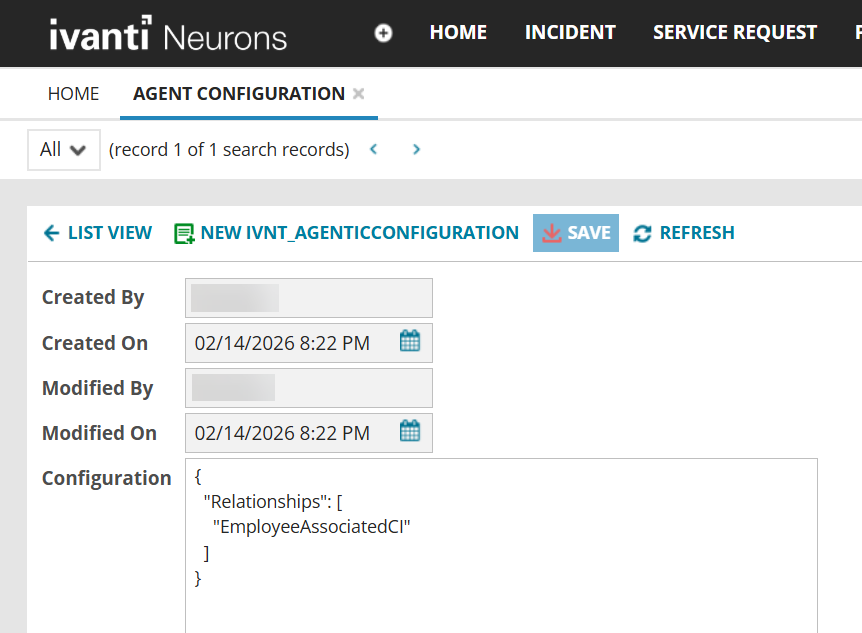
Click NEW IVNT_AGENTICCONFIGURATION.
-
Enter the following details:
•Created By: The name of the admin who created the record.
•Created On: The date and time when the record was created. Use the calendar icon to select the value.
•Modified By: The name of the user who last modified the record.
•Modified On: The date and time of the most recent modification. Use the calendar icon to select the value.
•Configuration: Configure the required relationship names by referring to Employee record > Relationship tab.
Image of the Agent Configuration page
-
-
Enable the Full-text indexed option for relevant CI fields
To enable full-text search on relevant fields, go to CI Business Object > Fields tab, and enable Full‑text indexed option.
The CI Business Object contains multiple device‑related fields, such as model number, model name, and serial number. For effective device identification, it is important to anticipate the type of device information users are likely to provide when prompted by an agent. To allow agents to search devices using this information, enable the Full‑text indexed option for corresponding fields.
By default, some fields are already enabled for full‑text indexing.
For more information, refer to About the Different Search Types.
| f. | Allow transfer to live agent: Enable the toggle button to transfer the interaction to your Service Desk Human Agent in case the Agentic AI bot cannot solve the user's request. |
Along with this toggle, you must also enable the Allow transfer to live agent toggle in Global Settings > Escalation Handling.
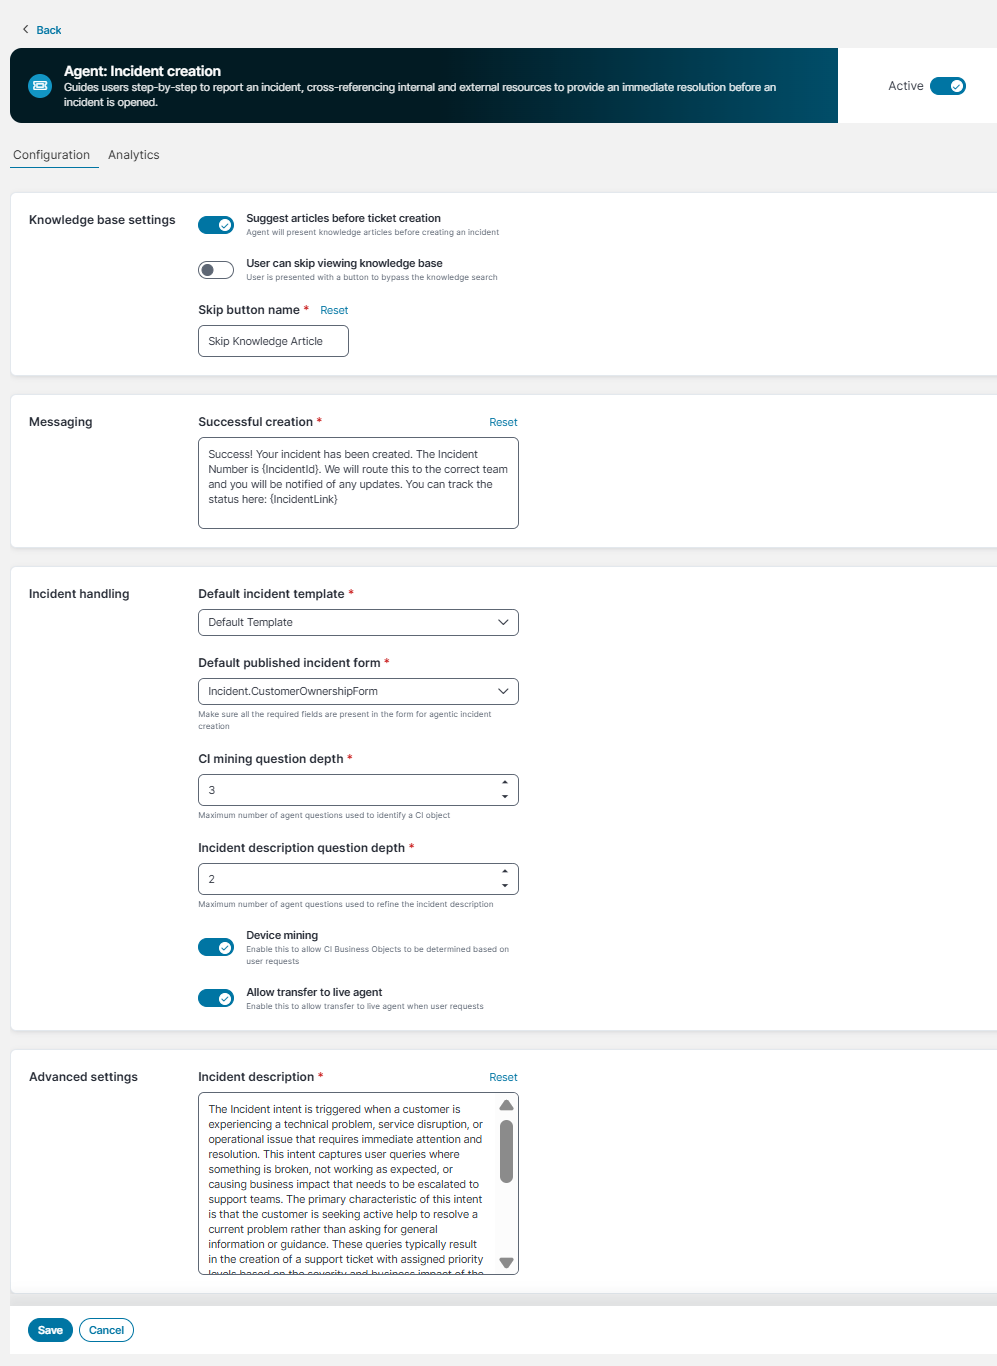
10. Under Advanced settings > Incident description, define the scope of the Incident agent by detailing the types of incident queries the agent can handle. You can also provide some example queries related to incidents to help the agent better understand the context. When users ask queries other than those defined here, the agent considers them out of context and replies to users accordingly.
Modifying the intent description might result in unpredictable agent behavior. We recommend that only users with experience in LLM prompt engineering make these changes.
Image of the incident creation agent settings
Fields marked with an asterisk (*) are mandatory.
Limitations
•While interacting with the Incident creation agent, certain query types prompt the agent to ask the user to upload a screenshot or image of the error. However, uploading screenshots, attachments, or supporting documents is currently not supported by Agentic AI.
•When creating an incident, after the incident draft is presented to the user, the user cannot modify the incident priority by simply stating, for example, This is a high priority issue. The Agentic AI determines the incident priority based on the incident description.
•When creating a new incident, the Agentic AI does not search for previously created similar incidents and their resolutions. As a result, multiple identical or similar incidents can be created.
•During a Live Agent Transfer session, the End Conversation button is displayed only after the Live Analyst sends a response. Users can end the session only after the Live Agent has sent a response and the chat bot is waiting for input from the user. If the Live Agent does not respond, the session times out automatically, but the user cannot terminate the session.
•During Live Agent Transfer, a conversation summary should be sent to the Live Agent at the beginning of the session. This functionality is currently not working.
•At the end of a Live Agent Transfer session, users are not informed about what to do next. However, when the session ends, the Agentic AI is reset and users should initiate a new prompt, even if no live agent was available.
•The Agentic AI handles only IT‑related issues. Other Line of Business (LoB) queries, such as HR, Facilities, and other non‑IT requests are not supported.
•The Agentic AI does not fully support language translation. While it understands prompts in multiple languages, it currently responds using a combination of the user’s locale and English. The following image shows an example in which the user provides input in French, but the agent responds in English:
![]()
•To create incident tickets for user queries, the Incident agent uses the appropriate template from the Saved templates list. In some cases, the agent might have limited ability to predict certain required fields in the templates, except fields such as Profile Link, Status, Summary, Description, Urgency, and Impact. For example, fields such as Team, Owner, Category etc. Therefore, we recommend that administrators prefill the required fields in all saved templates. Leaving these fields empty might cause the agent to ask end users for the field values or might even prevent incident creation.
•If you add EmployeeAssociatedCI to the Configuration fields on the Agent Configuration page, only the devices associated with the employee through EmployeeAssociatedCI are considered for device mining by default.