Service request agent
Minimum Version: Ivanti Neurons for ITSM 2026.1
The Service request agent understands what the user needs and automatically submits the correct service request, making service delivery faster and easier.
To enable and configure the Service request agent, do the following:
1.Log in to Neurons for ITSM as an Administrator.
2.Open the Configuration console and select AI Configuration Hub > Agentic AI > Agent Settings.
3.Enable the Service request agent using the toggle button.
4.Click Configure to further configure the agent.
5.Under Messaging and interaction, configure the following settings:
•Successful creation: Enter a success message that agent displays following the successful creation of a Service request. You can add {ServiceRequestId} and {ServiceRequestLink} to the message, which displays the service request ID and link to the record.
•Allow transfer to live agent: Enable the toggle button to transfer the interaction to your Service Desk Human Agent in case the Agentic AI bot cannot solve the user's request.
Along with this toggle, you must also enable the Allow transfer to live agent toggle in Global Settings > Escalation Handling.
6.Under Service request handling > Default service request template, set the default Service request template from the dropdown.
When the agent cannot find a specific Service request template for the user's query, it uses the default Service request template you've configured . Furthermore, when multiple Service request templates match the user’s query, the agent presents the template you configured as the default option to the user.
We recommend that you carefully design and thoroughly test all Service request templates before deployment, as the Service request agent might not always display templates as expected if they are not properly configured.
7.Under Advanced settings > Service request description, define the scope of the Service request agent by detailing the types of Service request queries the agent can handle. You can also provide some example queries related to Service requests to help the agent better understand the context. When users ask queries other than those defined here, the agent considers them out of context and replies to users accordingly.
Modifying the intent description might result in unpredictable agent behavior. We recommend that only users with experience in LLM prompt engineering make these changes.
Image of Service request agent settings page
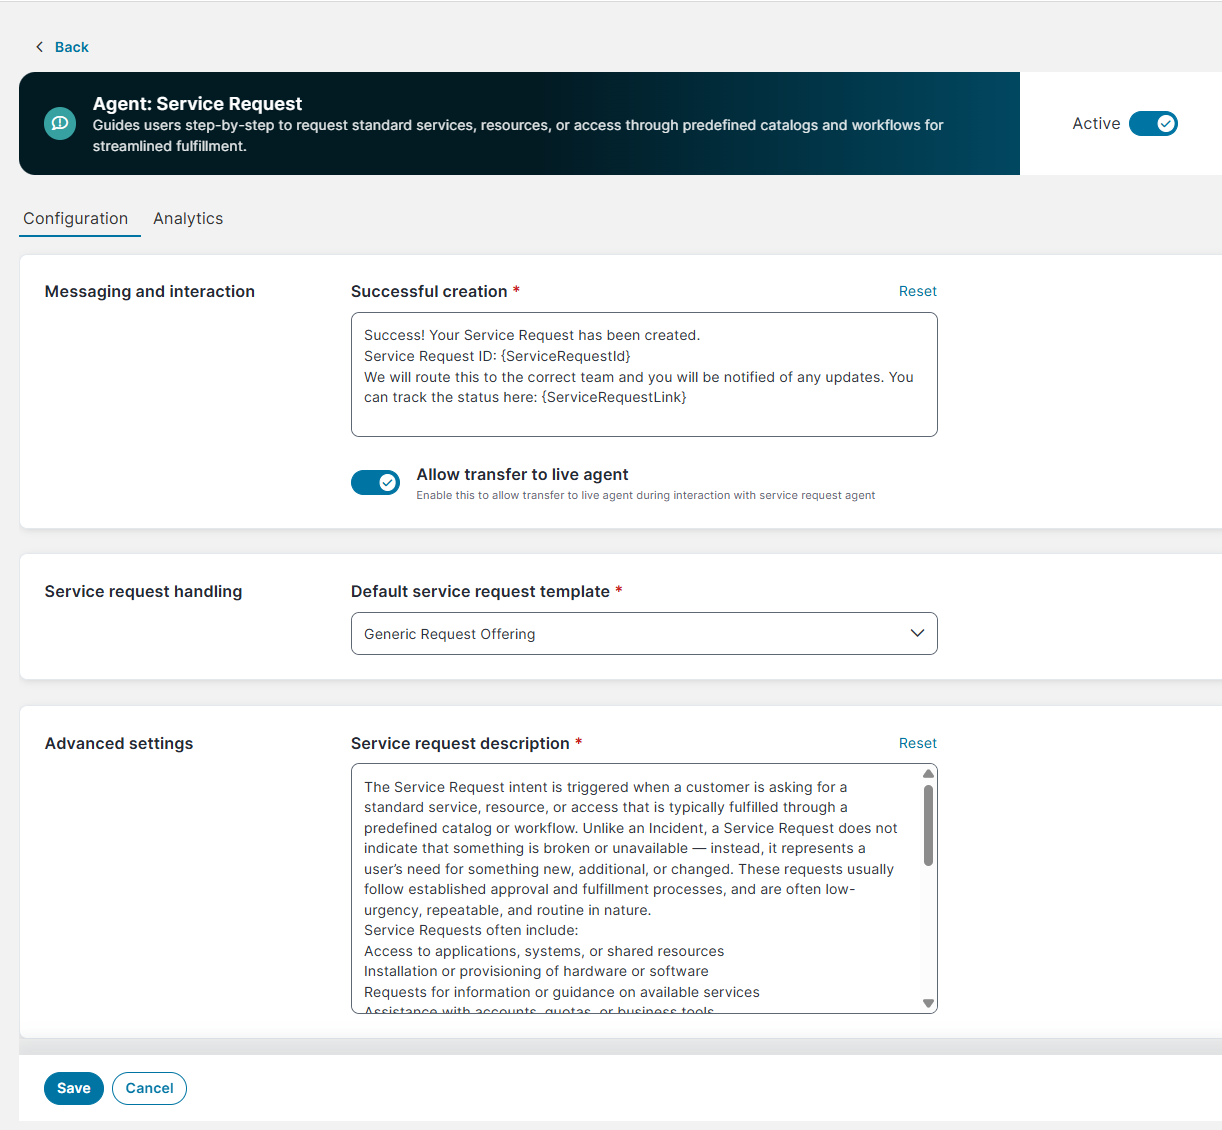
Fields marked with an asterisk (*) are mandatory.
Limitations
•If multiple templates match a Service request prompt, only the top three are displayed. If none of these meets the user’s needs, the user should select the default Service request template.
•For some Service request templates, users may be prompted to enter the mandatory Requester field. The Adaptive Card dropdown list displays a limited number of entries. If the required requester is not visible within the list, the user cannot select the desired requester.
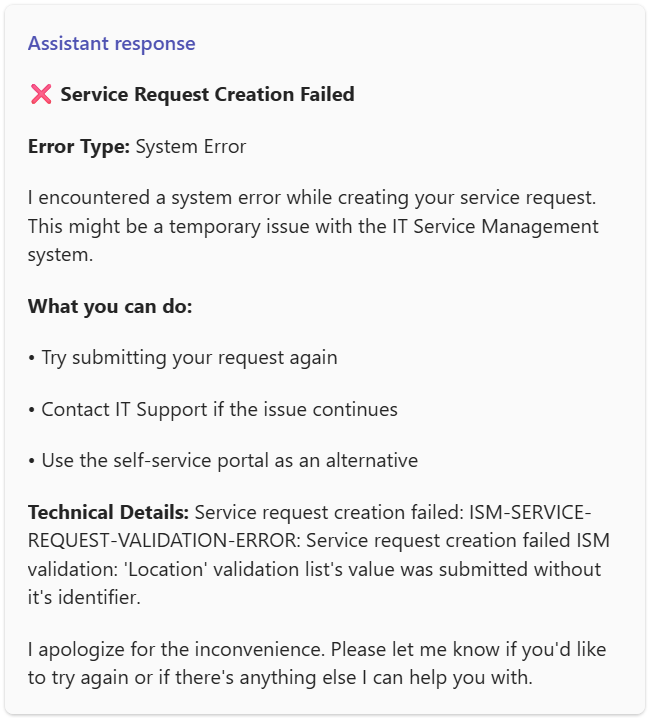
•Some Service request offerings generate errors upon submission of the Service request draft. The errors occur when the Service request draft have the following format:
Sample prompts that may generate this error include I need a new printer for my office and I would like to onboard a new vendor.
•During a Live Agent Transfer session, the End Conversation button is displayed only after the Live Analyst sends a response. Users can end the session only after the Live Agent has sent a response and the chat bot is waiting for input from the user. If the Live Agent does not respond, the session times out automatically, but the user cannot terminate the session.
•During Live Agent Transfer, a conversation summary should be sent to the Live Agent at the beginning of the session. This functionality is currently not working.
•At the end of a Live Agent Transfer session, users are not informed about what to do next. However, when the session ends, the Agentic AI is reset and users should initiate a new prompt, even if no live agent was available.
•The Agentic AI handles only IT‑related issues. Other Line of Business (LoB) queries, such as HR, Facilities, and other non‑IT requests are not supported.
•The Agentic AI does not fully support language translation. While it understands prompts in multiple languages, it currently responds using a combination of the user’s locale and English. The following image shows an example in which the user provides input in French, but the agent responds in English:
![]()
•Form Design Limitations: The agent renders a fixed set of controls: text, multi-line text, number, checkbox, single-select dropdown, date, and time. Any other field type is shown as a plain text box. Advanced form-designer styling, such as row alignment or custom masking, is not supported by the agent.
Example: A template that aligns fields into columns or masks a text field, such as Social Security Number formatted as ___-__-___, renders as plain, stacked text boxes with no masking.
•Pick List Restrictions: Only single-select pick lists are supported. Multi-select and Select all options are not available. Radio-button fields are not supported and appear as a text box. Pick-list options must be available when the card is displayed.
Dropdowns are intended for reasonably sized lists. When the agent retrieves options directly, a single dropdown returns up to 200 values. Large pick lists are not automatically converted to a search box, except for Employee fields, which use type-ahead. A very large list can exceed the Microsoft Teams card size limit and fail to display. Keep pick lists to a manageable number of options.
Example: A Select applications to install field that allows multiple choices lets the user pick only one value. A Yes/No field built with radio buttons appears as a text box.
•Expression Limits: Cascading (dependent) dropdowns are supported. The parent field appears first, and after it is selected the child dropdown is shown on the next page, with its options filtered by the parent value. The parent and child are presented on separate pages, not together on one card. Multi-level chains (for example, Country → State → City) span multiple pages the same way.
Fields that are simply marked required are enforced: you cannot continue to the next page or submit the request until they are filled, and the card highlights the missing field.
For conditional rules (written as expressions), support is partial:
•Show / hide a field based on another field’s value works for a single, simple condition (for example, show a field only when OSType = "Windows"). Complex conditions — those combining multiple checks with and / or, or using functions — are not evaluated, and the field is left visible.
•Making a field required based on another field’s value is not evaluated; the field is treated as optional.
•Making a field read-only based on another field’s value is not evaluated; the field may remain editable.
Example (Laptop Loaner form): On Page 1, you select Platform = Windows; on Page 2, the Windows Version field appears (simple show/hide — works). If you instead select Platform = Linux, Windows Version is correctly hidden. However, if the template makes Windows Version required only when Platform = Windows, the agent does not enforce it — the field shows with no required marker and can be left blank.
•File Uploads: File attachment fields are not supported. File-upload fields in the template are hidden, and requests submitted through the agent do not include attachments.
Example: A New Hardware Request template that asks the user to attach a quote or approval PDF submits with no file attached.
•Dates and Times: Date fields block past dates but do not enforce minimum or maximum ranges, cross-field date rules, or relative-date limits. Date-and-time fields appear as date-only pickers, so the time value is not captured. Time fields use fixed 15-minute intervals.
Example (Laptop Loaner form): Rules such as submit at least 2 days in advance and maximum loan of 3 weeks are not enforced. Users can select a Return Date beyond 3 weeks and still submit the request.
•Validation Rules: Validation support is limited. Email fields are checked only loosely, and phone number and URL formats are not validated. Complex or expression-based validation rules are not enforced on the card, and read-only fields may still appear editable.
Example: A phone field accepts abc123, and an email field accepts john.doe without a domain. Both values can be submitted without error.
•Ivanti recommends limiting agent-enabled templates to standard field types with single-select or cascading pick lists, and testing each Service Request template through the agent before deployment. Templates that use multi-select fields, file attachments, radio or image fields, conditional (expression-based) rules, or date-range rules will not fully function.