Summarization agent
Minimum Version: Ivanti Neurons for ITSM 2026.2.
The Summarization agent uses AI to automatically generate clear and concise summaries of key information from any business object, helping users quickly understand important information at a glance.
To enable and configure the Summarization agent, do the following:
1.Log in to Neurons for ITSM as an Administrator.
2.Open the Configuration console and select AI Configuration Hub > Agentic AI > Agent Settings.
3.Turn on the Summarization Agent Configuration toggle to enable the Summarization agent.
4.Click Configure to further set up the agent.
5.Under General settings, configure the following:
•Enable Localization: Turn on the toggle to enable localization. Enabling this option allows the AI create content in the language and style of the selected region or country. This ensures the generated content matches local language preferences, cultural tone, and formatting.
•Audit History: Audit History keeps a record of past actions or events. It helps track all actions or changes related to an item or process so you can review them later if needed. The setting is enabled by default and cannot be modified.
•Activity History: Activity History keeps a record of all changes made to data. It shows who made the change, when it was made, and what was changed, so you can easily review the full history of updates. The setting is enabled by default and cannot be modified.
6.Under Business Object Settings, configure the following:
•Select a Business Object: Select the business object from the dropdown to configure the Summarization Agent feature.
The agent returns an error when you request a summary for a business object that is not configured in this setting.
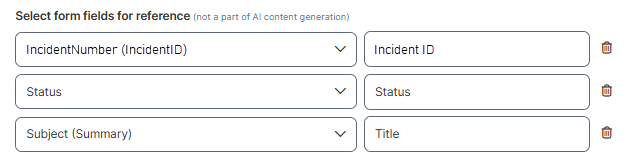
•Select form fields for reference: Select relevant fields from the dropdown. You can use form fields to display additional information along with the AI-generated summary on the adaptive card of the chat.
Image of the form field settings
-
From each dropdown, you can select the desired business object fields that you want to define for Business Object ID/Name, Status, and Title respectively.
-
Business Object ID/Name: Select either ID or Name for identification, depending on the business object you are configuring. For example, for the Incident business object, you can define its Incident ID, whereas for CI business object, you can define its Name. Accordingly, modify the text in the rightmost text field (for example, Incident ID or CI Name). The agent displays the corresponding field value as ID or Name on the adaptive card in the chat.
-
Status: Select the business object field that you want to display as the Status. The agent displays the corresponding field value as Status on the adaptive card.
-
Title: Select the business object field that you want to display as the Title. The agent displays the corresponding field value as Title on the adaptive card.
You can change the order of Business Object ID/Name, Status, and Title.
The Status and Title fields are mandatory and should not modify their text field names in the rightmost section.
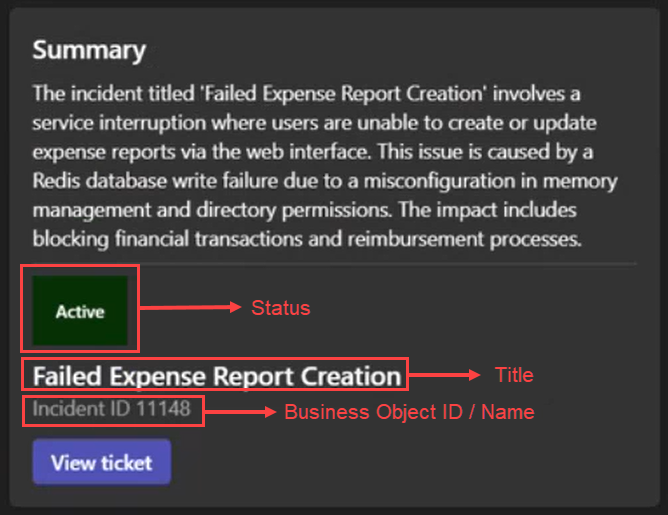
The following image shows an example of an adaptive card that agent displays when users asked for a business object summary. Along with the summary, you can see additional information displayed based on the form field settings.
•Select the fields to generate Al content: The AI considers the fields you select here to generate the business object summary.
| a. | From the dropdowns, select the relevant fields of the business object to generate the summary. |
| b. | Fill in the Display name and Description. |
| c. | Click |
Image of the Summarization agent configuration page

When users chat with the agent, it is mandatory to provide both the business object name and the business object ID to generate the summary.