Configuring Workspace
Role: Administrator
Workspaces such as Knowledge, Announcements, Alerts, and FAQ can be configured to align with your organizational needs. This section provides step-by-step guidance for configuring each workspace
You can configure the Knowledge workspace by selecting the knowledge.SelfServiceNextgen layout. You can configure this layout in both grid and form views.
Additionally, you can also refine the knowledge content by adding object filters. For example, if you want to display only published knowledge articles, you can include that filter under object permissions.
Configuring the Knowledge workspace
1.Log in to Neurons for ITSM as Administrator.
2. From the Configuration console, click User and Permissions > Role and Permissions. Select Self Service role. The Role: SelfService page appears.
3.Click Top Level Tabs, and then click Add New Tab.
4.Under Add New Tab, click Object Workspace.
5.Under Adding New Tab pane, enter Knowledge in the Name field.
6. In the Object Workspace's Configuration pane, select the following in the Object and Layout fields:
•Object: Knowledge
•Layout : Knowledge (Knowledge.SelfService.NextGen)
7.Click Add This Tab.
The Knowledge tab is added to the workspace.
8.Click Save.
To delete this tab, click Delete This Tab or click  in the Top Level Tabs.
You can configure the Announcements workspace based on your requirements.
1.Log in to Neurons for ITSM as Administrator.
2. From the Configuration console, click User and Permissions > Role and Permissions. Select Self Service Role. The Role: SelfService page appears.
3.Click Top Level Tabs, and then click Add New Tab.
4.Under Add New Tab, click Object Workspace.
5.In the Adding New Tab pane, enter Announcement in the Name field.
6.To display the workspace in the menu left pane in home page, select the tab is initially visible checkbox.
To display announcements in the left pane, select the Announcement checkbox in the menu navigation settings when configuring the page in Page Designer. For more information, see Configuring Global Settings.
7. In the Object Workspace's Configuration pane, select the following from the Object and Layout fields:
•Object: Announcement
•Layout : Announcement.SelfService.NextGen
Administrators can modify the configured layout to customize the Announcement user interface.
Configuring the Announcements Workspace
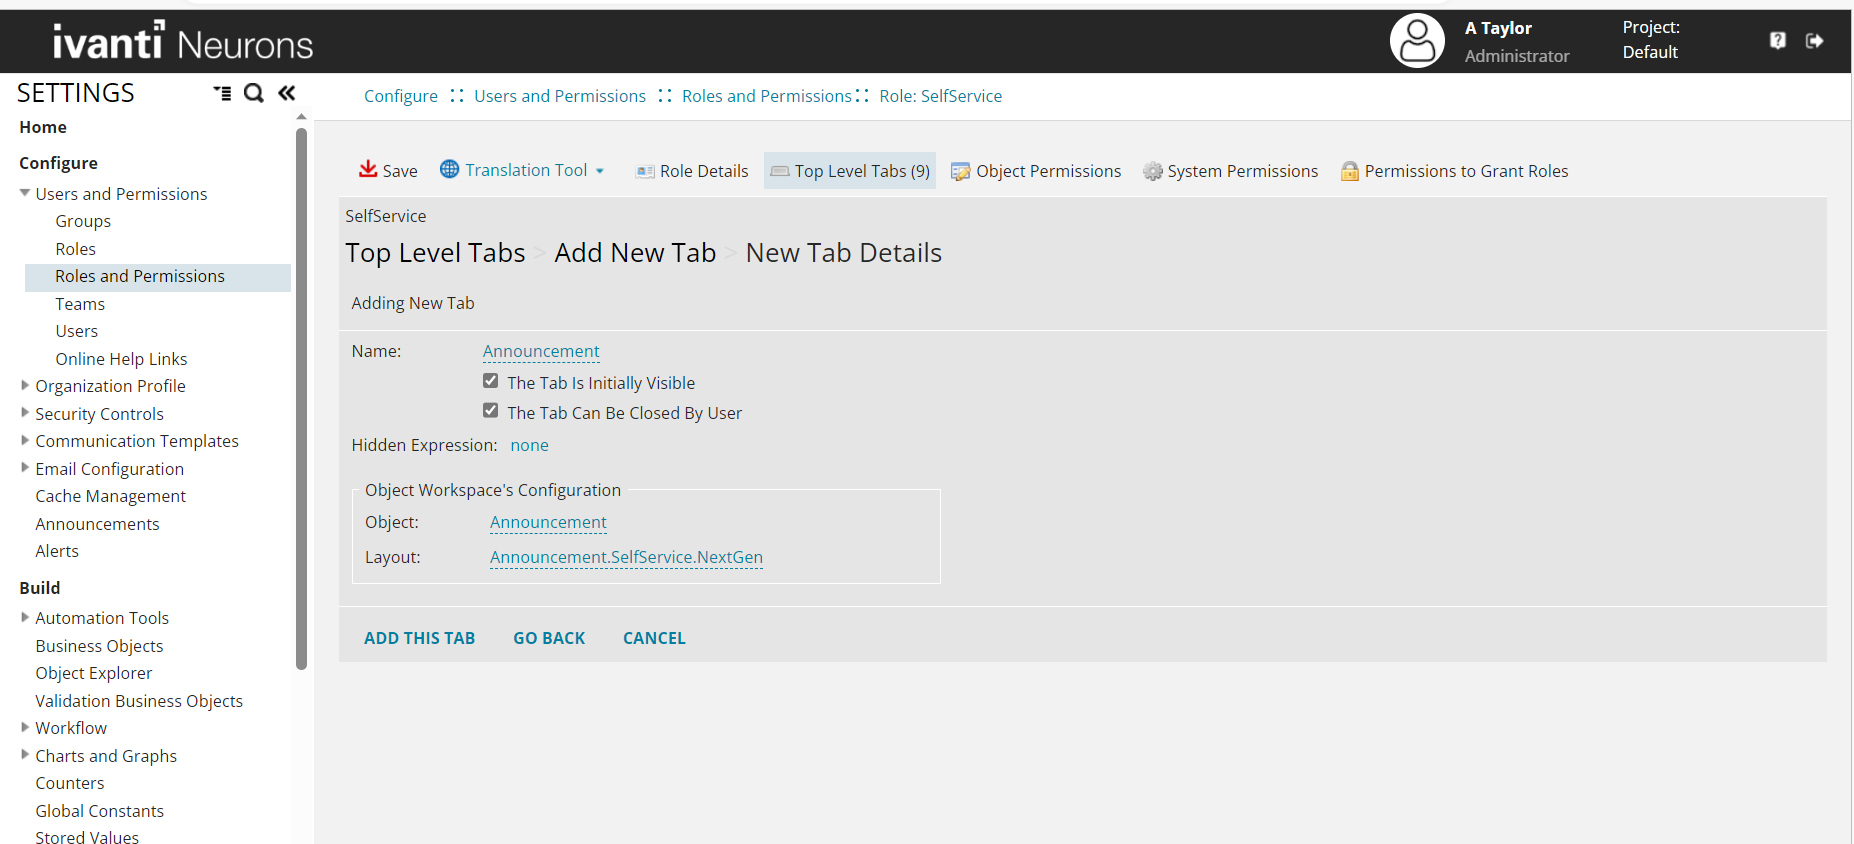
8.Click Add This Tab.
The Announcements tab is added to the workspace.
9.Click Save.
To delete this tab, click Delete This Tab or click in the Top Level Tabs.
You can include the Alert and FAQ workspaces on the Home page by following the same steps used to configure the Announcements workspace—select the appropriate object and layout for either FAQ or Alerts. To enable alert notifications and FAQs, see the "Additional Settings" section in Configuring Global Settings.
You can configure the Alert workspace based on your requirements.
1.Log in to Neurons for ITSM as Administrator.
2. From the Configuration console, click User and Permissions > Role and Permissions. Select Self Service Role. The Role: SelfService page appears.
3.Click Top Level Tabs, and then click Add New Tab.
4.Under Add New Tab, click Object Workspace.
5.In the Adding New Tab pane, enter Alert in the Name field.
6. In the Object Workspace's Configuration pane, select the following from the Object and Layout fields:
•Object: Alert
•Layout : Alert.SelfService.NextGen
7.Click Add This Tab.
The Alerts tab is added to the workspace.
8.Click Save.
To delete this tab, click Delete This Tab or click in the Top Level Tabs.
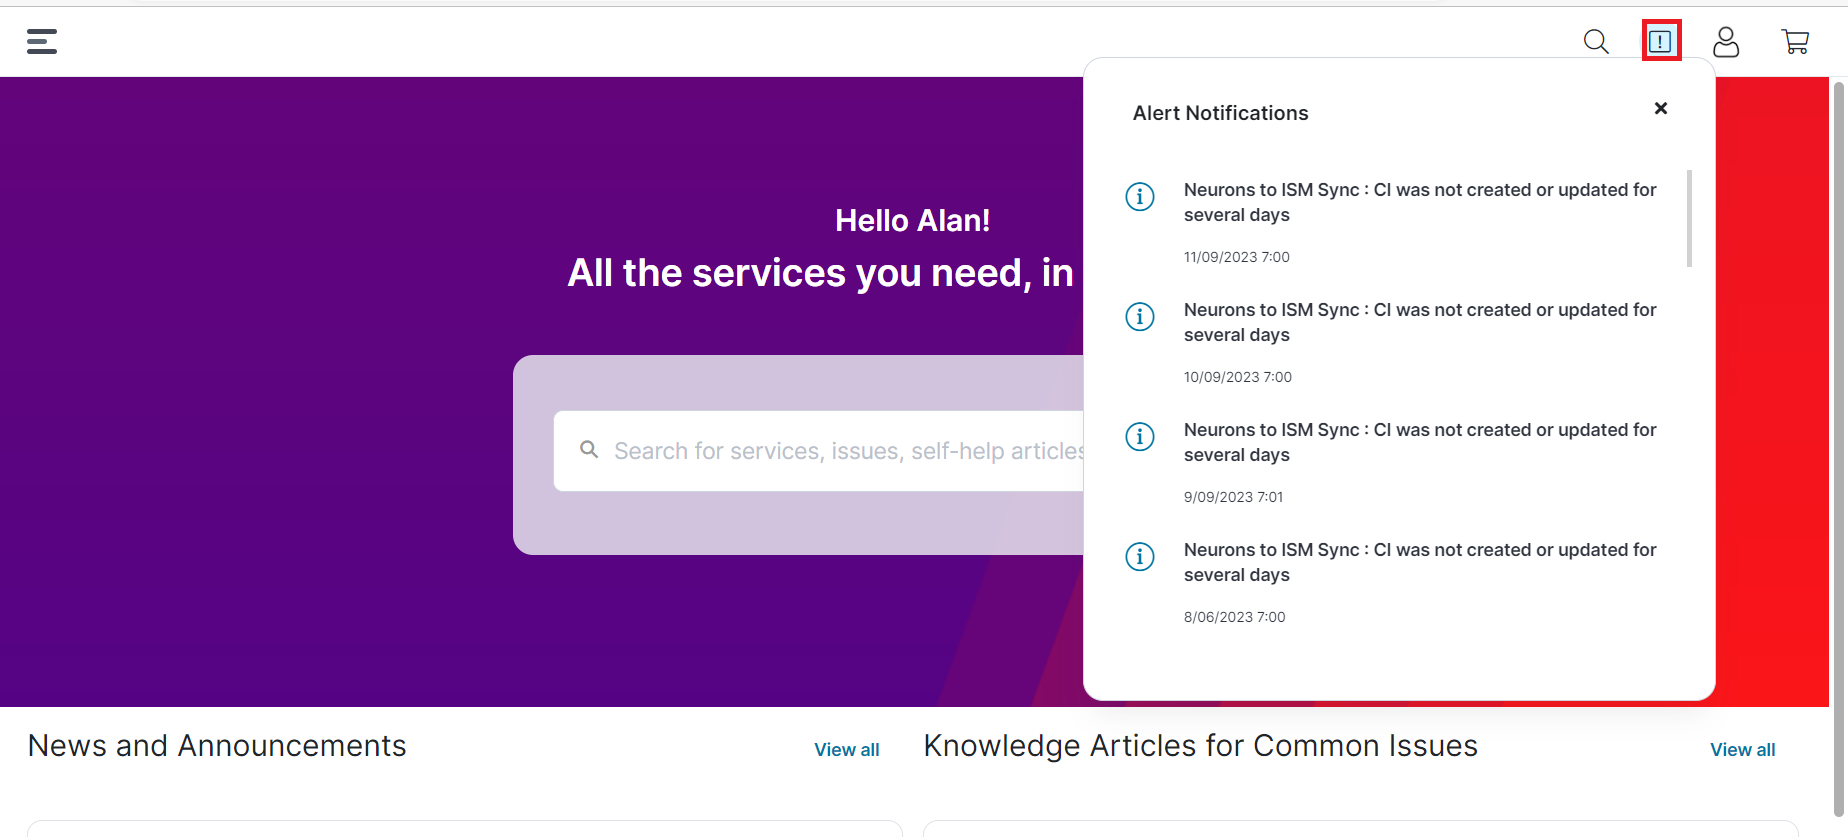
Click  to view the alert notifications.
Viewing Alert Notifications
You can configure the Announcements workspace based on your requirements.
1.Log in to Neurons for ITSM as Administrator.
2. From the Configuration console, click User and Permissions > Role and Permissions. Select Self Service Role. The Role: SelfService page appears.
3.Click Top Level Tabs, and then click Add New Tab.
4.Under Add New Tab, click Object Workspace.
5.In the Adding New Tab pane, enter FAQ in the Name field.
6. In the Object Workspace's Configuration pane, select the following from the Object and Layout fields:
•Object: FAQ
•Layout : FAQ.SelfService.NextGen
7.Click Add This Tab.
The FAQ tab is added to the workspace.
8.Click Save.
To delete this tab, click Delete This Tab or click in the Top Level Tabs.
By default, the My Items workspace is configured out of the box. However, you can customize it to meet your organization’s requirements. When you log in to the UIv3 Self-Service portal, the workspace displays your raised requests along with their status.
1.Log in to Neurons for ITSM as Administrator.
2. From the Configuration console, click User and Permissions > Role and Permissions. Select Self Service Role.
The Role: Self Service page appears.
3.In Top Level Tabs, click My Items.
4.Select Enable Issue Templates check box to modify or delete the existing object names.
5. In Configure My Items card, you can modify the view of My items details to appear in Self Service portal.
6.Click Save.
To delete this tab, click Delete This Tab.
Managing My Items Status and Status Mapping
To add a custom status or modify an existing status for a request offering and display it in the UIv3 Self Service workspace, update the My Item Status field in home page. After updating this field, the new status appears alongside existing statuses in the workspace.
1.Log in to Neurons for ITSM as Administrator.
2.On the home page, select More.
3.Search for My Item Status, and open the workspace.
The workspace displays the following fields:
•Status - Name of the Item status. For an example, statuses are: Active, Draft, Approved, Rejected, Assigned.
•Created Date Time - Displays the date and time when the status was created.
•Lastmod date time - Displays the date and time when the status was last modified.
4.Click New My Item Status.
The application displays a blank form.
5.Enter the new status in to the text box.
6.Click Save.
You can customize the status train view in My Items workspace in the Self Service portal. You can configure in Administrator home page. Use the My Items Status Mapping workspace to define status values, control their display order, and maintain localized labels for service requests.
Define status values and assign a sort number to control the order in which the statuses appear. You can also modify existing status names to meet organizational requirements. For more information, see Pick_Lists.
The system renders the Status Train in the My Items workspace in the Self Service portal based on this configuration. If the configuration is missing or incorrect, the system displays the Status Train in a disabled state to indicate a configuration issue.
Viewing My Item Status Mapping

1.Log in to Neurons for ITSM as Administrator.
2.On the home page, select More.
3. Search for My Item Status Mapping and open the workspace. The My Item Status Mapping displays the following fields:
•Business Object Name - Displays the record type associated with each entry, such as Approval Request, Incident, or Work Order, along with the total number of records.
•My Item Status - Displays the status for each item of the selected record.
•Business Object Status - Displays the corresponding business object status for each item.
•Sort Order - Displays the priority number that determines the order in which statuses appear for the selected record.
1.Click New My Item Status Mapping.
The New My Item Status Mapping window appears.
2.In Business Object Name select the required object from the dropdown.
3.In My Item Status, click the search icon to select an existing status from the list, or click the arrow and perform one of the following actions:
•Add New - Enter a new status in text field and click Save.
•Edit icon - Edit an existing status, update the value and click Save.
•Go to - Navigate to the required status and click Save.
4.In Business Object Status, select the corresponding status from the dropdown.
5.In Sort order, enter unique numeric value to define the display sequence.
Typical status train
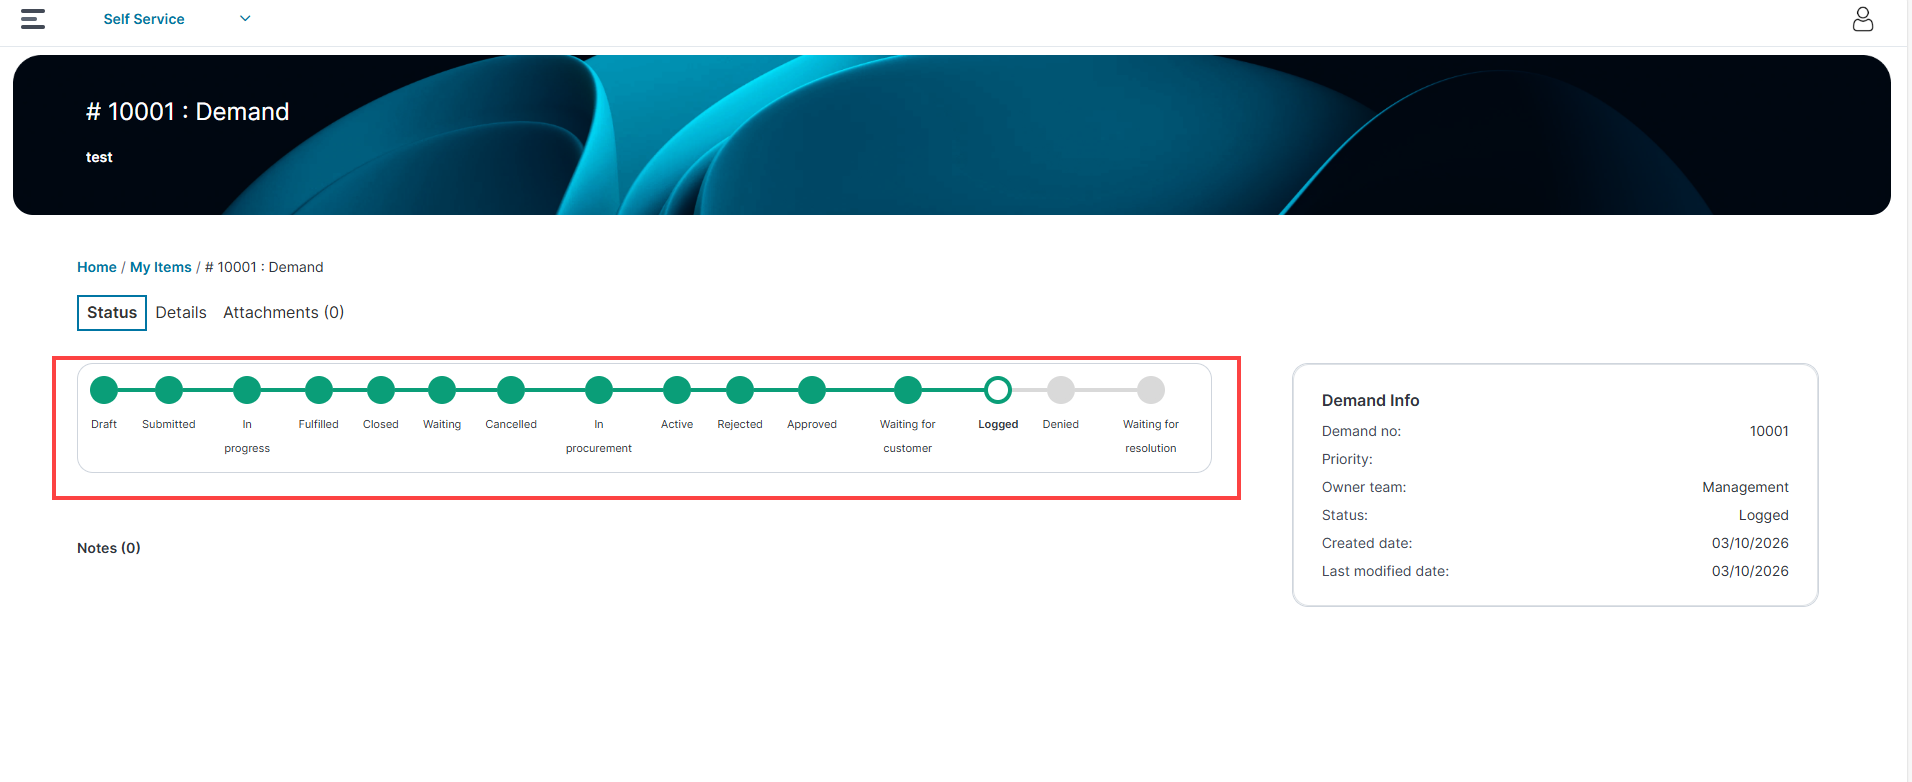
For the Self Service portal, ensure the desktop app shows a maximum of 12 statuses and the mobile app a maximum of 5, to prevent the status train layout from overflowing.
The following are the limitations of status mapping:
-
You cannot assign a sort order value that already exists for another status within the same business object.
-
You cannot map a single business object status to multiple My Item Status values within the same business object. The combination of Business Object Name, My Item Status, and Business Object Status must be unique. In the figure Viewing My Item Status Mapping each combination is unique.
-
When the sort order is updated, all mappings with the same My Item Status within a Business Object are assigned the new sort order.