Voice
Editor Tab
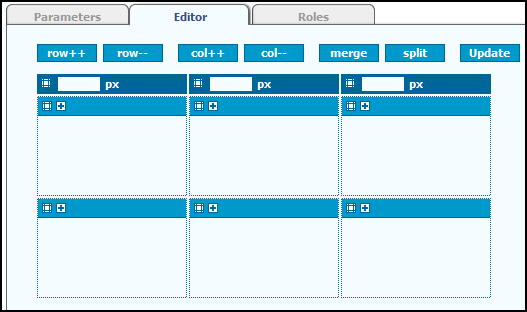
The Editor tab lets you specify the view parts the view displays, and the location of the view parts on the view page. For example, you can place a pie chart depicting the Total Busy Time statistic above a bar chart depicting the Calls Queued statistic, and a table to the right that shows each agent’s state.
Each view is divided into a table consisting of rows and columns. Rows/columns can be added or deleted to create the view layout.
The controls on the Editor tab let you specify the following attributes:
•The number of rows and columns. A view could contain a single row and column (in other words, a single cell). Cells within a row or column can be merged.
•The width of the columns in the table.
•The view parts each cell contains. A cell can contain multiple view parts.
•Whether or not the cell has a border.
Use the cell controls to configure the View layout:
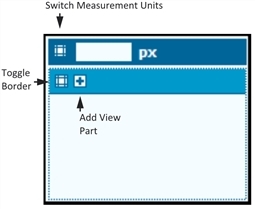
•Use the controls at the top left of each column to alter the column width by doing one of the following:
•Type the pixel measure in the px field.
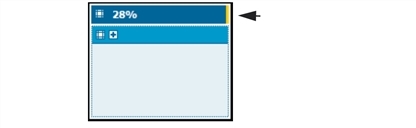
•Click the Switch Measurement Units control to switch to a percentage measure, then alter the width by clicking and dragging the yellow line that appears on the right.
•Click the Toggle Border control to apply a border to the cell (click the control again to remove the border).
•Click the Add View Part control to add one or more view parts to a cell. To remove a view part from a cell, move the mouse cursor over the view part so the delete control appears; click the delete control. Click and drag a view part to move it from one cell to another or change the order of view parts within a cell.

•Click the row++ button to add a row below the existing rows.
•Click the col++ button to add a column to the right of the existing columns.
•Click the row-- button to remove the bottom row from the View.
•Click the col-- button to remove the column on the right from the View.
•To merge cells, select the cells (press the Ctrl key to select multiple cells), then click the merge button. Cells can span multiple rows or columns.
•To split a merged cell, select the merged cell and click the split button.
When the View Layout Configuration is Complete:
•Click the Update and Commit Changes buttons to enact the changes.
Was this article useful?
Copyright © 2019, Ivanti. All rights reserved.